Star Fox Switch 2 Guide: Essential Tips, Checklists, and Route Secrets
Star Fox for Nintendo Switch 2 is a 3D, on-rails shooter that blends mostly linear missions with a campaign map that can branch in non-linear ways. If you’ve already played Star Fox 64 (or the 3DS remaster), you’ll recognize the structure immediately: the Switch 2 edition keeps the same core level layouts and secrets.
Checklists
Star Fox for Nintendo Switch 2 is a 3D on-rails shooter that pairs largely linear levels with a non-linear campaign progression path. If you’ve played Star Fox 64 or its 3DS remaster, you know exactly what you’re getting into, as the Switch 2 version features identical level design and secrets.
Stage Setup and Progression
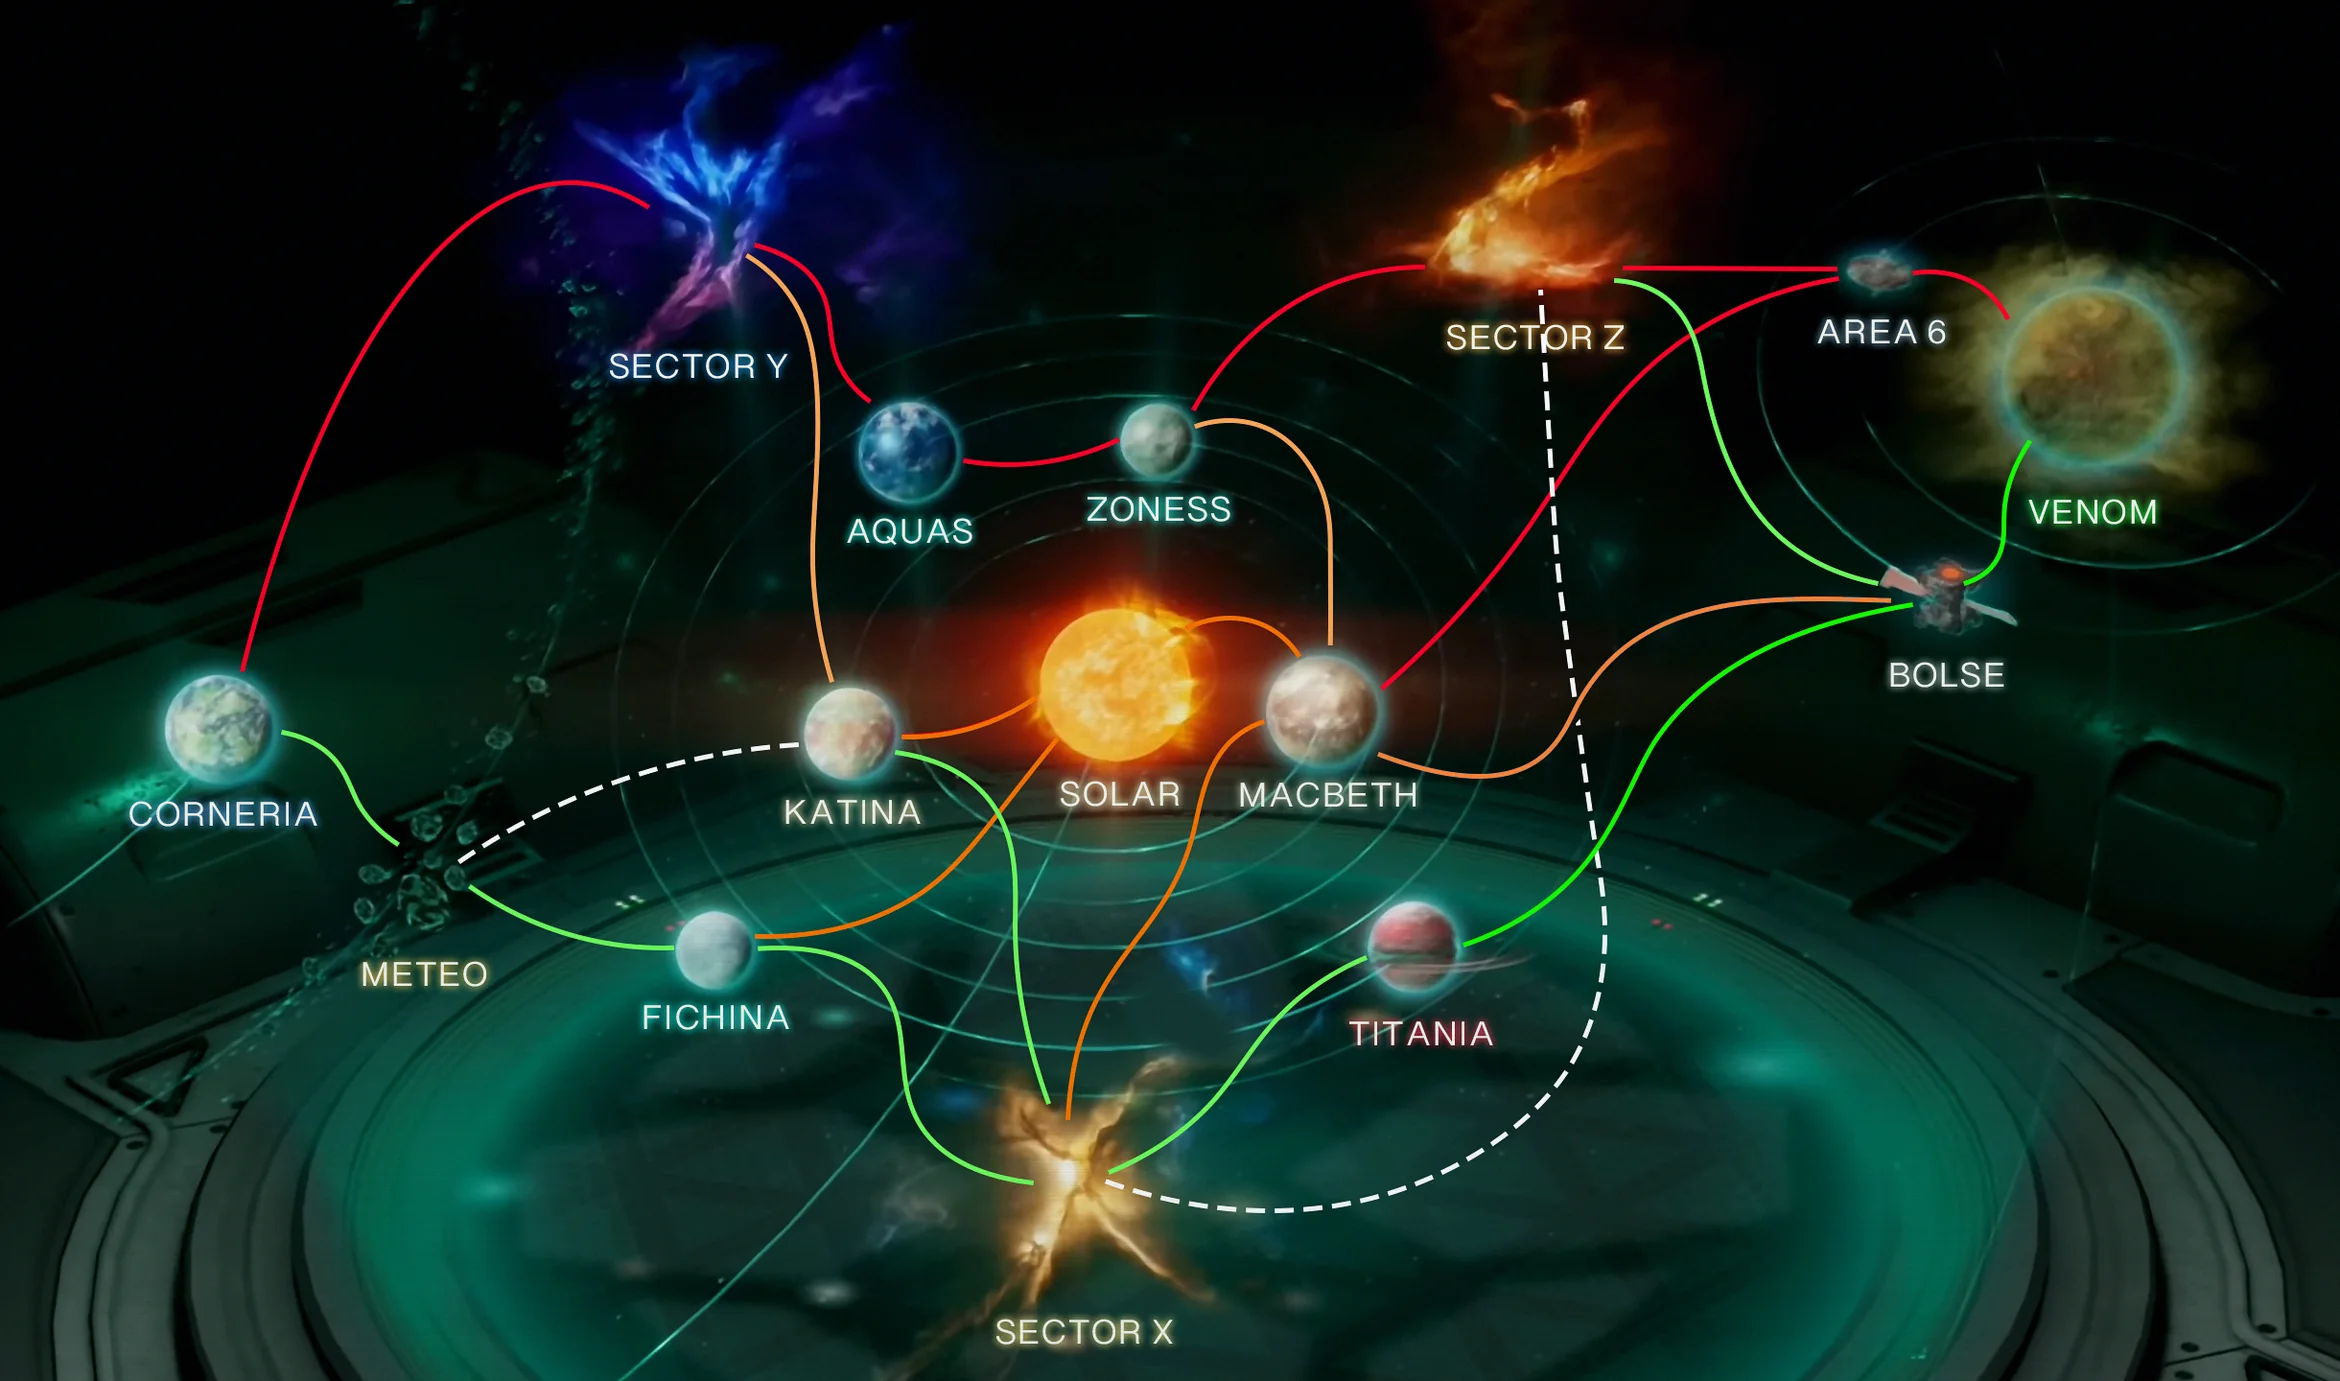
In total, there are 16 distinct stages, covering settings like planets and nebulae, plus a satellite, an asteroid field, and even a blazing sun.
Each run begins at the bottom-left corner of the Lylat System map at Corneria and gives you seven missions. What you do in each stage determines how the routes branch as you progress—eventually leading you to one of two versions of the last mission, Venom.
The difficulty of a stage can vary depending on which route you came from. In some cases, the challenges you face shift slightly based on your entry point. Still, the overall route difficulty generally follows a pattern: paths are typically categorized as easy, medium, or hard, with harder routes tending to sit toward the top of the map and the easier route positioned along the bottom.
After clearing a mission, the world map updates immediately and shows your current location. Once a stage is beaten, you can change your route choice from the map menu, or replay a mission to access an alternate path—though retries cost one ship. If you want to plan ahead, the “All Alternate Routes” guide is a good reference.
The top stats panel tracks your total hits so far and how many ships you have left. The bottom bar lists which areas you’ve already completed during this run, how many hits you earned in each mission, and which of your wingmen survived the fight.
The icons under your squad indicate who made it: yellow is Peppy, green is Slippy, and blue is Falco. If you see all three triangles below the mission, that means all three allies survived without taking damage. If an ally is forced to retreat during a mission, they won’t be available for the next battle either.
How to Play Star Fox
The campaign starts with a Training mission that covers how to pilot your Arwing. Later on, you’ll also take control of two additional vehicles: the tank-like Landmaster and the submarine Blue Marine.
The fundamentals carry across all vehicles. Every one of them can shoot, lock on to targets, Boost for speed, Brake to slow down, and execute a barrel roll to deflect incoming fire. Each vehicle also has its own specialties. The Arwing can loop and turns faster by banking, the Landmaster can hover briefly, and the Blue Marine carries unlimited torpedoes that automatically lock on.
Lock-on behavior is especially important. By holding the fire button and waiting until you’re in range, you can lock onto an enemy and release a charged homing shot.
That charged shot can eliminate multiple enemies at once, which matters when you’re chasing hits—since hit totals can unlock alternate exits or medals. You can also upgrade each vehicle’s lasers to stronger versions by picking up a wing-shaped Laser upgrade item (labeled with an L).
Once you fire a charged shot, you can’t lock on and charge another until the current shot detonates. The tradeoff is that you can still use your standard lasers during the charge window—an approach that helps rack up hits and points reliably.
Pro Controller Rapid Fire
Beyond locking on, the quicker you fire your lasers, the better your odds of unlocking medals. Rapid bursts are especially useful when you’re facing large enemy groups or destructible asteroids, though it’s harder to do consistently with your thumb. You can adjust your grip during heavy sequences and tap A/fire using your index finger, but there’s also a Switch 2 Pro Controller trick: assign the two under-panel paddles (GL and GR) to the A/fire action. With that setup, you can use three fingers—two paddles plus a face button—to push your firing speed when it matters.
To configure the GL/GR paddles: hold the Home Button and open the GL/GR Buttons configuration area. Choose GL and press A, then select GR and press A again to finish the mapping.
When the Arwing collides with the ground or an enemy, it can lose one wing or both—Normal or Expert modes only. Damage affects how the ship maneuvers; for example, with one wing lost it will slowly drift to one side. After wings are damaged, the next Laser pick-up you find will instead be a wing repair item.
All vehicles can take damage from enemy projectiles and from collisions with enemies or hazards, indicated by the shield gauge in the upper-left corner. When the shield runs out, the next hit destroys the vehicle and ends the stage. You’ll either spawn at the start of the level or at a mid-level Checkpoint if you passed through the ring. If you have no lives left (shown in the upper-right corner), the run is over. Silver Rings restore shields, while Gold Rings provide more protection than Silver Rings.
Gold Rings replenish and expand the shield gauge if you collect three. That bigger health bar carries over into the next mission in your campaign, but it expires after that. Gold Ring progress is shown in the upper-left corner. If you collect three additional Gold Rings during the same mission after already expanding your shield gauge, you’ll gain an extra ship (a life).
Finally, you can pick up bombs (the red B items). Throw a bomb at an enemy; the resulting explosion can damage or destroy multiple craft within range. You can also trigger the blast manually by pressing the bomb button again after launching it. Just keep in mind that firing a bomb out into the distance may cause the explosion to happen too far away from enemies in the foreground.
Difficulty Modes Differences
There are three difficulty modes, with Expert mode locked behind medals (and medals not being available in Easy mode). Below are the differences across the settings.
Medals
If you play on Normal or Expert and finish a stage with all three wingmen still present while reaching a pre-set hits threshold, you’ll earn a medal.
Medals are shown in the stage progression bar and also appear on the Achievements page, which you can access from your campaign or by pressing X on the main menu (an example is referenced in the guide). On Normal difficulty, earning all medals grants access to Expert mode plus a new cosmetic outfit for Fox that he wears in Expert mode (with more details noted in the “Endings and Unlocks” section).
To see the exact hit requirements for each stage, check the Walkthrough sections. Each defeated enemy (excluding vegetation and certain fixed installations) counts for a single hit. Larger targets can award bonus hits as additional points, displayed on screen (for example, “+3”). Those bonus values can shrink the longer it takes you to bring down the enemy or the boss.
Endings and Unlocks
Star Fox includes two endings based on the path you take.
Collect All Normal Medals:
Character Avatars and AR Accessories:
When using Game Chat with a USB camera plugged in, you can apply AR filters to appear as one of multiple classic Star Fox characters. You start with Star Fox and Star Wolf already unlocked, and you can earn additional characters by completing challenges in Challenge Mode and collecting medals through the campaign.
On Switch 2, Star Fox also includes a customizable Battle Banner shown to other players when you’re playing online in Battle Mode. There are 61 banner backgrounds and 79 emblems in total to unlock, and the conditions for each item are listed on the Customize Battle Banner screen, accessible from the top of the main menu.
Up Next: Walkthrough
Top Guide Sections
- Essential Tips and Tricks
- Walkthrough
- Challenge Mode
- All Alternate Routes