Gothic 1 Remake: The Lost Apprentice Quest Path, Maps, and Key Locations
The Lost Apprentice is a Swamp Camp quest in Gothic 1 Remake that begins in Chapter 2. You’ll take it on by speaking with Cor Kalom in the Swamp Camp, where the missing apprentice Caine has left a trail that leads through the Abandoned Mine, a flooded section, several dangerous mine creatures, and finally a boss encounter. The quest also ties into The Brotherhood’s Plan, which may or may not already be active depending on which camp allegiance you chose.
Key takeaways
- You start The Lost Apprentice by talking to Cor Kalom in the Swamp Camp during Chapter 2.
- Caine’s hut is identified at the Swampweed mashers by a novice smoking Swampweed; Caine’s hut is the left one.
- The Abandoned Mine requires access via the Abandoned Mine Key, obtained from Orry after convincing him to let you in.
- Inside the mine you’ll use a Detached Winch to reopen a submerged route, then fight a boss: the Undead Orc.
- After defeating the orc, you’ll report back to Cor Kalom, show him the Strange Amulet, and trigger the next quest, Y’Berion.
Checklists
The quest includes multiple phases, starting from finding Caine’s hut and moving toward the Abandoned Mine. From there, the route runs through the mine’s flooded areas, an optional detour route, the mine shaft descent, and additional caverns before the final boss and the escape back outside.
You can use the in-game checklist-style objectives to jump directly to the part of the quest you need help with, or follow the full walkthrough from start to finish. The phases listed are: how to start, searching the Swamp Camp for Caine’s hut, finding the Abandoned Mine, finding Caine inside (including the flooded winch room, optional upper path, winch usage, shaft descent, Molerat Cavern, swimming sections, the Undead Orc boss fight, and escaping), then returning to Cor Kalom.
- How to Start The Lost Apprentice Quest
- Search the Swamp Camp for Caine’s Hut
- Find the Abandoned Mine
- Find Caine in the Abandoned Mine
- Flooded Winch Room
- Optional Detour – Upper Minecrawler Path
- Use the Detached Winch
- Descending the Mine Shaft
- Molerat Cavern
- Swimming Through the Mine
- Boss Fight – Undead Orc
- Escaping the Mine
- Return to Cor Kalom
- Flooded Winch Room
- Optional Detour – Upper Minecrawler Path
- Use the Detached Winch
- Descending the Mine Shaft
- Molerat Cavern
- Swimming Through the Mine
- Boss Fight – Undead Orc
- Escaping the Mine
How to Start The Lost Apprentice Quest
Head to the Swamp Camp and look for Cor Kalom to trigger the quest. Once you arrive, use the in-game signs that point you toward the potion area.
When you reach the staircase with a sign above it, climb to the top platform to locate Cor Kalom’s laboratory. Caine is Cor Kalom’s apprentice, so you should find information here.
At the top, a Templar guard blocks you because he’s suspicious of you being a Shadow. You tell him you’re searching for Caine, and he asks why.
If you choose the dialogue option “It’s about ore. Caine still owes us.”, the Templar accepts the explanation. He’ll say Cor Kalom is angry because he hasn’t arrived today, and he directs you to go inside and speak with Kalom.
Cor Kalom keeps things brief: Caine didn’t show up today, and Cor Kalom wants you to find him. This interaction starts The Lost Apprentice.
Search the Swamp Camp for Caine’s Hut
- In-game objective for The Lost Apprentice – “I gotta find Caine.”
After leaving Cor Kalom’s lab, the Templar guard stops you again and points you toward Caine’s hut. He says it’s along the route toward the Swampweed fields, and you can get directions from the novices.
- In-game objective for The Lost Apprentice – “I gotta find out which hut is Caine’s and search it.”
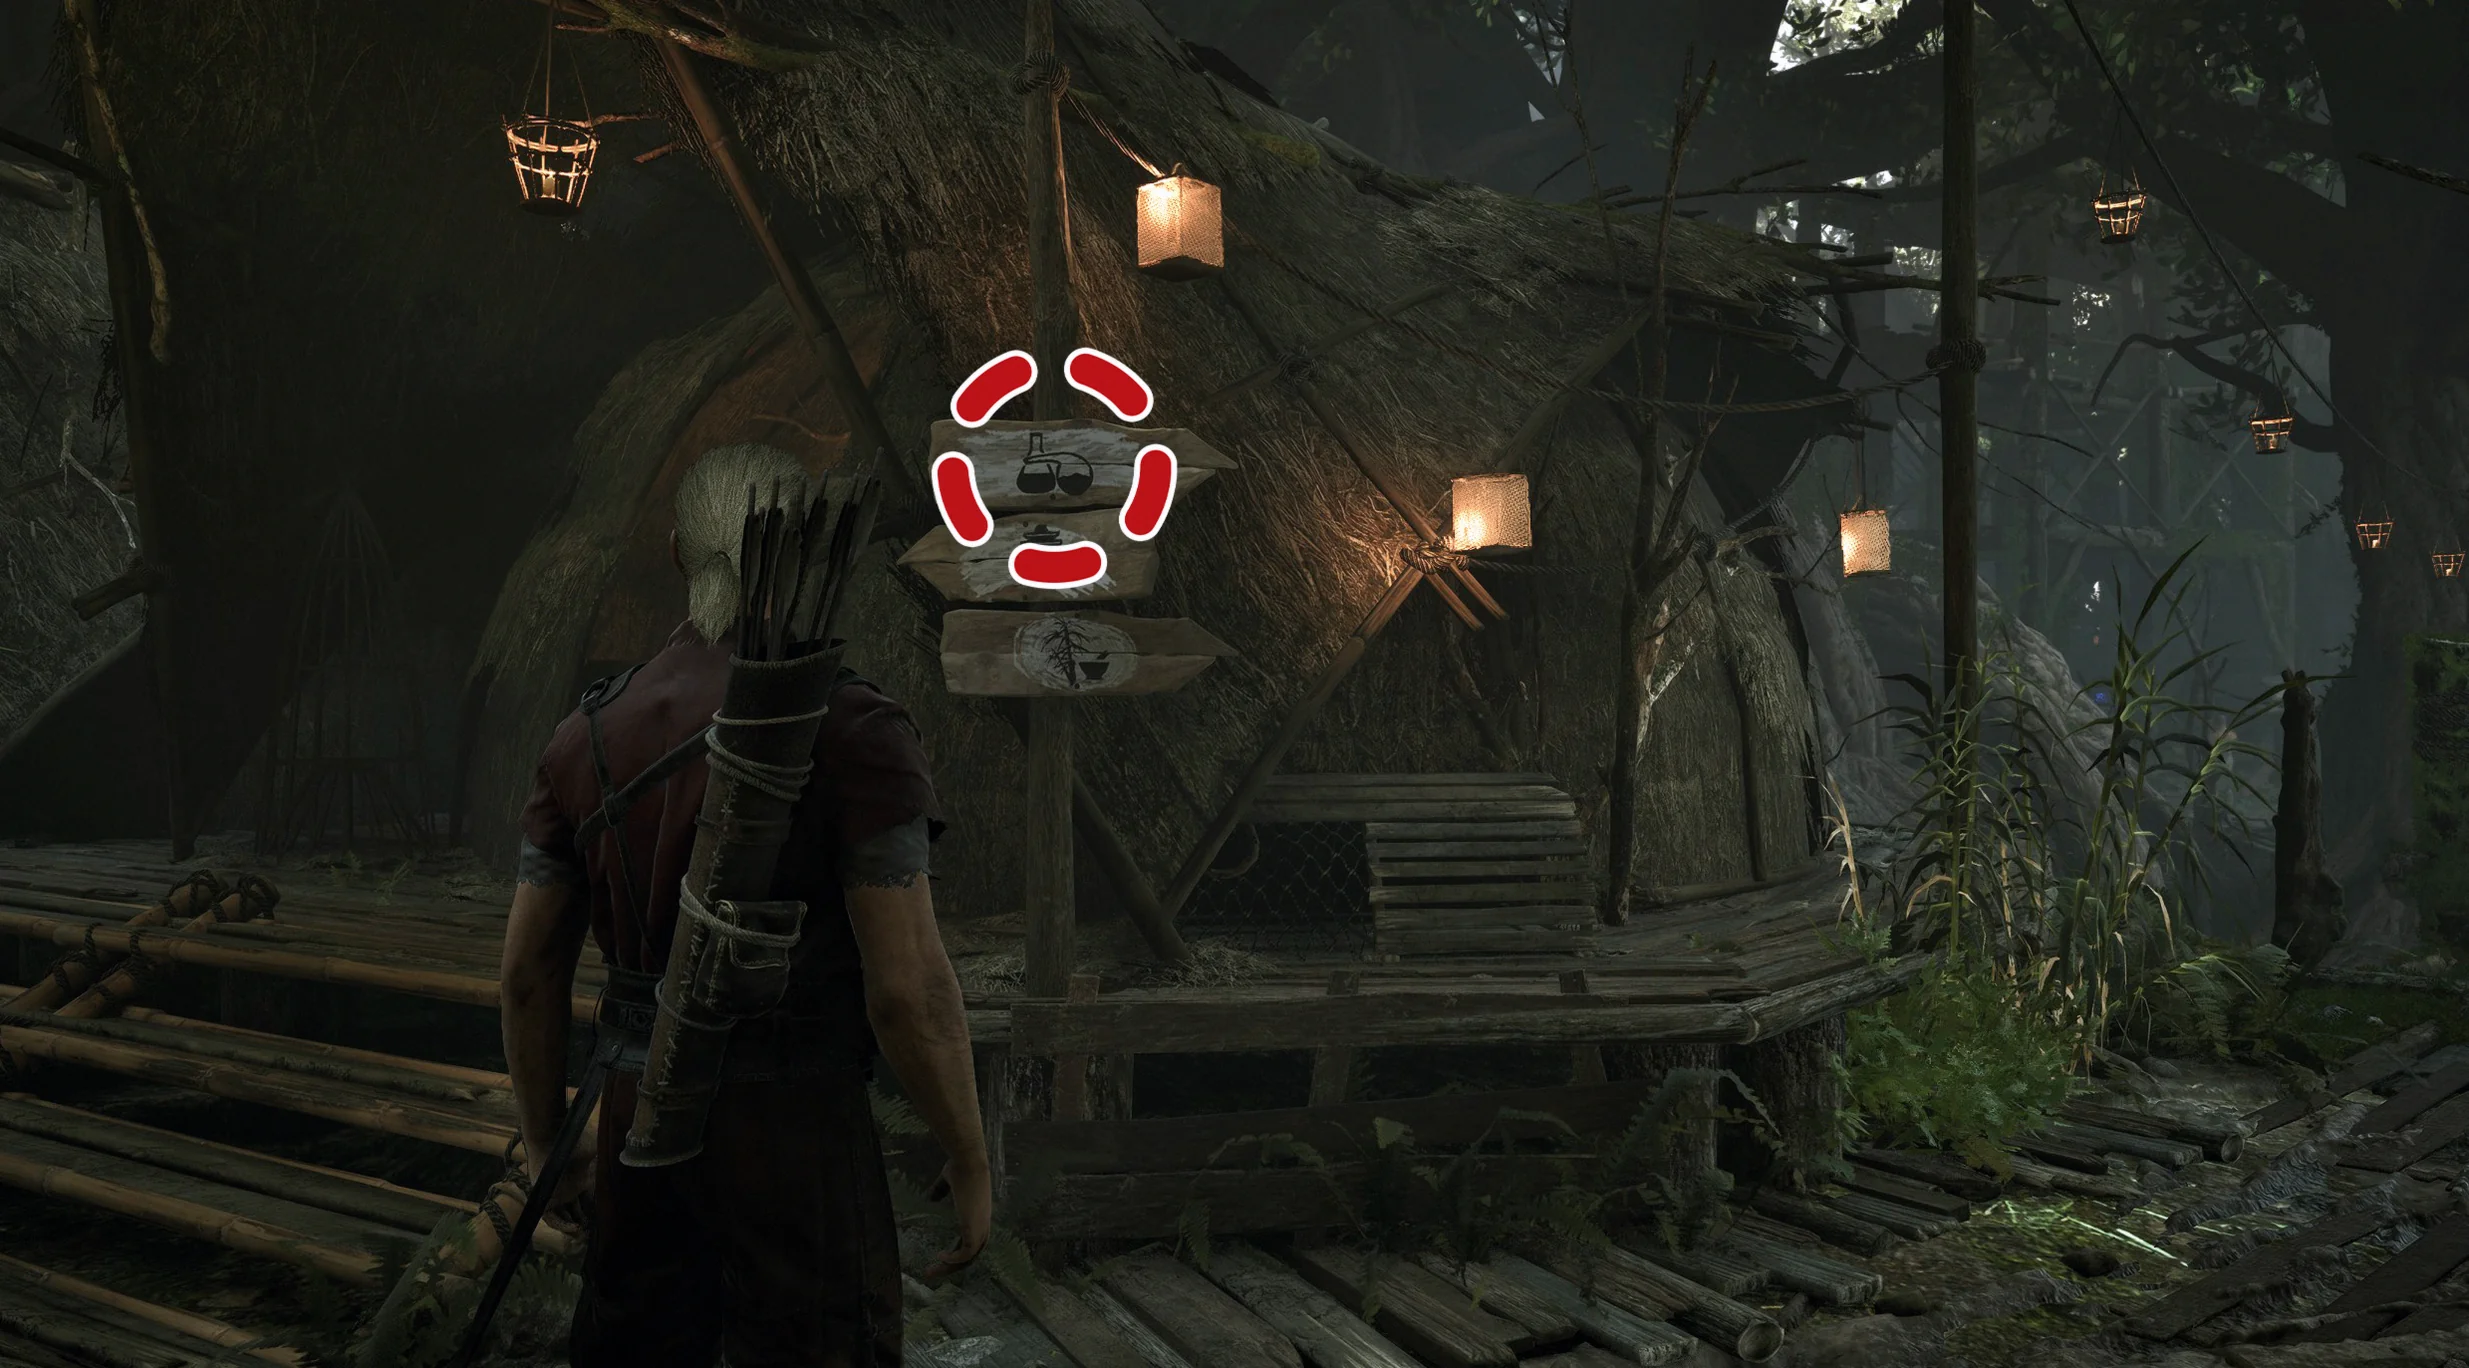
To locate the hut, follow the signs to the Swampweed mashers. It’s visually marked by a tree beside the mortar and pestle.
When you arrive, find a novice sitting on the ground and smoking Swampweed between two huts. If you ask him, he’ll slowly tell you that the hut behind him belongs to Caine—though there are two huts behind him, and his directions aren’t very specific. Looking at the novice from where you stand, Caine’s hut is on the left.
Inside, there isn’t much to do beyond obtaining the Drawing of the Abandoned Mine. You can open it if you want, but you only need to pick it up to move the quest forward.
Find the Abandoned Mine
- In-game objective for The Lost Apprentice – “Maybe someone recognizes the drawing.”
Talk to Nyras nearby. He recommends speaking with Lester. Lester is a helpful novice who spends his time talking to Baal Namib at the front entrance of the camp.
From Nyras, follow the path away from the Swampweed mashing station and circle around the outside of the camp. As you near the front entrance, Lester and Baal Namib should be on your right.
Lester recognizes the drawing as the Abandoned Mine near the Exchange Zone—where people get thrown into the Dome, including you. He explains that it flooded and Gomez had it sealed off.
Whatever you tell Lester, he warns that you’ll probably have to bribe a guard to gain access to the mine.
- In-game objective for The Lost Apprentice – “I gotta get access to the abandoned mine.”
Getting to the mine starts with returning to Old Camp.
From Old Camp North Gate, cross the stone bridge, then take the next right. Keep following that road all the way up the hill.
Along the way you’ll pass the spot where you fought your first Juvenile Scavengers. Not far past that, the Abandoned Mine entrance appears.
At the mine entrance, you’ll find Orry standing guard. This is the guard Lester warned you about. Orry also mentions that a cultist passed through recently, and it might have been Caine.
If you’re aligned with Old Camp, you can tell Orry that entering the mine is official business for Raven, and he should let you pass. If not, you’ll need to offer Nuggets—Swampweed rolls may work as an alternative.
Once you convince him, Orry gives you the Abandoned Mine Key, along with 200 Experience Points. Now you can finally enter the mine.
Find Caine in the Abandoned Mine
The mine is very dark when you first enter. In the first open room, grab two torches, since they’ll be useful later. You can also find a Pickaxe and some meatbugs in this area. After that, continue deeper by following the cart tracks.
Ahead, there’s a low-ceiling section that forces you to crouch to get through. If you haven’t crouched much during the game, here’s the reminder: press Square on PlayStation, X on Xbox controllers, or use the default crouch key on PC (the guide notes the default keybinding is C).
Eventually you reach a large room featuring a bridge over a chasm. Cross the bridge to spot a glowing rock ahead, and underneath it is a new threat: the Minecrawler Nymph.
New Enemy – Minecrawler Nymph
These small creatures have health comparable to a Juvenile Scavenger, but they hit harder. When nymphs attack, they can chain multiple bite strikes in quick succession—so keep your distance until you spot an opening. Once you have one, two solid hits with a sword that deals around +20 damage should be enough to finish them.
The timing on their attack tells is fast, so you’ll need quick reactions. If you successfully dodge their first strike, they often miss the second as well.
Ranged attacks can work too, but they’re fast-moving and thin, making them harder to aim and land consistent hits on.
Not far past the nymphs you’ll find a burned-out fire pit with another torch. Nearby are two ore deposits you can mine with your pickaxe. Unlike many older-mine deposits that give more per hit, each deposit here yields only 1 Ore Nugget per strike, for a total of 5 Ore Nuggets per deposit. The mining animation is lengthy, and there are 19 deposits in the mine (which could total 95 Ore Nuggets)—so the guide suggests keeping them in mind if you want to farm.
The deposits are at a fork. One route goes down the left, while another option is an elevator shaft opening in front of you. There isn’t much to do immediately ahead of you from this view, and it looks like you could return later by dropping down from there. For now, go down the left-hand path.
Flooded Winch Room
You’ll emerge into your first flooded room. A ladder rises on the left, while a ramp descends into the water on the right. Climb the ladder to reach two more ore deposits (each good for 5 Nuggets) and also pick up spare arrows on the second level.
To progress, you have to dive into the water. There’s a ladder you can swim to on the opposite side, but before you reach it, swim toward the center of the room and dive below the surface. The guide notes you should use the same button as crouching to dive; when underwater, your jump input makes you rise.
At the bottom center of the room’s water, you’ll find a large glowing ore pile. Swim to it, and you’ll also discover a Detached Winch—grab it because you’ll need it later. You can also take a few spare nuggets here, then return to the surface.
Next, swim to the far side of the room, climb onto the platform, and climb the ladder.
There’s a quick detour you can take here to gain extra ore and experience, but you can also skip directly to using the winch if you want to keep the story moving.
Optional Detour – Upper Minecrawler Path
After climbing the ladder, you’ll land near stairs. Climb them and follow the path until you reach glowing crystals across a small gap.
On the other platform, you’ll face two Minecrawler Nymphs. You can try to snipe them from range while they’re unable to reach you, or you can jump into the fight.
Once both nymphs are dealt with, cross the gap if you haven’t already, then continue along the upper route collecting Mistcap mushrooms as you go.
Before the small bridge, there’s an ore deposit on your left, and then three more ore deposits after you cross. Be careful: once you cross the bridge, there’s a third nymph waiting around the corner on the right.
Further ahead, you can see the top of the mineshaft you encountered earlier. If you walk along the right side and drop down to the lower platform, you’ll find an open chest containing arrows, a healing potion, Swampweed, and additional items. This route can help you leave the mine more directly if you decide to turn back.
For the main route, climb back to the upper platform and return to the top of the ladder you used to reach the flooded area, so you can use the winch handle.
Use the Detached Winch
From the top of the ladder, look left. There’s a platform slightly below yours with a mechanism on the far end. As you approach the gap, make sure you jump over, then interact with the mechanism to pull out the Detached Winch you found earlier and attach it.
With the winch active again, interact with it and crank clockwise to open the metal gate that previously kept the submerged passage sealed.
Now you can jump back into the water, follow the currents past the opened gate, and climb up the tunnel on the other side. Soon you’ll reach the upper section of a new chamber.
Descending the Mine Shaft
You can descend the mine shaft in two different ways. The first is to jump straight into the water below; the water is deep enough that you won’t take damage.
The second method uses the ladder on the left side of the walkway. Climb down via the platforms and ladders until you reach the water’s surface. If you go this route, you’ll pass four additional ore deposits on the way down, giving you a potential total of 20 Ore Nuggets.
When you’re finally in the water, check the chest sitting on a table at the bottom of the room. Open it for materials and ore nuggets.
Once you surface to breathe, descend again and follow the water currents through the flooded mining tunnel. The guide notes there isn’t much of note there beyond a couple patches of Kingstide, so focus on reaching the other side without running out of air.
Molerat Cavern
After climbing back out of the water, it’s smart to prepare for a tougher encounter. Save if you can, and make sure your health is close to full.
There’s an ore deposit nearby, but don’t mine it yet. A group of three Molerats waits just around the corner to your left, along with a new enemy: the Molerat Mother.
If you can remove any of the smaller Molerats before the mother fight begins—either with ranged attacks or by pulling the smaller ones away—it will make the larger fight significantly easier.
New Enemy – Molerat Mother
This creature is a larger, more dangerous Molerat. Her health pool is bigger and she deals much more damage, but her threat level isn’t wildly different from her smaller offspring.
The key danger is the sheer damage she can output. If you’re around Level 6, her attacks can erase more than half of your health bar, so reliable dodging is essential.
Her main attack is a two-step rush: she runs forward and then bites you in the follow-up. The second part comes about a second after the dash. If you dodge the initial lunge, you’re likely to get tagged by the actual bite right after—so instead, wait until she commits to the bite animation, then dodge.
She also has a burrowing attack similar to the other Molerats. You can dodge it like the smaller ones, or “cheese” it by circling the central pillar so that she stays on the far side. Since she can’t dig underneath the pillar, staying in motion around it keeps you safe. The guide also calls out that this is a good way to maintain distance while using healing items.
After you defeat the Molerat Mother and the Molerats with her, the cavern opens up for exploration. You’ll find five ore deposits, plus occasional pickups such as Cavern Dewleaf, Mistcap mushrooms, or Slave’s Bread mushrooms.
When you’re ready, proceed to the far side of the cavern—passing the crushed Minecrawler—and continue down the nearby corridor. There’s one more ore deposit plus more mushrooms and moss before you need to enter another deep pool of water.
Swimming Through the Mine
When you’re ready, jump in and swim under the low-hanging ceiling to continue. There’s a tunnel split here: one side goes left and the other goes right. The left route is blocked by a locked chest at the far end, and unlocking it requires improving your diving skill by finding a diving teacher so you can breathe underwater for longer.
For the main route, go right.
Not long into the right path, you’ll reach another cavern where you can surface to regain air. Climb onto the nearby platform to mine another ore deposit and find a pickaxe on the ground. After that, you’ll need to jump back into the water for more swimming.
In the lower portion of this pool, there’s a broken grate you must swim through to keep moving forward.
After going through, you emerge into a bigger cavern and the music changes. There’s nothing special in the water aside from ruins, so swim to the right-hand side of the platform when you’re ready to climb out.
Near a small campfire, pick up a hammer (listed as junk) and a scroll of Light (listed as magic). Then proceed through the nearby stone corridor.
You’ll reach a four-way intersection. Small chambers sit on both left and right sides, and each contains a potion-like item. On the left, there’s a Potion of Healing on the ground. On the right, there’s an Essence of Magic Energy on the ground.
Save your game, then climb the stairs.
Boss Fight – Undead Orc
Caine has been killed by an Undead Orc.
As soon as you enter the chamber, the orc raises its axe and rushes straight at you. If you’re wearing only the basic camp armor from the start of this chapter, this fight is likely to hurt more than the Molerat Mother encounter. Dodge as many of its attacks as you can, particularly the uppercut that deals more damage, or stay out of its strike range for the entire fight.
If you choose to fight from a distance, you can sprint out of the danger zone while the orc attacks. That spacing should give you time to charge and fire a couple arrows. The guide notes there’s a small delay as your character turns around and starts sprinting again after shooting, so don’t keep aiming as the orc closes—back off instead so it doesn’t get too close.
If you prefer melee, you’ll either need to dodge each strike or sprint away and then return for your opening. The orc often swings in two- or three-hit sequences. Once it commits to a third strike and misses, that’s your guaranteed window to attack.
If you’ve trained for melee combat, use full three-hit combo strings. The guide says this approach deals the most damage and should also stun the orc briefly after the third hit. To do it, alternate which attack button you use and press each subsequent input at the right moment. The recommended pattern alternates right, then left, then right (or the reverse). Landing that third hit is what makes the fight easier.
When the orc is defeated, you earn 250 Experience Points and can loot its body. It carries a powerful axe that’s difficult to wield, plus an amulet. Grab both, and both The Brotherhood’s Plan and The Lost Apprentice will update.
You can also loot Caine’s body in the center of the room for a few items.
In the back corners, you’ll find one chest in each corner. The left chest holds gold, junk, and a Judgment Staff. The right chest contains Ore Nuggets and a Ring of Defense.
Staves can’t be used until you have training in two-handed combat, which requires mastering one-handed combat first.
Escaping the Mine
From the orc chamber, take either staircase that leads upward. This moves you into a room with a stone spiral staircase.
Once you reach the top, you’ll find a gaudy stone door with an indentation. Use the Strange Amulet you got from the orc, and the door will open.
Follow the stream ahead. It leads outside, placing you on a grassy area above the mine.
If this is your first time here, scavengers and goblins will be patrolling. You can usually avoid most of them by sticking to the right side, or fight them to clear the area. Just watch for goblin rock-throw attacks, since they’re surprisingly strong.
To leave the area, look for a gap in the rocks near the red flag, which leads away from the waterfall you came up from. Beyond that gap is a set of stone steps you can use to descend.
When you reach the bottom, you’ll be back at the front of the mine with Orry, and you can return to Old Camp from there.
Return to Raven
- In-game objective for The Brotherhood’s Plan – “Raven will want to know about Caine.”
To progress the next step in The Brotherhood’s Plan, head back to Raven in the Old Camp castle.
When you speak with Raven, he’s startled by what you tell him. Eventually, he suggests you should use your newly acquired amulet to earn Cor Kalom’s trust—possibly letting you learn more about what the Brotherhood has planned.
- In-game objective for The Brotherhood’s Plan – “I’m supposed make myself useful with the Brotherhood.”
Return to Cor Kalom
- In-game objective for The Lost Apprentice – “I should report back to Cor Kalom.”
To wrap up The Lost Apprentice, tell Kalom that Caine has died. Go back to the Swamp Camp, climb the stairs to Cor Kalom’s laboratory, and report the news.
Your character shows the Strange Amulet to Cor Kalom. Cor Kalom states that it’s pulsing with the Sleeper’s magic, then orders you to deliver the amulet to Y’Berion (the Swamp Camp leader) right away.
While you’re still speaking to Cor Kalom, you can ask for a reward. Doing so will earn you 50 Ore Nuggets.
When the conversation ends, the quest is completed. You immediately gain 1,000 Experience Points, and a new quest called Y’Berion starts automatically.
Up Next: How to Travel to New Camp
Top Guide Sections
- 16 Things to Do First in Gothic 1 Remake
- Walkthrough
- Quests
- How to Travel to New Camp