Mass Effect 2 Dossier: The Assassin Walkthrough—Illium Fight and Key Choices
Mass Effect 2’s Dossier: The Assassin mission on Illium drops you into a multi-floor fight against Eclipse mercenaries and mechs, then culminates in a confrontation with Nassana Dantius—followed by Thane’s return to the Normandy and a handful of key morality-driven dialogue branches.
Where to start and what you’ll get
This walkthrough section focuses on Dossier: The Assassin on Illium, covering every combat stretch, all collectible locations, and the dialogue choices that affect Paragon/Renegade outcomes.
If you’re trying to jump straight to a specific part of the run, here’s the order of topics covered: Mission Rewards, Travel to Tasale, Talk to Liara, Talk to Seryna, Climb the Tower, Take Elevator, Find the Bridge, and then Back on the Normandy (including a note about the Datapad).
- Experience: 1,000 XP
- Weapon: M-97 Viper
- Mission Credits: 30,000 credits
- Found Credits: 30,000 credits
- Research: Submachine Gun Damage
- Resources: 500 Element Zero
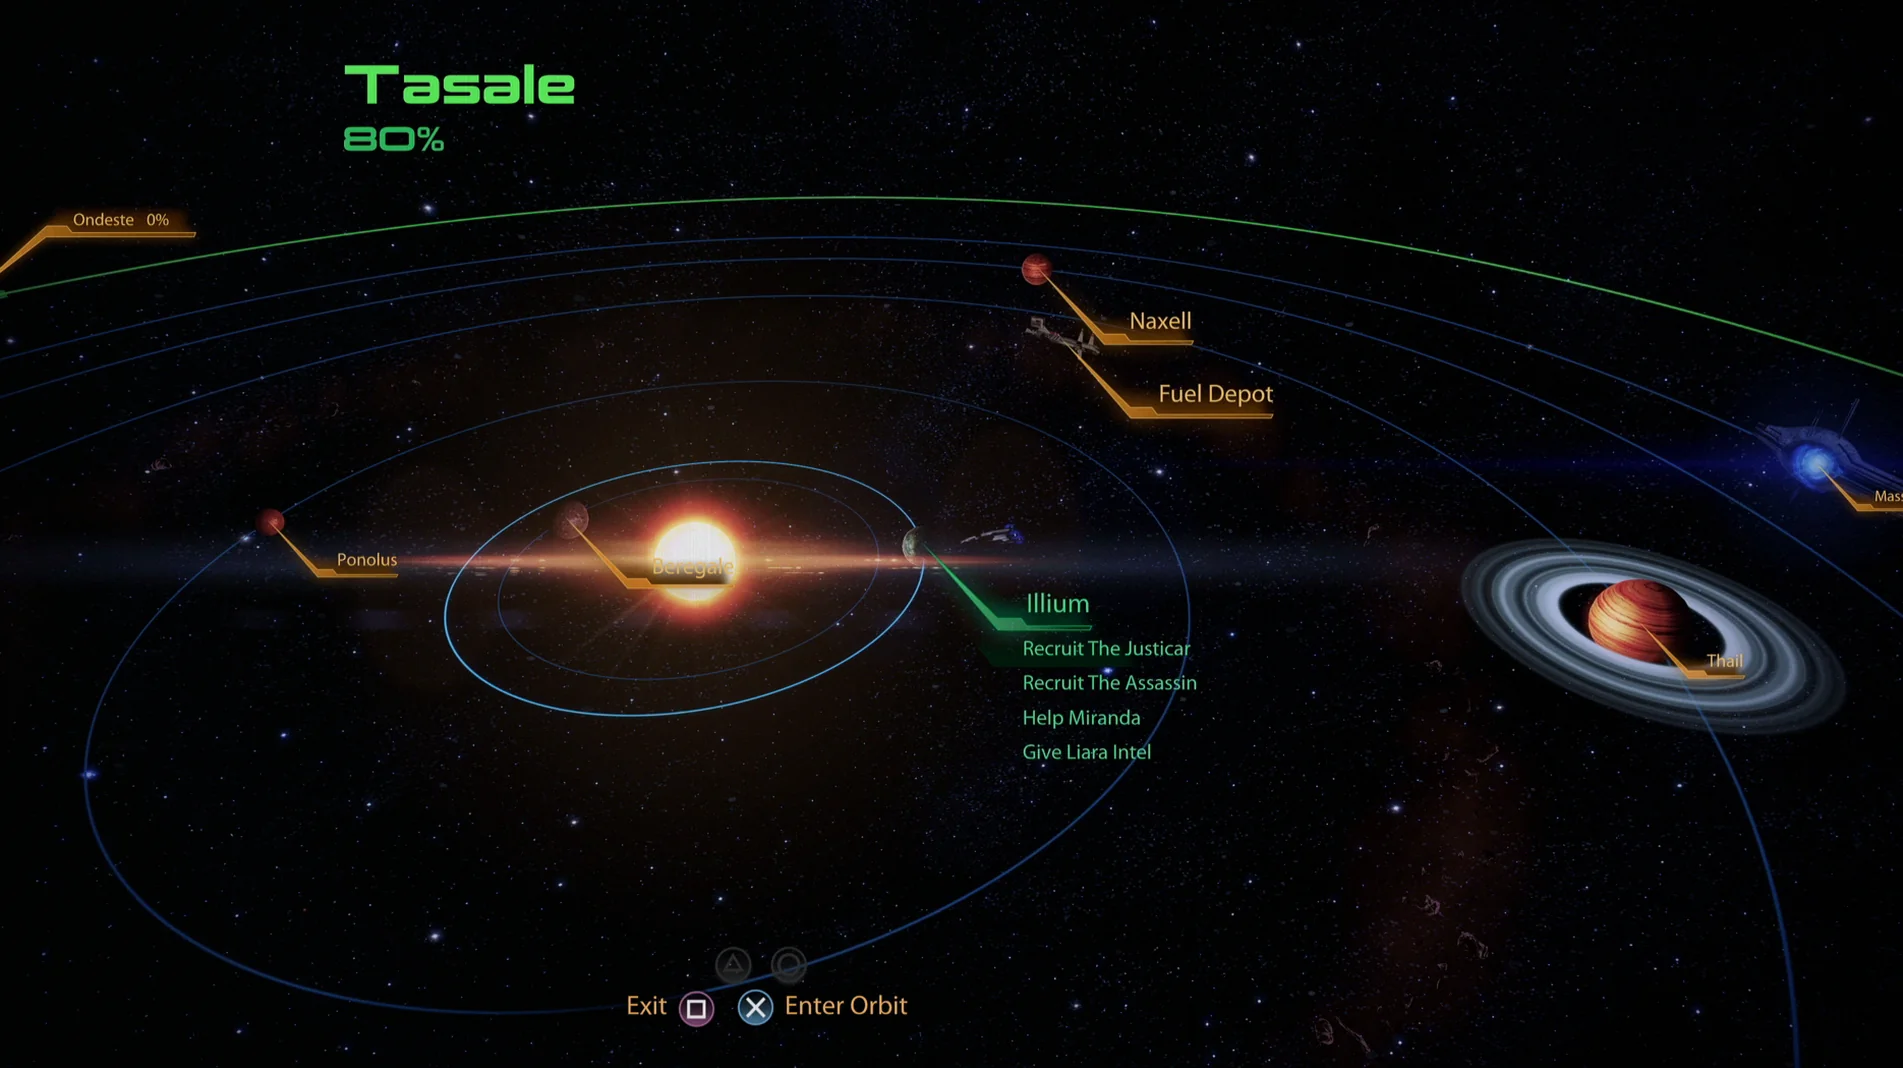
Travel to Illium (via Tasale) and set up your squad
To access this Dossier mission, you need to complete “Horizon.” After that, you can reach Illium in the Crescent Nebula. You’ll land directly in the Tasale system, with Illium as the second planet orbiting its star—so land and proceed.
If you’re interested in mining before the mission proper, the guide points you toward the rich worlds in the Illium system (starting with Tasale).
Recommended loadout
-
Squad tactics:
- Miranda is recommended because the encounter includes tough Vanguards protected by Barriers. Her Warp can strip those defenses, and her Overload helps deal with synthetics and Shields.
- Grunt is the other suggested pick because his Incendiary Ammo can help strip Armor. With Miranda, this covers all three major enemy protection types mentioned in the guide.
-
Unique dialogue:
- For the widest set of unique lines, bring Grunt and Garrus.
- If you’re playing Renegade, replace Garrus with Jack.
Talk to Liara, then avoid the Shadow Broker option
If it’s your first visit to Illium, the guide reminds you there’s plenty to do before hunting the Assassin, Thane—specifically recommending its separate “Illium – Shopping and Side Quests” page.
When you’re ready to start the mission chain, find Liara’s Office. It’s in the center of the Trading Floor area, tucked in an alcove with stairs nearby, close to the door that leads toward the transport area. Talk to Liara and choose “Thane” to get your next lead.
WARNING: Don’t take the Shadow Broker detour
If you installed the Lair of the Shadow Broker DLC, you may see a “Let’s get the Shadow Broker” option. The guide explicitly warns you not to choose it, because it triggers a long sequence of missions you may want to handle later.
Liara explains the Assassin, Thane Krios, is targeting Nassana Dantius, a corrupt executive. Thane has also recently contacted a woman named Seryna at the transport terminal (Shipping & Cargo), which is where you go next.
Talk to Seryna and prepare for Dantius Towers
Head to the Shipping & Cargo section on the east side of the map. Look for a small office corner near the stairs that lead to the door for the Transport Hub area. Seryna is there, and she fills you in on Thane’s plan and Nassana’s involvement.
- If you’re Renegade, start the conversation with “Show some respect” to gain +2 Renegade Points.
After she outlines what Thane is doing, you can respond in a couple of ways:
- “Where is he?” for +2 Paragon Points
- “Then talk fast” for +2 Renegade Points
Use the Investigate dialogue options to learn as much as you want, then select “I’m ready” to proceed to Dantius Towers.
Climb the tower: mechs, mercs, and multiple morality checks
Once you agree to move with Seryna, she rides out with your selected squad toward the towers where Thane Krios and Eclipse mercenaries are holed up. On the way, you get a chance to ask Seryna for tips before she drops you and your party at the tower’s base.
After Seryna leaves, you’ll spot mechs attacking two helpless Salarians. When those mechs are brought down, they quickly switch targets to you. The four mechs are initially held back by a large glass window in front of you—approach or shoot it and the battle becomes unavoidable either way.
The guide highlights the FENRIS mechs as the biggest threat due to their speed and aggression, but warns not to ignore their LOKI counterparts, which seem to carry stronger-than-usual weaponry.
With all four mechs down, move forward. The path splits—right and left. You’ll eventually need to go right, but first you should go left.
- Medical Station — 100 Credits, located on the back wall of the left-side room.
- Secure Terminal — 4,800 Credits, to the left of the Medical Station in the same left-side room.
When you turn left, you’ll reach a small room with a door off it and a dying Salarian. Start with either:
- “I’m sorry” for +2 Paragon Points
- “You’re lucky” for +2 Renegade Points
If you pull the Paragon Interrupt, Medi-Gel will save him, granting +5 Paragon Points and giving you the chance for additional information. If you miss the Paragon Interrupt, you can still respond with:
- “Hang on” for +5 Paragon Points
- “We’re done here” for +2 Renegade Points
After the conversation, go through the nearby doorway and turn left down the next hallway to continue.
Take the elevator: positioning, waves, and hidden loot
Coming out into a larger area filled with boxes and crates, expect heavy incoming fire. At first you’ll mostly face LOKI mechs and their FENRIR counterparts. The space slopes left and features a corridor ahead that also bends left. Enemies stream from the earlier opening, while the other corridor can be used to set up for dealing with the threat.
The guide suggests that if you have long-range tools—like a sniper rifle, good aim, or other distance-focused attacks—you may want to hold position and focus left from behind the initial crates. Otherwise, dash to the alternate corridor and fight from there, still facing left.
Along the way, Eclipse mercenaries will try to stop your advance. They won’t be too difficult, but many possess powerful biotic abilities and visible biotic barriers, so plan to deal enough damage before they fall. Eventually the room curves back left (depending on where you’re facing), and that’s where mercenaries deliver their strongest push on this floor.
Once the mechs and biotic mercenaries are cleared, head through the door on your left, climb the ramp, then go through another door.
- Med Kit x2 — 200 Credits, on your right immediately after entering the door at the top of the ramp.
The guide notes you’ll overhear two guards on the upper floor talking to Nassana over a communicator, but your Assassin will handle them, including one that throws the body through the vent above the Med Kits.
Use cover and wait for more mercenaries to arrive. Expect a mix again of LOKI mechs and various mercenary types. Be ready for biotic-capable mercenaries to rush in; the suggested approach is to stay patient, let enemies enter from the left, and pick them off as they appear. You may need to break cover briefly to grab ammo if you’re low, but otherwise the guide favors controlled pacing.
As you move left to meet the next group, there are two options. One is a door at the top of the area leading to a leftward corridor along the building’s top edge—use it for flanking. If you split the squad to different positions, flanking is even more effective. The other is simply continuing left from the area where enemies streamed in, which leads to more direct fighting head-on.
- Med Kit — 100 Credits. After clearing the enemies above, look right for a dark alcove between a red corridor and a small white-lit room (both visible in the referenced screenshot).
Characters who can use sniper rifles gain a notable advantage here because of the open sightlines. Enemies—including mechs and mercenaries—pour in from the far end of the building, and since the spawn is straight ahead, long-range headshots can remove threats before they get close. The guide stresses this won’t work for everyone, but it’s an option for some players.
After you clear the floor’s remaining stragglers, the guide says you should be left with only a handful of enemies if you handled prior areas thoroughly. If you rushed earlier, expect the far end to trigger the final waves. Either way, standard cover-and-patience tactics should work.
With the enemies eliminated, ignore the elevator door for the moment and explore left of it. Along the perimeter wall, there’s a door you can bypass hidden behind a pile of wall panels. Inside, you’ll find frightened Salarians and can earn Morality Points:
- Answer “Yes” for +2 Paragon Points
- Answer “No” for +2 Renegade Points
When the conversation ends, search the room for loot:
- Med Kit — 100 Credits, in the back-right corner where the Salarians are.
- Secure Locker — 3,000 Credits, in the back-left corner of the same room.
After that, exit and U-turn right around the construction cover to grab more items:
- Viper Sniper Rifle, at the far end of the walkway running past the Salarian room.
- Power Cells — 100 Credits, beside the Viper Sniper Rifle.
- Secure Terminal — 4,200 Credits, beside the Power Cells and Viper. It’s mislabeled as a “Hack,” but you can “Secure Terminal.”
M-97 Viper and the elevator assault
The guide describes the M-97 Viper as a sniper rifle that trades away the Mantis’ power for a larger clip size and faster firing. You can shoot multiple times before reloading, though muzzle climb is strong. It also states that the DLC Incisor Sniper Rifle outclasses it by letting you fire many rounds per shot, offering higher power, and featuring gentler muzzle climb.
When you return to the elevator and finally examine it, you call it down toward you. The guide advises taking party advice but immediately seeking cover, because the elevator doesn’t arrive empty. When the door opens, Eclipse mercenary engineers attack alongside biotic mercenaries—and even a gigantic Krogan bounty hunter.
The Krogan is presented as the main threat, so focus it first if possible. Then mop up the remaining units while your squad handles some of the work. The area is tight, leaving little room for mistakes, but you should survive long enough to access the elevator yourself and ride it up to the next floor.
Find the Bridge: cutscenes, Datapad pickup, and the Nassana finale
On the next floor, wait for an important cutscene. As the elevator rises, you encounter a mercenary who talks trash before you corner him.
- From the start, you can say “I need answers” for +2 Renegade Points.
When he refuses to talk, you can respond with either:
- “I’ve got an offer” for +2 Paragon Points
- “Listen carefully” for +2 Renegade Points
If the Eclipse merc still won’t talk, you’ll get a few more options:
- If you pull the Renegade Interrupt, you shove the Eclipse Merc through the window to his death for +5 Renegade Points.
- If you ignore or miss the interrupt, use Persuasion options:
- “Don’t be stupid” (Charm) gives +5 Paragon Points, convincing him to leave.
- “I hope you can fly” (Intimidate) gives +5 Renegade Points, and Shepard shoves the Eclipse Merc through the window to his death.
- “Don’t be stupid” (Charm) gives +5 Paragon Points, convincing him to leave.
- “I hope you can fly” (Intimidate) gives +5 Renegade Points, and Shepard shoves the Eclipse Merc through the window to his death.
After regaining control, turn back toward the elevator. As you approach it, look to the right for the Datapad and pick it up. The guide says this Datapad belongs to the “Illium: The Assassin: Salarian Family Data” assignment, which it claims is handled on its own page linked later in the mission walkthrough.
The next area can be accessed through the two doors flanking the elevator. It’s essentially a huge hangar space with about six to eight mercenaries and mechs. The guide says they can be removed fairly easily due to the room’s size and the small enemy group. Once the threat is cleared, you can explore.
Check the left wall for another Bypass door hidden among half-built pillars. This one is different from the earlier door: a distraught Salarian threatens to shoot you. The situation is compared to the Eclipse Merc at the window earlier.
- If you pull the Renegade Interrupt, you knock out the Salarian for +5 Renegade Points.
- If you ignore the Interrupt, you’ll find he doesn’t want to shoot you, and you’ll get two Persuasion choices:
- “Let me help you” (Charm) gives +5 Paragon Points.
- “Put down the gun” (Intimidate) gives +5 Intimidate Points.
- “Let me help you” (Charm) gives +5 Paragon Points.
- “Put down the gun” (Intimidate) gives +5 Intimidate Points.
After that, the Salarian—named Telon—ends up on the ground (either knocked down by your Renegade Interrupt or because he faints). You then speak with his brother Chesith. When he asks whether you shot the dead Eclipse merc, you can choose:
- “I don’t think so” for +2 Paragon Points
- “Not that one” for +2 Renegade Points
Once the conversation ends, grab the following:
- Med Kit — 100 Credits, inside the Salarian room on your right after the cutscene.
- Eclipse Merc Corpse — 6,000 Credits, to the right of the Med Kit near the door.
Exit and move toward the far end of the open hangar. At the bottom of the ramp, you’ll find a Comm Terminal you can open to tell Nassana that her men won’t be coming back to her anytime soon.
- Power Cells — 100 Credits, to the left of the Comm Terminal where you briefly speak with Nassana.
Then head up the ramp near the Comm Terminal to reach the next floor level. This portion of the building forms a U-shaped space and is naturally occupied by another enemy wave, though the guide notes it’s still a relatively sparse group for the size of the room.
Mechs fall quickly here, as usual, while biotic mercenaries put in more effort.
Before leaving through the exit doorway at the far end, the guide says to grab loot first using the Weapons Locker if you don’t like how the Viper feels or looks on Shepard.
- Med Kit — 100 Credits. Located between the exit doorway and the Weapons Locker to its right.
- 500 Refined Element Zero. Stand at the Weapons Locker with your back to it. Ahead is a half-built pillar; check its left side for the Eezo box.
Go through the doorway to wrap around outside. You’ll see mercenaries working on an explosive device, so take cover and shoot it. That easily disposes of the two Eclipse Mercs tinkering with it. The main threat in this area is the Eclipse Commando, described as powerful with biotic abilities, a barrier, a shield, and significant firepower—so prioritize it first while keeping other enemies away.
After the area is quiet, go to the end and turn right. The guide recommends watching the top of the ramp for collectibles.
- Submachine Gun — “Submachine Gun Damage,” located next to a dead Eclipse merc at the top of the ramp.
- Eclipse Merc Corpse — 12,000 Credits, the Eclipse merc you found the Submachine Gun beside.
- Med Kit — 100 Credits, also next to that dead Eclipse merc.
Now it’s time to cross the bridge you’ve heard about. Even though it warns about high winds and being unfinished, the guide says it behaves like a standard bridge—just with wind audio and slight camera wobble. Space is limited, so stay as far from enemies as you can and use your weapons to maximum effect. Sniper rifles are again emphasized, especially for deleting threats from afar, including two Rocket Drones perched on the other tower.
Enemies on the far side of the bridge will fire down at you from above. You can fight them while still on the bridge, or use the ramp to flank and engage up close (though you’ll be exposed). Near Nassana’s door, you’ll face one more Eclipse Commando. If you cleaned up earlier enemies leading to this point, you can gang up and remove him more easily.
When you finally enter Nassana’s area, you confront Nassana at last. The opening of the scene depends on whether you completed a specific Mass Effect 1 Assignment that first allows you to meet her.
- If you completed “UNC: Asari Diplomacy” in Mass Effect 1, you can unlock additional conversation options:
- “Interesting idea” for +2 Paragon Points
- “Is that what you think?” for +2 Renegade Points
- If you didn’t complete Asari Diplomacy, say “You tell me” to unlock the extra conversation options.
- “Interesting idea” for +2 Paragon Points
- “Is that what you think?” for +2 Renegade Points
If you reach those extra options, you can say:
- “You still think it’s me?” for +2 Paragon Points
- “You’re delusional” for +2 Renegade Points
After choosing one and selecting “No, we can’t,” you’ll be able to choose:
- “I met some of your workers” for +2 Paragon Points
- “You’re pathetic” for +2 Renegade Points
No matter which route you take, Thane Krios eventually drops in, kills all of her men, then assassinate Nassana.
During Thane’s conversation, when he reveals he let you cause chaos as a distraction, you can answer:
- “Bastard” for +2 Paragon Points. If you choose this, you can then pick:
- “Saving lives” for +2 Paragon Points more
- “Killing bad guys” for +2 Renegade Points
- “Saving lives” for +2 Paragon Points more
- “Killing bad guys” for +2 Renegade Points
The guide says there are also two response pairs you’ll always be able to make:
- Paragon: “We’ll find a way” and “I’m sorry” for +4 Paragon Points total
- Renegade: “So I’ve heard” and “You’re worried about humans?” for +2 Renegade Points
The conversation’s intent is clear: this is Thane’s final mission, and he’s testing how far Shepard will go. He’s also dealing with a life-threatening illness and wants to push the world toward something better before he dies. The guide notes that because taking down the Collectors fits that goal, he decides to join your Squad for free.
Completing the mission grants +5 Paragon Points and +5 Renegade Points. Then it’s time to return…
Back on the Normandy: Thane’s reception and the Datapad reminder
After you’re back on the Normandy, Thane is greeted by Jacob and EDI. Jacob isn’t especially welcoming; he assumes Thane is just a “precise” mercenary, and Thane corrects that quickly. You can reply with:
- “What’s the problem, Jacob?” for +2 Paragon Points
- “Watch yourself, Thane” for +2 Renegade Points
After that, Thane heads out to the dry part of the Normandy.
- At the end of the conversation, tell Jacob “Keep an eye on him” for +2 Renegade Points.
Thane can be found in Life Support—described as the door on your right when coming out of the elevator on the Crew Deck.
- During your main conversation with him, choose “Can we help?” for +2 Paragon Points.
The guide lists Thane’s Normandy Upgrade as the Modular Probe Bay, which doubles your Probes’ capacity. It also says that buying the upgrade refills your probes for free. While it doesn’t alter the story, it’s described as extremely useful for mining.
Then it’s time for your routine on the Normandy:
- Crew Deck: talk to Kasumi for a comment about meeting Liara again.
- CIC: talk to Kelly and Joker for their thoughts on Thane.
- Engineering: talk to Tali for her Loyalty Mission, and mentions Gabby and Ken may have comments related to one of the Normandy’s upgrades.
The guide also brings you back to the Datapad you picked up after talking to the Eclipse merc. It frames this as part of a side quest, and reminds you to return it to its owner the next time you’re on Illium—pointing to the “Illium: The Assassin: Salarian Family Data” page.
- Illium: The Assassin: Salarian Family Data
Finally, it lists additional Mass Effect 2 help pages, including Legendary Edition Changes, How-To Guides, Key Choices and Consequences, Romance Options, Walkthrough, and Side Quests.
What’s next
The guide’s next planned section is: Up Next: Dossier – The Justicar.