Crimson Desert Pywel Guide: Legendary Animals in Hazy Tales and More
Crimson Desert’s Pywel is packed with both “everyday” wildlife and higher-tier magical creatures, but the real pull for completionists is the Legendary Animal category. These special finds live in your Exploration Challenges under Hazy Tales, and they’re tied to progression-style rewards—either by hunting down the creature or, in some cases, taming it into a Legendary Mount. The update also includes Legendary Animal bosses that aren’t listed under Exploration Challenges, expanding what “Legendary hunting” can mean in practice.
Why the Legendary Animal list matters for players
Across Pywel, there are 22 known Legendary Animals distributed through multiple regions. Some of them can be hunted or tamed into Legendary Mounts, while others require direct combat to defeat. The system is also broader than the Exploration Challenges view: there are 2 additional Legendary Animal bosses that exist outside the tracked checklist, meaning you can miss major rewards if you only focus on the tab.
Below is a structured walkthrough of the known Legendary Animals and where to find each one.
- Exploration Challenges track Legendary Animals under “Hazy Tales,” but not every Legendary boss.
- Some Legendary Animals become mounts (tame/register), while others must be defeated in combat.
- Region routes matter—many spawns are best reached via specific landmarks and traversal paths.
- Preparation changes outcomes: stamina management, frost resistance, and the right approach can be the difference between a quick hunt and repeated failures.
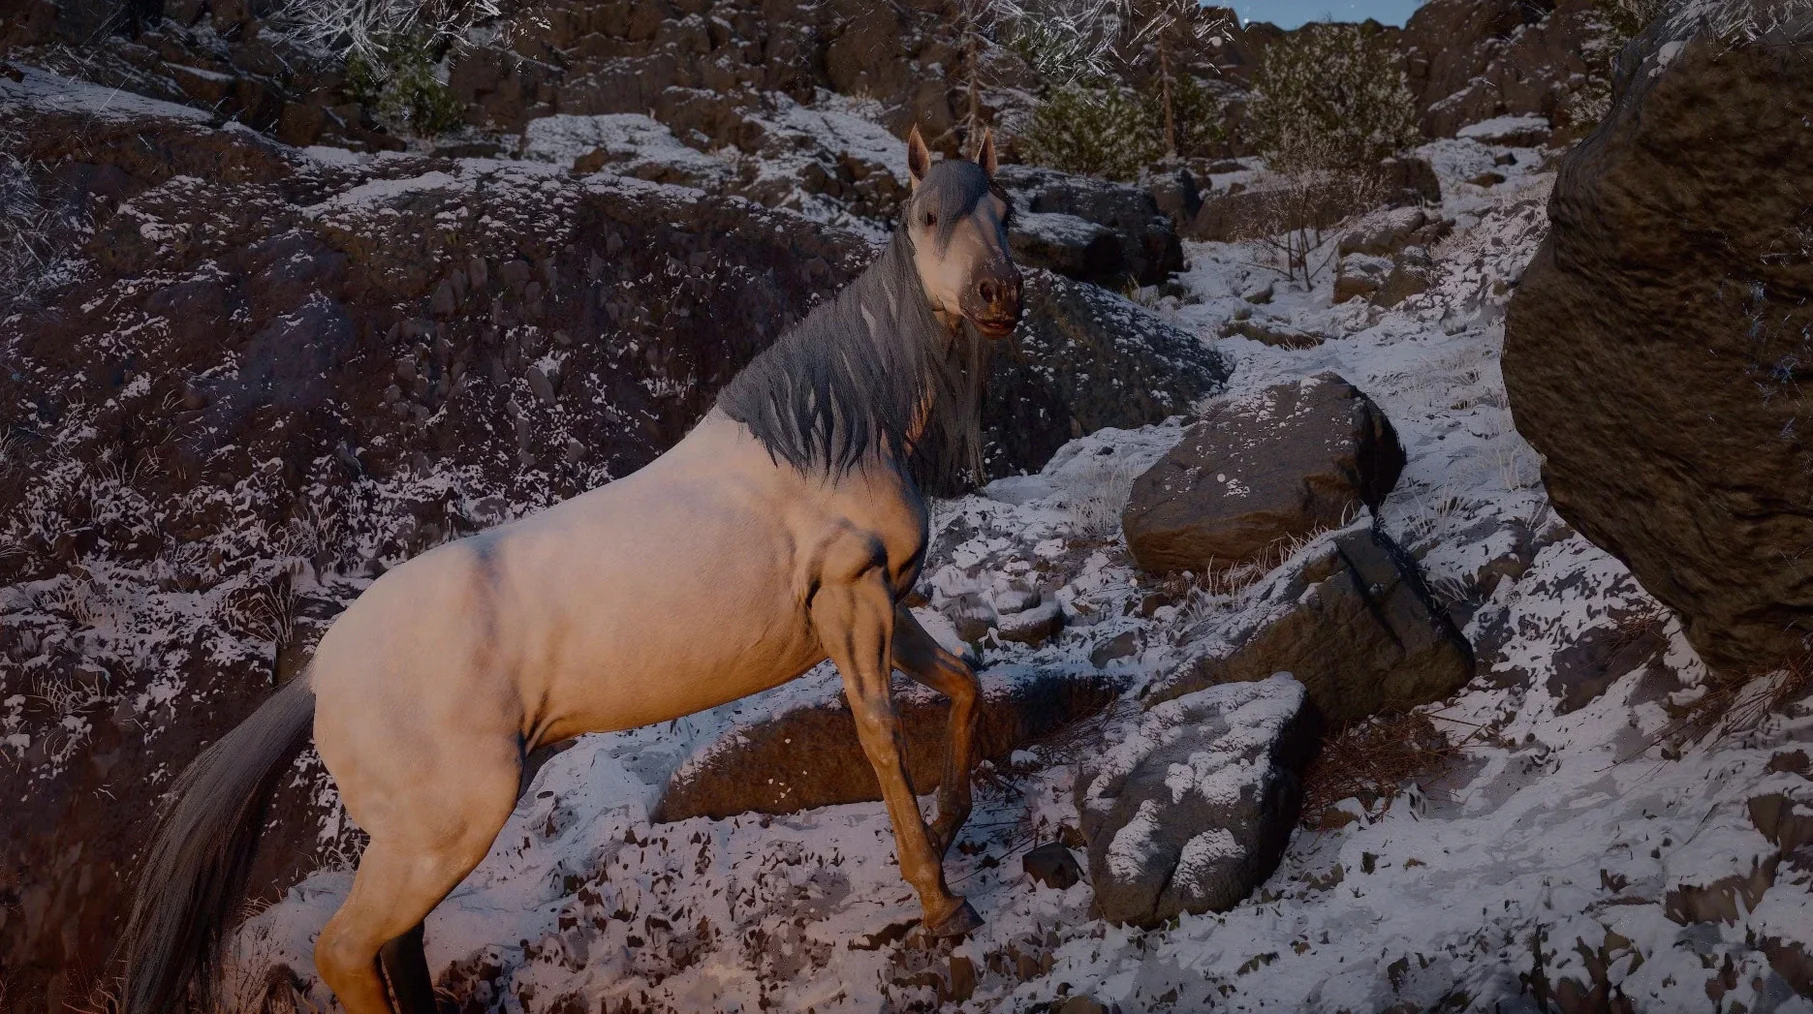
Legendary Horse – Royler Location
- Location: Snowgrass Hearth – Silver Wolf Mountain, Pailune Territory
- Reward: Summonable Legendary Horse Mount (350 Health, 315 Stamina, 10 Attack, 50 Defense)
Royler is a white Legendary horse with gold-tinged legs. It can be tamed and ridden, and it’s found on the southern ridge of Silver Wolf Mountain where the Pailune and Hernand regions meet. To reach it, travel up and around Sage’s Peak, cross the Ancient Rift, and follow the river upward—past the Silver Wolf Mountain Shrine—east of Steinnfell Fortress.
Royler is usually near a small pond and its river source, a spot that also houses a Legendary Fish. The area is surrounded by mountains on most sides and is often shared with other wild horses; Royler is the only one fully white. Good news: there are no hostile enemies in this immediate area.
Royler doesn’t appear to react to Sugar Beets or Sugar Cubes the way other wild horses do, so speed is key. Because the terrain is mountainous, Royler won’t be able to escape far without getting caught on rocks. The recommended move is to herd it toward any route leading away from the small river to the east.
For taming, run in, jump on, then attempt the tame by counterbalancing against its kicking legs. Hold the input direction toward its rear as it spins unpredictably. Stamina drains quickly, so refill the rope meter before it hits zero. If you get thrown, your stamina refills instantly on retry, and the horse typically doesn’t travel far between attempts.
Since Legendary horses can buck faster and more erratically, using a controller is recommended. It lets you swivel directional input quickly while keeping the camera steady, rather than trying to hold movement direction precisely while constantly matching camera rotation.
Once you tame Royler, register it immediately. Legendary horses start with notably stronger baseline stats than other horse breeds, featuring high stamina, speed, and acceleration—but Royler has lower health and is harder to manage than the Rokade Legendary Horse. Like other Legendary Horses, it gains additional skills as your Trust Level rises.
Legendary Horse – Rokade Location
- Location: Spire of Insight – Steel Mountains, Hernandian Territory
- Reward: Summonable Legendary Horse Mount (600 Health, 240 Stamina, 15 Attack, 65 Defense)
Rokade is an all-black Legendary horse that can be tamed and ridden. It lives in the Steel Mountains region around the Spire of Insight near Hernand’s southeastern border. You can access it most easily from the southern fishing town of Vellua or by climbing the mountains south of the Willow River.
Rokade is typically spotted slightly west of the Spire of Insight itself, and north of an Abyss Teleporter set along the bluffs. It commonly travels with other wild horses, but it’s the only one with a fully black coat.
As with Royler, Rokade doesn’t seem to be influenced by Sugar Beets or Sugar Cubes. You’ll need to catch up quickly. The Steel Mountains’ isolated layout gives you plenty of dead ends; the guidance here is to push Rokade toward the western cliffs or toward the small lake bordered by high mountains to the north.
After taming, register Rokade right away. Compared to other horse breeds, Legendary horses have much higher starting stats—Rokade has especially high health, defense, and handling. However, it’s slower and has less stamina than Royler. Like other Legendary Horses, it also unlocks extra skills as your Trust Level climbs.
Legendary Horse – Camora Location
- Location: Redtree Forest, Crimson Desert
- Reward: Summonable Legendary Horse Mount (450 Health, 240 Stamina, 27 Attack, 100 Defense)
Camora is the final Legendary Horse you can find in Pywel. It’s located in the secluded Redtree Forest in the Crimson Desert and requires a significant stamina investment to tame. It rarely stays put: it buckles you in continuous circles until you’re thrown off.
From the nearby river, search for a large cave entrance. Enter to reach the secluded grove where Camora roams.
Because Camora can sprint away quickly, it can slip into the jungle around the cavern. It has three possible exits it can bolt through, and some Briantos in the herd may resemble it depending on the time of day you attempt the tame.
Wearing the Shadowleaf Helm is essential. The helm functions as a Wildlife Disguise, letting you approach Camora without it running away immediately and reducing the chance it leaves the Redtree Forest area. That buys you more attempts at getting it under control.
If you’re still struggling, aim your camera toward the floor when you start riding. The top-down angle makes it easier to match Camora’s tail, which helps with your control during the taming balance checks.
In stat terms, Camora sits mid-pack for Health, but it leads in Attack and Defense at Trust 1. Its general speed and handling match Rokade. As with the other Legendary Horses, more skills unlock as your Trust increases.
Legendary Fish – Golden Tench Location
- Location: Sunset Valley – Mountain of Frozen Souls, Hernandian Territory
- Reward: Golden Tench
The Golden Tench is a medium-sized fish that lives in icy falls around the Mountain of Frozen Souls. It can be found at the base of the large waterfall on the far southern edge of Hernand, beyond the Sunset Valley town.
Follow the small river running through Sunset Valley southward. Eventually you’ll reach a pool of water that should be empty of life, except for the golden Legendary fish.
Although it’s framed as a tough angler challenge and likely to put up a strong fight, there’s an alternate approach: when the fish swims by, you can jump into the water and grab it bare-handed, skipping the usual minigame.
Legendary Fish – Golden Carp Location
- Location: Snowgrass Hearth – Silver Wolf Mountain, Pailune Territory
- Reward: Golden Carp
The Golden Carp is a medium-sized fish in a small icy pond. It’s located on the southern range of Silver Wolf Mountain bordering Pailune and Hernand. To reach it, go up and around Sage’s Peak, cross the Ancient Rift, and follow the river up past the Silver Wolf Mountain Shrine, east of Steinnfell Fortress.
In the pond’s area, you’ll find a river source that flows east. The spot is also home to a Legendary Horse. Golden Carp tends to be the only fish living in that pond, and the region’s lack of hostile enemies makes it easier to focus on the catch. The pond is often surrounded by wild horses, and again, it’s the only fully white one in that group.
Legendary Fish – Coelacanth
- Location: Sanctum of Devotion, Delesyia
- Reward: Coelacanth
“Catching this fish would make you the greatest anger in Pywel.”
The text describes it as a prehistoric fish thought extinct long ago, but now reported more often. Ancient records claim it has “a taste befitting its demonic appearance,” and the fish is said to show up in a reservoir inside a city built around advanced technology.
The Coelacanth is located in the Valley of Origin Reservoir outside the Sanctum of Devotion in Delesyia. Unlike the golden fish entries, it may take more searching because it doesn’t stand out as much from normal fish.
Swimming and searching is the most effective method unless you can spot it while hovering from above.
Legendary Fish – Golden Coelacanth
- Location: Above the Mistshard Cave waterfalls, Demeniss
- Reward: Golden Coelacanth
This variant of the coelacanth is described as mythical, with its entire body covered in gold. It’s said to gleam even underwater, and the belief is that it lives at a waterfall hiding hidden gold within a nation of noble ambition.
The Golden Coelacanth is found in the river above the Mistshard Cave in Demeniss, near the border with the Crimson Desert. You can catch it with a rod or collect it by swimming out to it.
Legendary Fish – Clockwork Fish
- Location: West of the Timeworn Ruins, Crimson Desert
- Reward: Clockwork Fish
“Catching this fish would make you the greatest angler in Pywel.”
The Clockwork Fish is described as an artificial lifeform created by genius engineer Marni, framed as a demonstration of what human creation can achieve. It has been sighted in a lake where sand replaces water, in a land of blazing sun.
Even though it’s an invention associated with Delesyia, the Clockwork Fish actually appears in the Crimson Desert. Unlike typical fish living in water, this Legendary animal is located in quicksand.
Multiple quicksand areas exist in Crimson Desert, and the knowledge description suggests a dried-up lake—but the Clockwork Fish is not there. Instead, head to the Timeworn Ruins. Look for the lake west of that location.
Once you reach the lake, hover over the small island in the center of the quicksand. Identify the Clockwork Fish, then jump over to collect it. Standard fishing won’t work because the line is pulled toward the center island and snaps once it drops under.
Legendary Wolf – Silver Fang
- Location: Howling Hollow – Forest of Wolves, Hernandian Territory
- Reward: Silver Fang Helm, Fang of the Silver Fang
Silver Fang is a Legendary white wolf hidden in the northern Hernandian Mountains near the border to Pailune. It’s extremely difficult to coax out, requiring a long quest chain before it will appear. A clue can be earned by reaching 100 Trust with the Hide Merchant in Calphade, but the wolf won’t show up until all prerequisites are satisfied.
Silver Fang lurks in Howling Hollow, an area between The Sage’s Peak and The Ancient Rift in northern Hernand. However, it only spawns if you’ve defeated a related Legendary enemy: Black Fang, which is not listed as an Exploration Challenge entry.
Black Fang’s questline begins with Silence from Afar, a quest found near the river mill south of Hernand City. For that quest to be available, you must have completed a majority of the quest chains for House Roberts (including Estate in Dismay and Continuing Concern), House Celeste (including The Hellhounds and Queen of the Silkspun Citadel), House Serkis (including Lord Amidst the Ruins and Secret of the Lost Seal), and possibly House Alfonso (including House of Spears). You may also need to complete other Hernand faction quests, such as the Vellua Fisherman’s Guild.
Completing the Black Fang sidequest sends you to the Hernand North Gate east of The Sage’s Peak, in the northeast corner of the region, then routes you northwest to track Black Fang. Black Fang should be patrolling in a broad loop around Howling Hollow.
Once you defeat Black Fang in combat, fully finish and turn in the quest. This also grants an item that provides knowledge of every other Legendary Beast in Crimson Desert. Then return to the road leading back to Howling Hollow.
Inside Howling Hollow, you’ll find a large pack of wolves kept in check by Silver Fang, a large white wolf that uses many of Black Fang’s attacks. Silver Fang cannot teleport, but the arena is surrounded by life-sapping plants and thorns that can interfere with you.
If you’ve unlocked it, use a Charged Shot infused with elemental energy to clear the hazards during the fight, then dodge the wolf’s charges before retaliating. Use large attacks to wipe out the other wolves as well.
When Silver Fang falls, you receive the Silver Fang Helm and the Fang of Silver Fang. Take this Key Item to a Witch’s Lair to craft a trinket. The new trinket lets you temporarily summon Silver Fang as a rideable mount, but there’s a cooldown before you can use it again.
Legendary Animal – White Bear
- Location: Frostpierce Cave – Five Finger Mountain, Pailune Territory
- Reward: White Bear Helm, White Bear’s Claw
“Felling this beast would make you the greatest hunter in Pywel.”
The lore frames White Bear as a Legendary bear transformed from a betrayed warrior. It has a massive frame and thick snow-white fur. It’s described as tearing swords and shields apart “like paper,” and children of Pailune grow up hearing stories about the White Bear.
White Bear is located in the far northwestern corner of Pailune territory, along the map edge bordering the impassible Five Finger Mountain. The route begins past roads leading to Whisperleaf Fortress and Longbranch. Then look for an unmarked river flowing in from the northwest corner of the map. That river leads to a massive waterfall under a stone arch, with an Abyss Teleporter on top—where Frostpierce Cave sits below.
From the arch overhead, find the sloping rocky path down to the southwest. Climb up to locate the large white bear lounging in the snow alongside two similar white cubs.
Like all bears, White Bear is carnivorous and attacks on sight. It uses bear abilities including a stunning roar that can immobilize you unless you bring a sealed helm to negate its effect. When it charges, dodge to the side and then unleash strong attacks. Avoid its front claws and jaws unless you’re trying to be mauled or thrown around like a ragdoll.
After you defeat it, you’ll be awarded the White Bear Helm and White Bear’s Claw. Take the Key Item to a Witch’s Lair to craft a trinket that temporarily summons the White Bear as a rideable mount, with a cooldown before you can use it again.
Legendary Animal – White-Scaled Crocodile Location
- Location: Along the river between the Sanctum of Renunciation and Giant Totem
- Reward: Pale Predator’s Leather Gloves
The White-Scaled Crocodile is a Legendary animal that’s exceptionally hard to tell apart from ordinary crocodiles. Its white coloring doesn’t stand out regardless of the time of day. It’s an Elite enemy, so instead of the usual triangle marker, it uses a star (*) indicator.
All crocodiles can perform a lunge attack, and the White-Scaled Crocodile is no exception. If you fail to dodge, you’ll be killed by its death roll. Avoid that and the fight becomes more manageable, since you’ll mainly deal with standard tail smacks. If it becomes too risky up close, you can also snipe it from across the river with a bow, since it can’t close the gap quickly.
Slaying and skinning the White-Scaled Crocodile awards the Pale Predator’s Leather Gloves.
Legendary Animal – White Bison Location
- Location: NW of the Suhramahd Bazaar in the Crimson Desert
- Reward: Lamp of Crossed Dreams
Unlike the Great White Bison, the White Bison is found in Urdavah near a small pond northwest of Suhramahd Bazaar. The area contains multiple rock formations where the bison herd mingles.
As a herbivore, the White Bison bolts as soon as you approach. If you chase far enough, you may run into additional threats such as multiple Goldenscale enemies and iguanas. This is also where a large bandit mount nest is located. If you don’t want to deal with bandits, chase the White Bison west, away from the small passage leading toward the nest.
Skinning the White Bison grants the Lamp of Crossed Dreams.
Legendary Animal – Giant White Bison Location
- Location: Snowgrass Hearth – Silver Wolf Mountain, Pailune Territory
- Reward: White King’s Candlestick
The Giant White Bison is a large white-furred animal living on the frigid southern range of Silver Wolf Mountain, in the border zone between Pailune and Hernand. It’s not the same as the smaller White Bison found in the Crimson Desert. To reach it, travel up and around Sage’s Peak, cross the Ancient Rift, and follow the river past the Silver Wolf Mountain Shrine, east of Steinnfell Fortress.
You’ll find the Giant White Bison just north of an icy pond that feeds a river flowing east—where a Legendary Carp also lives. Mountains surround the area on most sides, and a white horse Legendary creature can also be found near the pond. Fortunately, there are no hostile enemies here, and the fish is usually the only occupant of the pond.
Look for a small ravine leading north from the pond, then climb up to the right to find a broad, relatively flat hillside under the mountains. A grazing group of bison will be there. Search the herd for the Giant White Bison and begin your hunt.
As a herbivore, it won’t fight back, but it will run when threatened. Due to the cold, it’s recommended to bring frost resistance clothing or food so you can regenerate stamina faster, since the Giant White Bison requires sustained damage to take down.
Once you fell it, skin the Giant White Bison to complete the task and receive a special candlestick trophy for your home display.
Legendary Animal – White Elk Location
- Location: Vat’nholl Fortress – Five Finger Mountain, Pailune Territory
- Reward: The Beholder
The White Elk is a large white-furred animal living in a frigid area in the southwestern side of the Pailune Region, near the well-defended Vat’nholl Fortress and along the Upper Nas River. It’s not far from the Hernand border along the Five Finger Mountain.
It’s generally found just east of Vat’nholl Fortress. However, since the fort is initially controlled by Black Bear and headed by a powerful boss, your hunt can be interrupted by constant attackers. The recommendation is to clear the fort before you begin.
Search the low foothills near Snow Plains Hearth outside the fort, then follow frozen streams upward. If you stay stealthy, you may frequently spot the enormous White Elk lounging on the ground amid a herd of mountain goats.
As a herbivore, the White Elk won’t fight back, but it runs when threatened. Its agility lets it leap onto rocks to escape. Corner it by chasing it upward against the rocks rather than toward the river. Cold conditions make frost resistance clothing or food highly recommended so stamina can recover quickly. The elk takes sustained damage to bring down, so consider heavy attacks to stagger it and prevent it from running.
After defeating it, skin the White Elk to complete your task and receive a special candle trophy for your home.
Legendary Animal – White Moose Location
- Location: The Black Wall, Pailune Territory
- Reward: Beckoning Forest
The White Moose is a large white-furred animal found on a frigid mountaintop in the eastern Pailune Region, directly east of Pailune City. Continue up the mountains beyond an abandoned cabin.
Climb the mountains east of the abandoned cabin to reach a large glacier with an Abyss Teleporter at its top. The glacier’s base is guarded by an Icewalker Miniboss. If you fly down from the glacier to the south, you can spot a grass patch between two mountains where the White Moose grazes alongside a large pack of smaller moose, with a bigger Spire visible further east.
As a herbivore, it won’t fight back but will run when threatened. You’ll usually do better cornering it by chasing it up against rocks instead of forcing it back toward the canyon. Because the environment is cold, bring frost resistance clothing or food to replenish stamina quickly. It also takes a long amount of damage to down, so heavy attacks are suggested to keep it staggered and unable to run.
After you defeat it, skin the White Moose to complete your task and receive a special chandelier trophy for your home display.
Legendary Animal – Snowwhite Deer Location
- Location: Sanctum of Solace – Silver Wolf Mountain, Pailune Territory
- Reward: Snowwhite Deer’s Antlers, Throne of the White Night
The Snowwhite Deer is described as a legendary deer “born from the mist,” with an enormous body covered in fur as white as snow. It’s foretold to appear at the dawn of a new era of peace, and children of Pailune grow up hearing stories about it.
In gameplay terms, the Snowwhite Deer is large and resilient, and it lives in the snowy north of the Pailune Region. It can be found along the southern section of Pailune, near a frozen river descending from Silver Wolf Mountain. The river passes through the Sanctum of Solace and continues toward the Pailune Beacon.
The deer itself roams a rocky mountain pass along the frozen river between the Sanctum of Solace (to the west) and the path up toward the Harpy Nest higher in the mountains. It’s frequently accompanied by smaller deer, and you can usually spot it from far away because of its extremely large, magnificent horns.
As long as you avoid the Sanctum area, enemy contact shouldn’t be a problem. The Snowwhite Deer and its group are described as completely docile. They’ll run when they sense you approaching, so frost resistance clothing or food is recommended to manage stamina in the cold. Even though it can’t fight back, it’s fast at escaping, so you’ll need to use stamina to keep knocking it down with strong attacks so it can’t flee.
When it’s defeated, complete your task by skinning the Snowwhite Deer. You’ll be rewarded with a special antler-made throne for home decoration, plus the Snowwhite Deer’s Antlers themselves. Bring the antlers to the Witches to craft a Sigil that lets you summon the deer as a temporary mount.
Legendary Animal – Vine Deer Location
- Location: In the meadow around the Elder Tree in Delesyia’s Bowsprit Cape
- Reward: Aged Branch
The Vine Deer is one of the hardest Legendary animals to identify. Its fur isn’t dramatically different from the rest of the herd, and while it has large antlers, the vine-like adornments on those antlers can be easy to miss—especially with the meadow’s lush greenery in the background.
Once you’ve spotted the Vine Deer, staying with it is your next challenge. It bolts when you get too close. Ranged damage options make the fight easier, and for melee-focused players, incapacitating it with a Sleep Arrow is the best option.
After slaying the Vine Deer, skin it to obtain the Aged Branch decor reward.
Legendary Animal – Red River Hog Location
- Location: Along the Red River near the Shadow Cliff Watch Camp in the Crimson Desert
- Reward: Chalice of Devouring
The Red River Hog lives along the Red River in the Crimson Desert. Brush and vegetation can be thick here, which makes it easy to overlook your target. It does travel in a pack of swine, and that grouping can make it easier to track.
Unlike other Legendary animals that are much larger or clearly different in color, the Red River Hog is only slightly bigger than the other hogs in its pack. The key visual cue is its rust-colored coat.
There’s no direct combat encounter with this Legendary animal. Instead, it’s more about chasing. You can use Sleep, Poison, or Explosive arrows to deal ranged damage and incapacitate it. After it’s slain, skin it to receive the Chalice of Devouring decor item.
Legendary Animal – White Lion Location
- Location: Turquoise Rock Pools in the Crimson Desert
- Reward: White Lion Necklace
The White Lion is found south of the Turquoise Rock Pools along the eastern coast of the Varnia portion of the Crimson Desert. It’s on a mesa rather than at ground level.
The White Lion is accompanied by three lionesses. Even if they start away from your target, they join the fight once combat begins. All three are dangerous with powerful claw attacks, and the White Lion itself has a roar that can inflict Daze.
Once the White Lion is defeated, skin it to receive the White Lion Necklace plus the standard animal parts.
Legendary Animal – Black Lion Location
- Location: Near the Crimson Wall in Demeniss
- Reward: Black Lion Earring, Valortread Armor Set (Quest Reward)
Finding the Black Lion follows a similar pattern to the Legendary wolf hunts (Silver Fang and Black Fang): you can’t track it until you’ve completed a complex mix of Hernand faction questlines. Those quest chains lead to a Legendary hunter who then makes the animal available to locate and hunt.
The hunt quest for the Black Lion appears only after you’ve completed nearly all major questlines tied to Hernand’s Houses, including:
- House Celeste (at least 20 quests total, including Legendary Wolf, Queen of the Silkspun Citadel, and Frozen Eldertree questlines)
- House Serkis (including Lord Amidst the Ruins and The Nemesis’ Demise questlines)
- House Robers (including the Continuing Concern questline)
- Beggars Alliance
- Kharonso Troll Alliance
As a rule of thumb, keep checking the Hernand region map for any major questline options and finish them until the Frozen Eldertree questline is completed. After a period of time, the Legendary Animals questline can be started—but it won’t show up on the map. Instead, travel to Lioncrest Manor just outside Hernand City, and look for a Wandering Sellsword outside the gate who asks to speak with you.
He’ll talk about searching for a Legendary hunter and give you a lead. This points toward a hunter at a trading post, but you’ll need to raise your Trust level with the hunter. Any pelt adds +50 Trust. Once your Trust is high enough, the hunter provides a map pointing to Torchlight Cabin, set on a hill north of Hernand City overlooking the bridge across Three Saints’ Falls.
Enter Torchlight Cabin to find the Legendary hunter, who seems nervous and only wants to drink. As with the previous NPC, raise Trust again—Wine increases Trust by +50. In return, the hunter finally gives you the Black Lion Observation Log, which places the lion on your map.
The Black Lion itself can be found along the border between Demeniss and the Crimson Desert, between the Hexe Sanctuary to the west and the Valley of the Moon to the east. Look for a cliffside covered in bare trees, and you’ll be prompted to track down and kill the Black Lion.
Search for a cluster of dead animals in sparse trees and inspect it. When you do, the Black Lion appears behind you to the north, accompanied by several lionesses similar to the White Lion. As with the White Lion, this Legendary beast hits hard and the group attempts to pounce one after another.
If you get grabbed, you’ll be yanked around and take massive damage, making well-timed parries or dodges critical. Use broad, heavy swings that can hit from multiple angles, keep pressure on the Black Lion first, and only then clear the adds.
After defeating and skinning the beast for the Black Lion Earring, return to Torchlight Cabin for a message from the hunter. The hunter has left a unique chest in the corner of the room, containing the complete Valortread Armor Set—described here as the Black Lion reward set.
Legendary Animal – White Tiger Location
- Location: The jungles of the Crimson Desert between Serpenthead Valley and Giant’s Yard Watchtower
- Reward: Tigerfang Ring
The White Tiger is found near Serpenthead Valley among dense jungle foliage. It may have a couple regular tigers with it, but the white coat makes the Legendary target stand out through the trees.
Unlike the White Lion or White-Scaled Crocodile, the White Tiger doesn’t have special attacks. The fight is straightforward: after you defeat it, skin the tiger to obtain the parts and the Tigerfang Ring.
Legendary Animal – Phoenix Location
- Location: South of the Trader’s Expanse Hearth in the Crimson Desert
- Reward: Phoenix Feather, Nightmare Burner
The Phoenix is located in the northern section of Trader’s Expanse. It flies a fixed route around the cliffs. In the middle of the area, you’ll see a tall rock pillar, and both the Phoenix and its accompanying small birds fly near the top of that formation.
To bring it down, shoot it while it’s in mid-air. A single arrow hit is enough. Go to where it lands, then skin it to collect your rewards. If you’re struggling to land the shot, the advice is to position directly underneath it and fire an Explosive Arrow upward.
To make it your pet, take the Phoenix Feather to a witch. Under Craft Abyss Gears, use the Special Items tab. Select the Sigil of Solidarity (Phoenix). Using that sigil from your inventory registers the Phoenix as a pet.
Legendary Boss – Skevald, the Carrion King Location
- Location: Hyena Den, east of Tommaso
- Reward: Putrid Touch Abyss Gear, Hyena Mask
Skevald the Carrion King is an untracked Legendary Animal and part of a Crimson Desert questline that begins in the city of Tommaso. Skevald is a large hyena that leads a pack from the den just outside the city. The people of Tommaso have posted a bounty notice to defeat it so trade routes can reopen.
You don’t have to begin the quest Village in Fear by checking posts around Tommaso. You can instead find Skevald at any point while exploring the wastes. Warning: Skevald is described as extremely tough, so you’ll want mid-to-late game gear and plenty of health items before engaging.
Skevald does not stay in one spot. It patrols a large route that starts at the Hyena Den, moves southeast across the road toward Desert Ruins, then circles back north to return toward the den. You can identify the fight area by the large band of hyenas following Skevald.
Because it travels with so many enemies, it can be difficult to engage if you don’t have a way to thin herds quickly. Consider using Axiom or elemental abilities, and explosive arrows to clear smaller enemies, or weapon arts that cleave through the hyenas.
In combat, Skevald is a fast brute fueled by toxic powers. It frequently sprays poison clouds when dashing or pouncing. Its lunge is especially deadly because it can knock you down and remove a large chunk of health in one burst. With toxic damage stacking, you need to constantly monitor your status so you don’t die before you can respond.
After you remove one health bar, Skevald suddenly disappears and the kill quest updates. You’ll need to find Skevald again and follow prompts to use your lantern to track it. Even though it marks the Hyena Den on your map, Skevald actually returns to its patrol route—so keep looping until you spot it a second time.
When Skevald is defeated, all other hyenas in the area flee. You’re awarded a new Abyss Gear that lets you deal the same toxic damage Skevald used. Return to Tommaso afterward to complete the quest and claim the Hyena Helm as well.