Crimson Desert Demeniss Guide: Every Treasure Chest Location in Order
Crimson Desert’s Demeniss region is packed with hidden valuables—some tucked behind waterfalls and inside caves, others placed in plain sight for anyone willing to explore. This guide walks you through each Treasure Chest spot in order, including what you get from every one.
Checklists
The Demeniss region in Crimson Desert is filled with hidden treasures, some secreted behind waterfalls and within caves, and others lying about, ready to enrich a curious adventurer like yourself. This Treasure Chest guide shows the location and reward from each one.
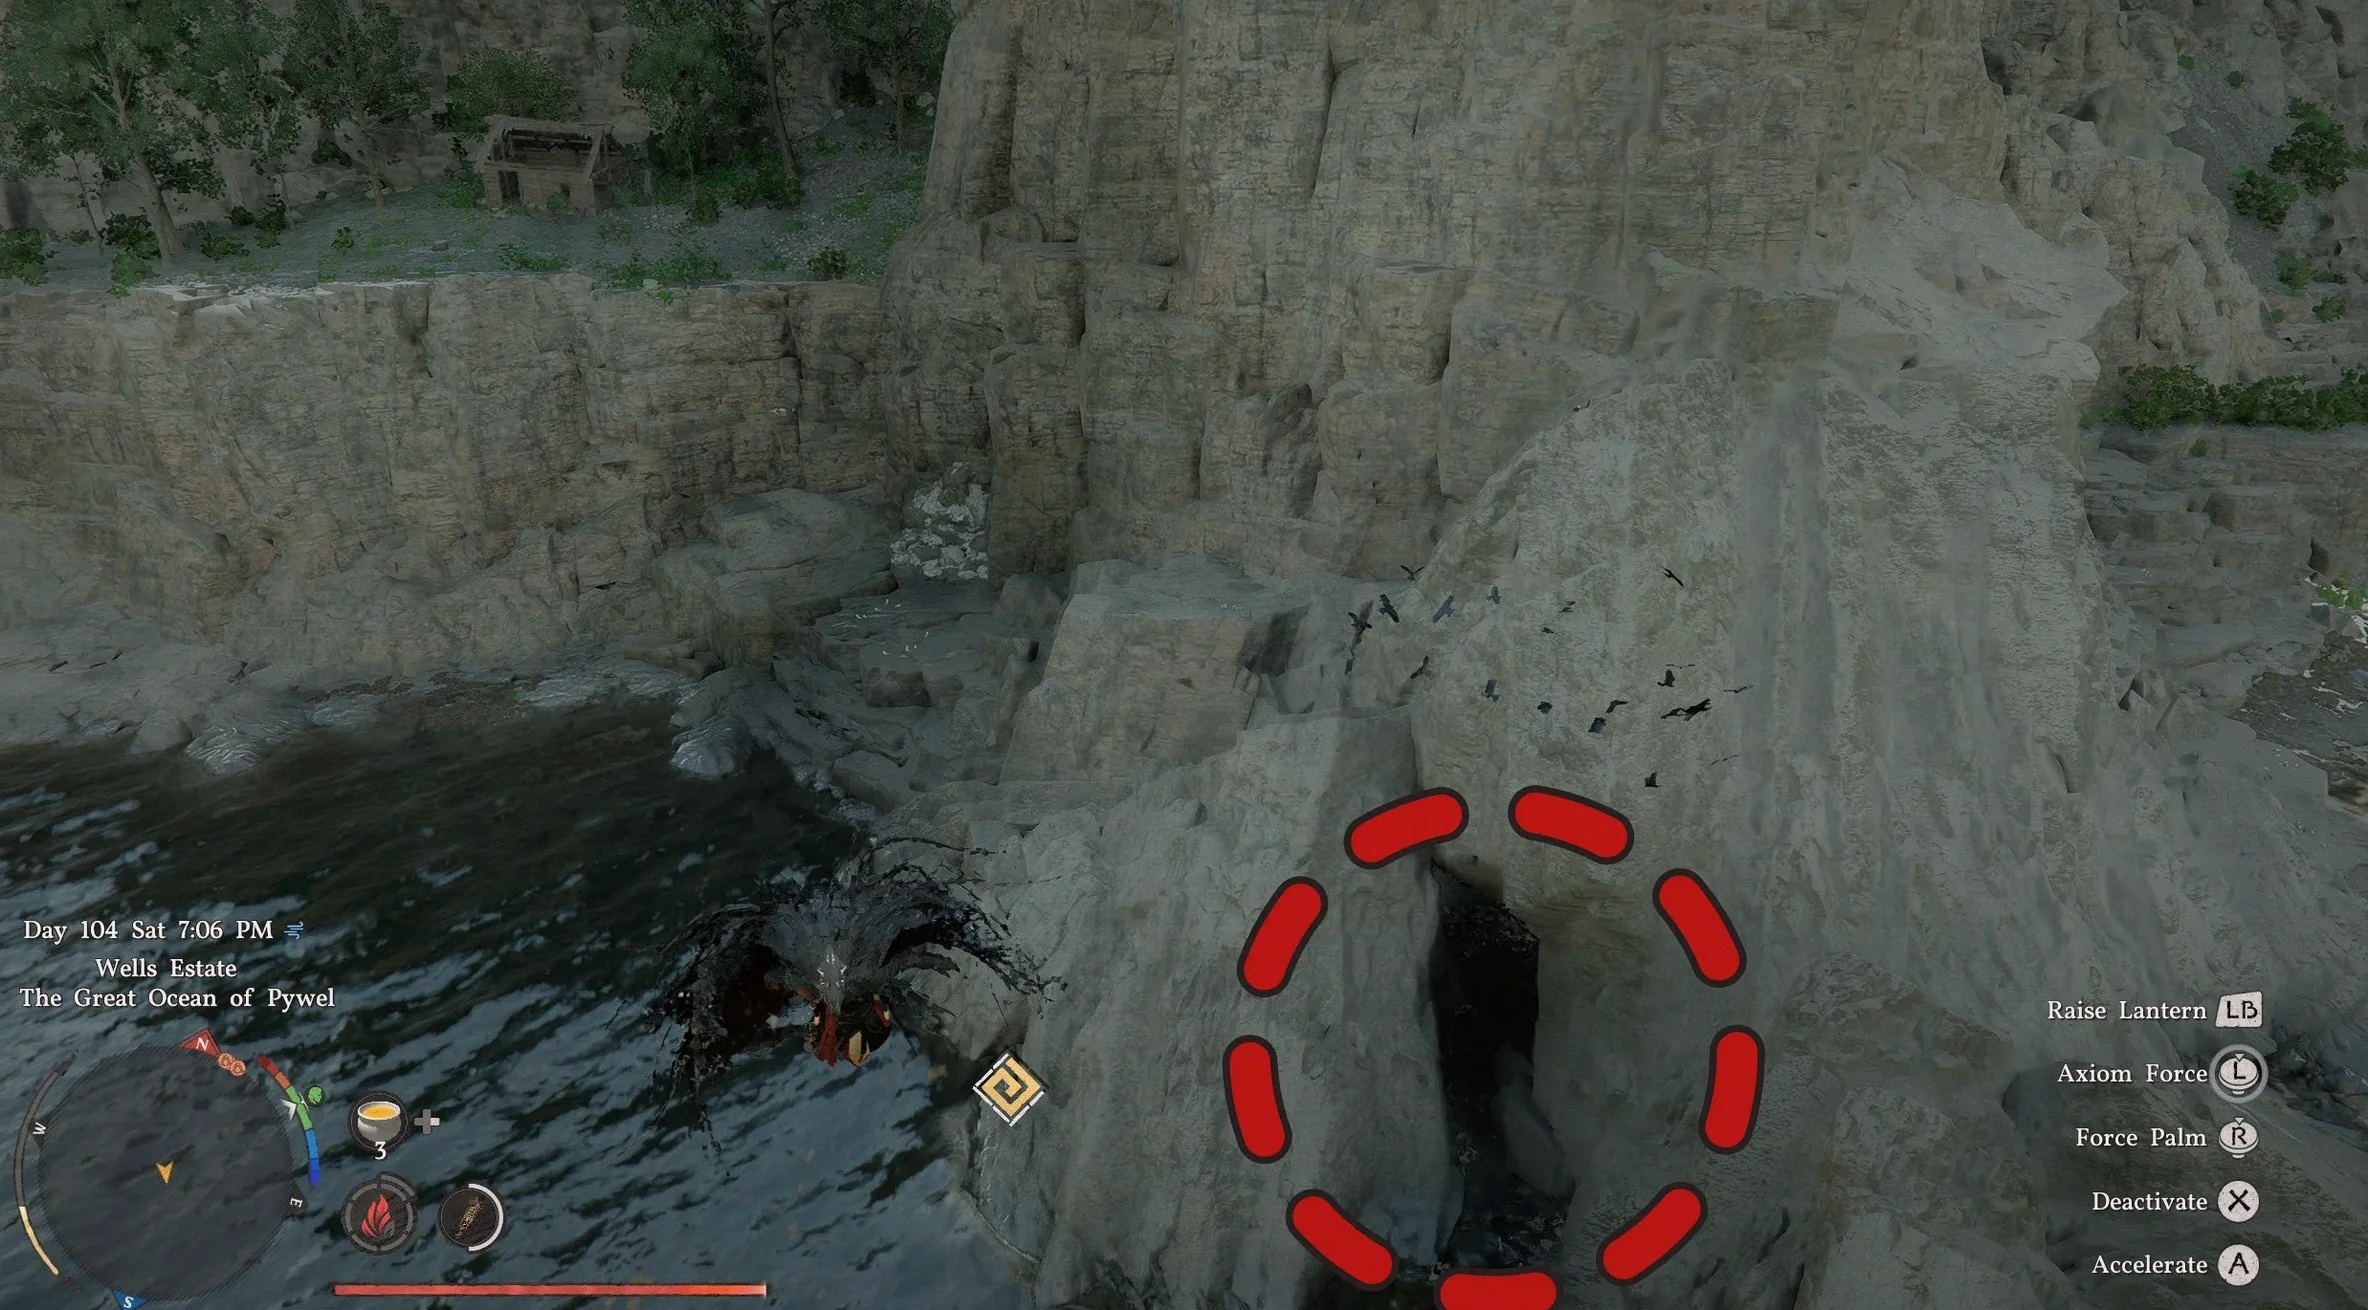
Abandoned Seaside Cabin Treasure Chest
- Reward: Shield of Sacrifice
The treasure chest near the Abandoned Seaside Cabin is inside an unmarked cave southeast of the cabin, right along the shoreline. You should spot a flock of crows circling above it.
Go into the cave and find the treasure chest on the back wall. Loot it to receive the Shield of Sacrifice.
Anvil Hill Gust Cave Treasure Chest
- Reward: Plate Gloves of the Cursed Soul
The Anvil Hill Gust Cave treasure chest is sealed behind a bismuth barrier inside a cave along the cliffs. Start by following the road deeper into Demeniss until you reach the guard station, then head west and south along the nearby cliffs.
Use Focused Force Palm (L3/LS + R3/RS, then R3/RS) to break the Abyss Cell that keeps the bismuth barrier intact. Afterward, don’t forget to store it in your Kuku Pot for later use in Kuku Blueprints. Once you’re inside, the chest sits next to a gravestone, with a Palmer Pill nearby. Open the chest to claim the Plate Gloves of the Cursed Soul.
Bowsprit Cave Hollow Treasure Chest
- Reward: Sior Blaster
The Bowsprit Cave Hollow treasure chest is tucked along the north wall of this large cave network. To find it, approach from the west and look downward toward the area packed with colorful flowers. Ahead, you should see the cave mouth.
Step into the cave, then look left—there’s a treasure chest perched on a ledge. Open it to loot the Sior Blaster. Only Oongka can equip this gun.
Breezeblown Knoll Treasure Chest
- Reward: Autumn Banquet Leather Gloves
The treasure chest near Breezeblown Knoll is just north of the Spire of Clockwork, in the cliffs along the river. It’s concealed in a small alcove beneath the overhanging cliff edge.
Climb into the cave and loot the treasure chest to obtain the Autumn Banquet Leather Gloves. Only Damiane can equip these gloves.
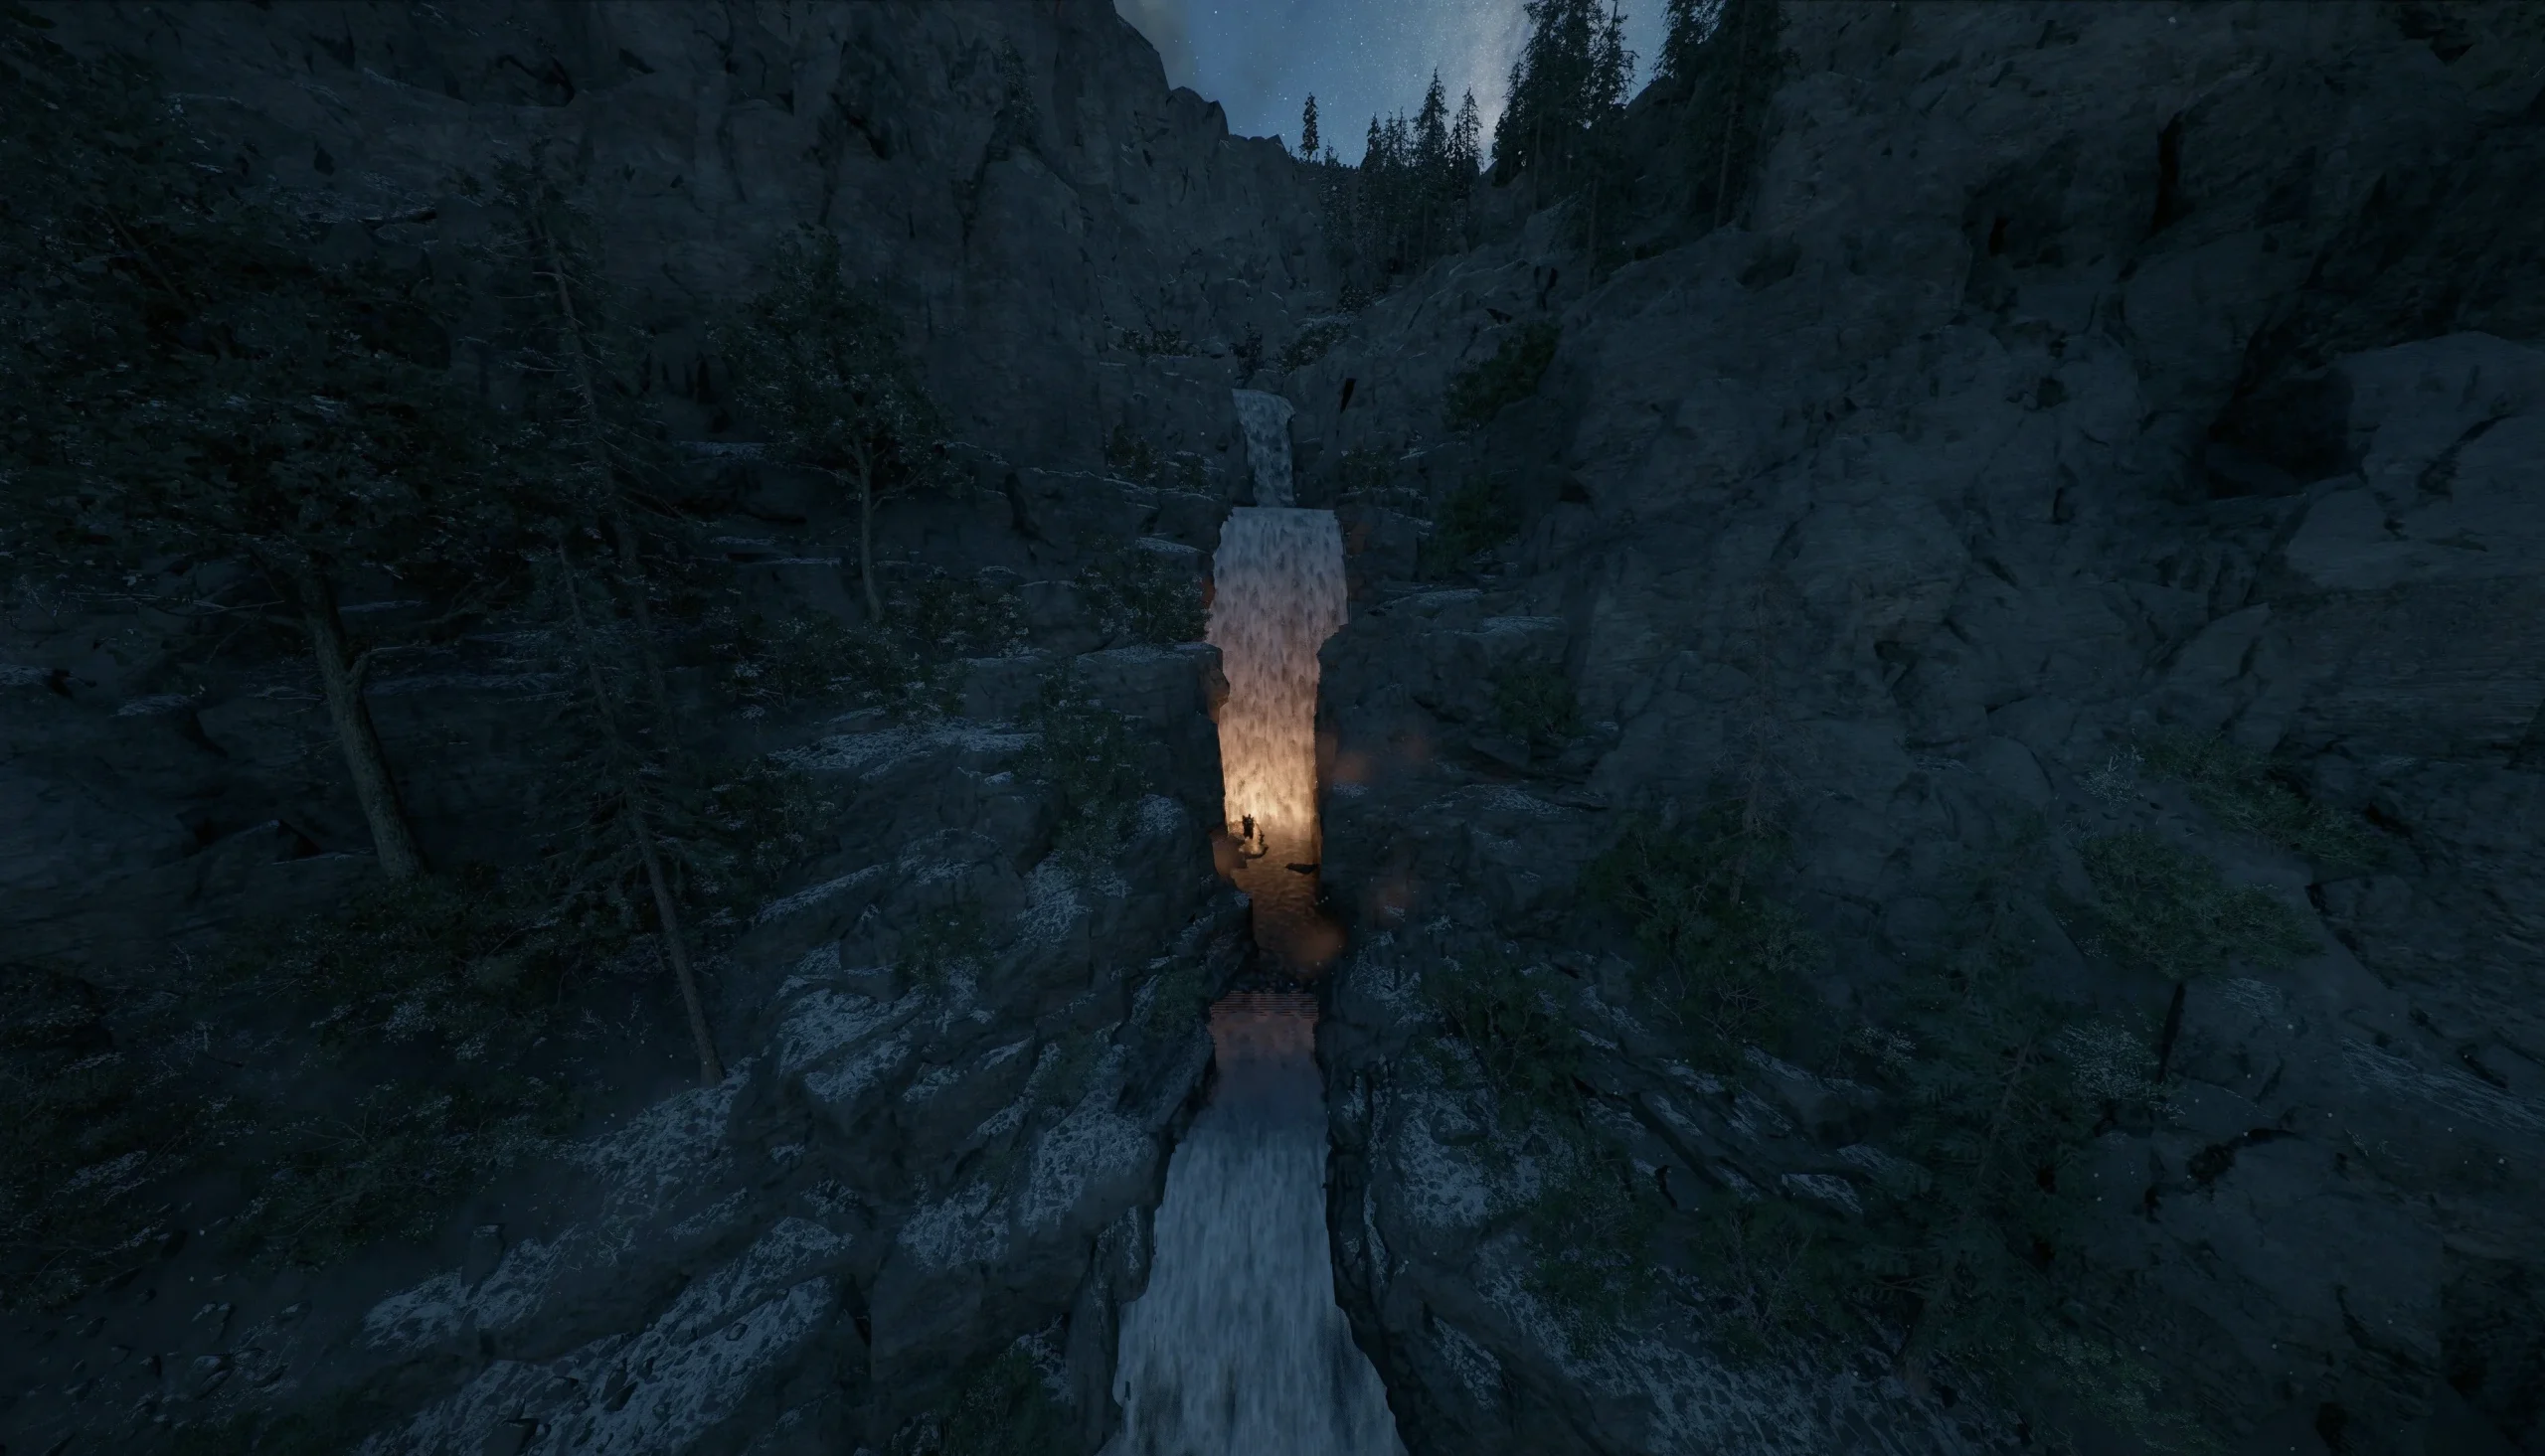
Cascade Grotto Treasure Chest
- Reward: Scorchflame Leather Boots
The Cascade Grotto treasure chest is behind the waterfall at Cascade Grotto. Approach from higher ground so you can glide down to the left cliff side of the falls, where a cairn marks the entrance.
Use Stab (R1/RB + △/Y) to get behind the waterfall. The chest is inside a small chamber. Inside, you’ll find the Scorchflame Leather Boots. The boots grant Attack, Defense, Critical Rate, and Lightning Resistance—useful stats on their own. They also include an Aptitude I Abyss Gear effect that boosts Skill EXP Gain by 10%.
Chattering Rocks Treasure Chest
- Reward: Frostcursed Plate Helm
The Chattering Rocks treasure chest is in a concealed chamber behind vines within the ruins.
Use Blinding Flash (L2/LB+R2/RB -> L2/LB) to scorch away the vines and reach the small room. Open the chest to obtain the Frostcursed Plate Helm.
Church of East Demeniss Treasure Chest
- Reward: Crimson Chaser Plate Cloak
The treasure chest at the Church of East Demeniss is in a hidden room near the top of the steeple. Climb onto the root and check the back of the steeple tower to locate a narrow wall section you can push.
Push the wall inward to reveal a secret room containing the chest. Open it to loot the Crimson Chaser Plate Cloak.
Church of West Demeniss Treasure Chest
- Reward: Autumn Banquet Cloth Cloak
The treasure chest at the Church of West Demeniss is in a hidden room near the top of the steeple. Climb onto the root and look at the back of the steeple tower to find a narrow wall panel you can shove.
Push the wall in to discover the secret room with the chest. Open it to loot the Autumn Banquet Cloth Cloak. Only Damiane can equip this cloak.
Cliffwall Cave Treasure Chest
- Reward: Elite Vanguard
The Cliffwall Cave treasure chest is protected by multiple ancient turrets around a waterfall near Bowsprit Cape. The simplest approach is to position yourself on a cliff across from the area, then glide into the cave.
After you glide inside, look left to spot the treasure chest. Loot it to get the Elite Vanguard.
Crescent Cave Treasure Chest
- Reward: Autumn Banquet Leather Boots
The Crescent Cave treasure chest is behind the western-most waterfall at the lowest level. A cairn indicates the spot right in front of where you can sneak behind the falls.
Use Stab (R1/RB + △/Y) to get behind the waterfall. From there, you’ll find the treasure chest in a small cave behind it. Inside the chest are the Autumn Banquet Leather Boots. They can only be equipped by Damiane.
Crystal Crown Cave Treasure Chest
- Reward: Wanderer of Faith Leather Cloak
The Crystal Crown Cave treasure chest is behind a waterfall west of Demeniss Port. The area has two massive waterfall groups, and this cave is behind the left-most waterfall in the northern set.
Use Stab (R1/RB + △/Y) to get behind the waterfall, then locate the chest in the small cave beyond. Open it to receive the Wanderer of Faith Leather Cloak. Only Damiane can equip this cloak.
Demeniss City Treasure Chest 1
- Reward: Black Sun
The first Demeniss City treasure chest is hidden behind a rotating wall beneath the bridge that leads into the castle. It sits on the middle pillar of the bridge, on the north side.
Climb up to the rotating section of the wall. Then activate Resist (LT/L2) and Force Palm (R3/RS) so the panel rotates to the opposite side. Loot the chest to obtain the Black Sun.
Demeniss City Treasure Chest 2
- Reward: Helfryn Leather Cloak
The second Demeniss City treasure chest is in the attic of a horseshoe-shaped manor on the north side of the city. You can reach the attic through a window on the south face of the eastern portion of the building.
Climb through the window to find the chest along the back wall. Loot it to get the Helfryn Leather Cloak.
Demeniss City Treasure Chest 3
- Reward: Helfryn Leather Gloves
The third Demeniss City treasure chest is in one of the towers lining the inner wall on the city’s north side. It’s located in a secret room behind a rotating panel on the south side of the tower, directly under the roof.
Climb up to the rotating panel on the wall, then activate Resist (LT/L2) and Force Palm (R3/RS) to rotate it to the other side. Loot the chest found there to receive the Helfryn Leather Gloves.
Demeniss City Treasure Chest 4
- Reward: Helfryn Leather Armor
The fourth Demeniss City treasure chest is in the belltower, about three-quarters of the way up. It’s hidden behind a narrow wall you can push on the southwest face of the tower.
Climb to the ledge, push the wall to enter the secret chamber, and locate the chest. Loot it to obtain the Helfryn Leather Armor.
Demeniss City Treasure Chest 5
- Reward: Helfryn Leather Boots
The fifth Demeniss City treasure chest is in a secret room along the outer wall of the city. The room is concealed behind wooden slats near the base of the wall.
Break the slats to enter, then loot the chest to collect the Helfryn Leather Boots.
Demenissian Ruins Treasure Chest
- Reward: Plate Cloak of the Cursed Soul
The Demenissian Ruins treasure chest is tucked away in a hidden room inside a broken section of wall attached to a tower that’s otherwise still standing mostly intact.
Climb up to the rotating panel on the wall, then activate Resist (LT/L2) and Force Palm (R3/RS) to rotate it to the far side. Loot the treasure chest inside to get the Plate Cloak of the Cursed Soul.
Forgotten Watchtower Treasure Chest
- Reward: Dark Marksman’s Plate Boots
The Forgotten Watchtower treasure chest is down a stair run just south of the watchtower itself. Use Force Palm (R3/RS) on the wall featuring a large stone square to drop yourself into the room where the chest is located.
The chest contains the Dark Marksman’s Plate Boots.
Fort Musket Treasure Chest
- Reward: Dark Marksman’s Plate Armor
The Fort Musket treasure chest is inside a secret alcove on the fort’s southeast wall. You won’t reach that exact area until the conclusion of the main story, but you can still grab the armor earlier if you time your movement correctly.
Stand on the tower across the road from the fort’s opening. Then use Aeriel Force Palm (▢/X → R3/RS) three times to gain enough height. Perform Aerial Roll (◯/B) twice to build speed, and activate Focus (L3/LS + R3/RS) right before you reach the opening. With accurate landing, you should touch down directly in the alcove.
Crouch to enter the door ahead, and the treasure chest will be in front of you. Loot it to obtain the Dark Marksman’s Plate Armor.
Gate of Peace Treasure Chest 1
- Reward: Liberre Rapier
The first Gate of Peace treasure chest is in the tower’s basement on the west side of the bridge. You’ll need to descend multiple flights of stairs until you reach a dead end, where you’ll find a rotating bookshelf.
Push through the bookshelf to locate another chamber holding the chest. Open it to loot the Liberre Rapier. Only Damiane can equip this rapier.
Gate of Peace Treasure Chest 2
- Reward: Steelheart Horseshoes
The second Gate of Peace treasure chest is in a hidden room beneath the bridge that heads east from the Gate of Peace.
Climb to the rotating panel on the wall under the bridge. Activate Resist (LT/L2) and Force Palm (R3/RS) to rotate the panel to the opposite side. Loot the chest inside to claim the Steelheart Horseshoes.
Golden Trading Post Treasure Chest
- Reward: Scorchflame Plate Armor
The Golden Trading Post treasure chest is on the ground level at the center of the wooden foundation. It’s hidden in a small hall tucked behind a swinging door.
Crouch and move under the swinging door to reach the chest. Loot it to obtain the Scorchflame Plate Armor.
Hayroof Farm Treasure Chest
- Reward: Crimson Chaser Plate Helm
The Hayroof Farm treasure chest is in a tall tower west of the farm’s map marker. It’s a standalone building with an opening at the base.
Enter the tower and use Aerial Force Palm ((▢/X → R3/RS) to reach the second level, where the chest can be found. Open it to get the Crimson Chaser Plate Helm.
Hollow Haven Treasure Chest
- Reward: Odeck’s Protector Plate Helm
You can only access the Hollow Haven Treasure Chest during Chapter 9: The Sage of the Desert. When you gain access to the area, the chest is located just east of Hollow Haven.
To locate it, search for a bismuth barrier inside the cave near Hollow Haven, then use Focused Force Palm (L3/LS + R3/RS, then R3/RS) to destroy it. Loot the chest to receive Odeck’s Protector Plate Helm.
Horseshoe Lake Burrow Treasure Chest
- Reward: Arben Greatsword
The Horseshoe Lake Burrow treasure isn’t solely contained in one chest, but it’s still worth grabbing. You’ll find it under a trapdoor on the small island in Horse Lake.
Use Blinding Flash (L2/LB+R2/RB -> L2/LB) to burn away the roots blocking your route, then open the trapdoor to drop into the stash below. Inside, you’ll find a chest containing random trade goods, a few crude gold bars, and the Arben Greatsword stuck in the ground. Only Oongka can equip this sword.
Horseshoe Lake Perch Treasure Chest
- Reward: Wanderer of Faith Boots
The Horseshoe Lake Perch treasure chest is underneath the building at the far end of the dock. You can reach it by swimming out or by dropping down from the structure above.
You’ll need to break the wooden wall in the way to access the chest. Then crouch to squeeze through and open the chest. Inside, you’ll find the Wanderer of Faith Boots. Only Damiane can equip these boots.
Kingshield Mountain Ruins Treasure Chest
- Reward: Autumn Banquet Plate Helm
The Kingshield Mountain Ruins treasure chest is hidden behind vines in an unmarked ruin west of the Kingshield Mountains. You’ll find it at the bottom of a chasm at the end of a long route leading north from Stonewall Farm.
Burn the vines away with Blinding Flash (L2/LB+R2/RB -> L2/LB) to uncover the treasure chest, then open it to claim the Autumn Banquet Plate Helm. It’s only equippable by Damiane.
Lost Song Cave Treasure Chest
- Reward: Demenissian Hero’s Musket
The Lost Song Cave treasure chest is behind the southern-most waterfall, about halfway up the cliffs. Look for the cairn that gives away the spot.
Use Stab (R1/RB + △/Y) to slip behind the waterfall. Then find the chest in the small cave beyond. Open it to obtain the Demenissian Hero’s Musket. Only Damian can equip this gun.
Lunar Spirit Grotto Treasure Chest
- Reward: Frostcursed Plate Gloves
The Lunar Spirit Grotto treasure chest sits behind a waterfall where the Denn River meets a chain of lakes. The telltale cairn is located on the left side of the falls, though you can still enter from the center because the water level is low enough.
Use Stab (R1/RB + △/Y) to get behind the waterfall. After that, the chest is in the small cave beyond. Open it to find the Frostcursed Plate Gloves.
Meadowlark Ranch Treasure Chest
- Reward: Jester Leather Mask
The Meadowlark Ranch treasure chest is in a tower north of the settlement’s map marker. It’s a square tower connected to a farmhouse.
To reach it, enter the tower through the lower entrance and use Aerial Force Palm (▢/X → R3/RS) to climb to the upper floor. The Jester Leather Mask is inside.
Mistshard Cave Treasure Chest
- Reward: Frostcursed Plate Armor
The Mistshard Cave treasure chest is behind a waterfall north of Deadfire Mountain, right along the border of The Crimson Desert. The cave entrance is concealed behind a waterfall marked by a telltale cairn on the right side.
Use Stab (R1/RB + △/Y) to get behind the waterfall, then proceed to the small cave beyond. Open the chest to find the Frostcursed Plate Armor.
Sanctum of Expiation Treasure Chest
- Reward: Frostcursed Plate Cloak
The Sanctum of Expiation treasure chest is concealed inside a secret passage running beneath the ruins. To enter, burn away the vines covering a low opening at ground level near the center of the ruins.
Duck inside and, once you reach the end of the passage, run to the right and follow the corridor as it curves. A spike trap rises as you move forward, so you must pass it quickly before it activates fully.
Sanctum of Mortification Treasure Chest
- Reward: Autumn Banquet Leather Armor
The Sanctum of Mortification treasure chest is hidden in a sealed room on the northern side of the ruins.
You must light the two stone lanterns positioned on either side of the sealed gate to open the route. Then loot the chest inside to obtain the Autumn Banquet Leather Armor. Only Damiane can equip this armor.
Secret Witch’s Cavern Treasure Chest
- Reward: Eastern Witch’s Fan
The Secret Witch’s Cavern treasure chest is about halfway up the inside of a large bluff near the Bay of Abundance. To locate it, find the flat area with colored flags, then head down and west. You should spot a very small ledge where you can enter the cavern.
Use Focused Force Palm to break the bismuth barrier in your way and reach the chest inside. Loot it to collect the Eastern Witch’s Fan.
Shadowwolf Cave Treasure Chest
- Reward: Plate Boots of the Cursed Soul
The Shadowwolf Cave treasure chest is behind a waterfall near the fork of the Lower Nas River. It’s on the right side of the falls, close to the telltale cairn.
Use Stab (R1/RB + △/Y) to get behind the waterfall. The chest is in the small cave beyond. It’s nearly buried under Silver Ore veins, so take a moment to mine while you’re here. Once ready, open the chest to receive the Plate Boots of the Cursed Soul.
Silvermoon Tradehouse Treasure Chest 1
- Reward: Wanderer of Faith Leather Armor
The first Silvermoon Tradehouse treasure chest is behind a rotating wall along the town’s northern main street. It’s beside a long rack of casks stored along the wall.
Climb up to the rotating panel on the wall, then activate Resist (LT/L2) and Force Palm (R3/RS) to rotate it to the other side. Loot the treasure chest within to get the Wanderer of Faith Leather Armor. Only Damiane can equip this armor.
Silvermoon Tradehouse Treasure Chest 2
- Reward: Wanderer of Faith’s Plate Helm
The second Silvermoon Tradehouse treasure chest is in a secret corridor under the dock. To access it, break a wooden wall on the west side of the dock.
After breaking the wooden wall, crouch and head south to find the treasure chest. Loot it to receive the Wanderer of Faith Plate Helm. Only Damian can equip this helm.
Stonewall Farm Treasure Chest
- Reward: Scorchflame Plate Helm
The Stonewall Farm treasure chest is inside a tower near the center of Stonewall Farm. It’s the only building of its type there—a tall standalone structure with a door at ground level and another near the top.
Enter the tower through the lower door and use Aerial Force Palm (▢/X → R3/RS) to climb to the upper level. The Scorchflame Plate Helm is waiting inside.
Stronghoof Saddlery Treasure Chest
- Reward: Nagmore Leather Boots
The Stronghoof Saddlery treasure chest is located in a tower north of the settlement’s map marker. It’s a square tower connected to a farmhouse.
To reach the chest, enter the tower from the lower door and use Aerial Force Palm (▢/X → R3/RS) to ascend to the upper level. Inside, you’ll find the Nagmore Leather Boots.
Sundell Farm Treasure Chest 1
- Reward: Crimson Chaser Chain Gloves
The first Sundell Farm treasure chest is in a tower east of the settlement’s map marker. It’s a round standalone tower.
Enter the tower through the lower door and use Aerial Force Palm (▢/X → R3/RS) to reach the upper level. The Crimson Chaser Chain Gloves are inside.
Sundell Farm Treasure Chest 2
The second Sundell Farm treasure chest is in a tower southeast of the settlement’s map marker. It’s a round standalone structure positioned at the corner of a fenced pasture.
Enter the tower from the lower door and use Aerial Force Palm (▢/X → R3/RS) to ascend to the upper level. Inside, you’ll find the Crimson Warden’s Bow.
Vinewood Winery Treasure Chest
- Reward: Troll Hook Greataxe
The Vinewood Winery treasure chest is in a tall tower near the center of the settlement.
Go into the tower and use Aerial Force Palm (▢/X → R3/RS) to reach the second level, where the chest is located. Open it to obtain the Troll Hook Greataxe. Only Oongka can equip this axe.
Well of Tragedy Grotto Treasure Chest
- Reward: Frostcursed Plate Boots
The Well of Tragedy Grotto treasure chest is behind a waterfall at the northern tip of the Denn River. The telltale cairn is on the right side of the falls, showing which side you should enter from.
Use Stab (R1/RB + △/Y) to get behind the waterfall. The chest is in the small cave beyond. Open it to find the Frostcursed Plate Boots.
Windrift Cave Treasure Chest
- Reward: Plate Helm of Cursed Soul
The Windrift Cave treasure chest is hidden behind a waterfall east of the Steel Mountains. The entrance is close to the telltale cairn at the base of the eastern waterfall.
Use Stab (R1/RB + △/Y) to get behind the waterfall, then locate the chest in the small cave beyond. Open it to claim the Plate Helm of Cursed Soul.
Windwail Cave Treasure Chest
- Reward: Bedure Chain Cloak
The Windwail Cave treasure chest is concealed behind a waterfall west of Bowsprit Cape. The entrance is near the telltale cairn near the top of the east-most waterfall.
Use Stab (R1/RB + △/Y) to get behind the waterfall. You’ll find the chest in the small cave beyond. Open it to loot the Bedure Chain Cloak.
Riverbed Terrace Treasure Chest
- Reward: Plate Armor of Cursed Soul
The Riverbed Terrace treasure chest is hidden under a large gravestone in an unmarked cemetery that sits just slightly northwest of the Demeniss West Gate.
Approach the gravestone—the largest in the area—and note the Palmar Pill placed in front of it. Use Force Palm (R3|MMB) on the gravestone to flip it over, revealing a concealed ladder leading down to a vault.
Climb down the ladder and you’ll find a treasure chest containing the Plate Armor of Cursed Soul.
Up Next: Delesyia Treasure Chest Locations
Top Guide Sections
- Things to Do First in Crimson Desert
- Essential Tips and Tricks
- Walkthrough
- Things Crimson Desert Doesn’t Tell You