Crimson Desert Guide: Where to Find Unique Rings, Earrings, and Necklaces
Crimson Desert’s accessory system is getting a full checklist-style walkthrough, detailing where unique rings, earrings, and necklaces can be found across Pywel—and how their refined stats can swing builds toward offense, defense, mobility, or sustain.
Crimson Desert Unique Accessories: Rings, Earrings, and Necklaces
Beyond Weapons and Armor, Crimson Desert lets you slot a set of distinctive accessories, including rings, earrings, and necklaces. Like other equipment, these pieces provide major stat improvements that help shape your “final” build—covering Attack, Attack Speed, Movement Speed, Defense, and Critical Rate.
When you upgrade and refine most accessories, they can gain additional bonuses on top of their initial attributes. Depending on the specific item and its starting stats, those extra gains can include Stamina Regen, Spirit Regen, and even Health Regen.
In total, 24 unique accessories have been found across multiple regions in Pywel. The guide then breaks down exactly where each one can be obtained, including base stats at first acquisition and the maximum stat values after full refinement.
Where Unique Accessories Come From
Unique accessories are most commonly discovered in Strongbox Puzzles. That said, you can sometimes find them in Treasure Chests and Sanctums, pick them up as loot from tougher bosses, or earn them through quest completion.
The guide provides a location breakdown for all unique accessories, including pieces exclusive to Kliff, Damiane, and Oongka.
Unique Accessories List: Rings, Earrings, and Necklaces
Crimson Desert Unique Accessories List (Rings, Earrings, and Necklaces)
- Refinement Lv 3
- Defense Lv 2
- Movement Speed Lv 1
- Health: +0.2 every 1 sec
- Refinement Lv 10
- Defense Lv 6
- Movement Speed Lv 4
- Health: +0.6 every 1 sec
- N/A
- Refinement Lv 10
- Attack Lv 3
- Attack Speed Lv 3
- Stamina Regen +8%
- Refinement Lv 4
- Defense Lv 3
- Refinement Lv 10
- Defense Lv 10
- Health: +0.8 every 1 sec
- Refinement Lv 1
- Defense Lv 1
- Refinement Lv 2
- Attack Lv 1
- Critical Rate Lv 1
- Refinement Lv 10
- Attack Lv 5
- Critical Rate Lv 3
- Spirit: +0.4 every 1 sec
- Refinement Lv 2
- Attack Lv 1
- Attack Speed Lv 1
- Defense Lv 5
- Refinement N/A
- Defense Lv 5
- Refinement Lv 3
- Defense Lv 1
- Movement Speed Lv 1
- Health: +0.2 every 1 sec
- Refinement Lv 10
- Defense Lv 4
- Movement Speed Lv 3
- Health: +0.8 every 1 sec
- Refinement Lv 3
- Attack Lv 2
- Critical Rate Lv 1
- Refinement Lv 3
- Attack Lv 1
- Attack Speed Lv 1
- Stamina Regen +2%
- Refinement Lv 10
- Attack Lv 3
- Attack Speed Lv 4
- Stamina Regen +6%
- Refinement Lv 4
- Attack Lv 2
- Critical Rate Lv 1
- Spirit: +0.1 every 1 sec
- Refinement Lv 10
- Attack Lv 5
- Critical Rate Lv 4
- Spirit: +0.3 every 1 sec
- Refinement Lv 2
- Defense Lv 2
- Refinement Lv 5
- Attack Lv 5
- Spirit: +0.2 every 1 sec
- Refinement Lv 10
- Attack Lv 11
- Spirit: +0.4 every 1 sec
- Attack Lv 3
- Defense Lv 3
- Refinement N/A
- Attack Lv 3
- Defense Lv 3
- Attack Lv 4
- Refinement N/A
- Attack Lv 4
- Refinement N/A
- Refinement Lv 1
- Attack Lv 1
- Refinement Lv 4
- Defense Lv 2
- Movement Speed Lv 1
- Health: +0.2 every 1 sec
- Refinement Lv 4
- Defense Lv 3
- Movement Speed Lv 1
- Health: +0.2 every 1 sec
Unique Accessories and Locations
If you’re hunting for a specific accessory inside a Strongbox Puzzle, the guide points you to the relevant location section below.
Hernand Unique Accessory Locations
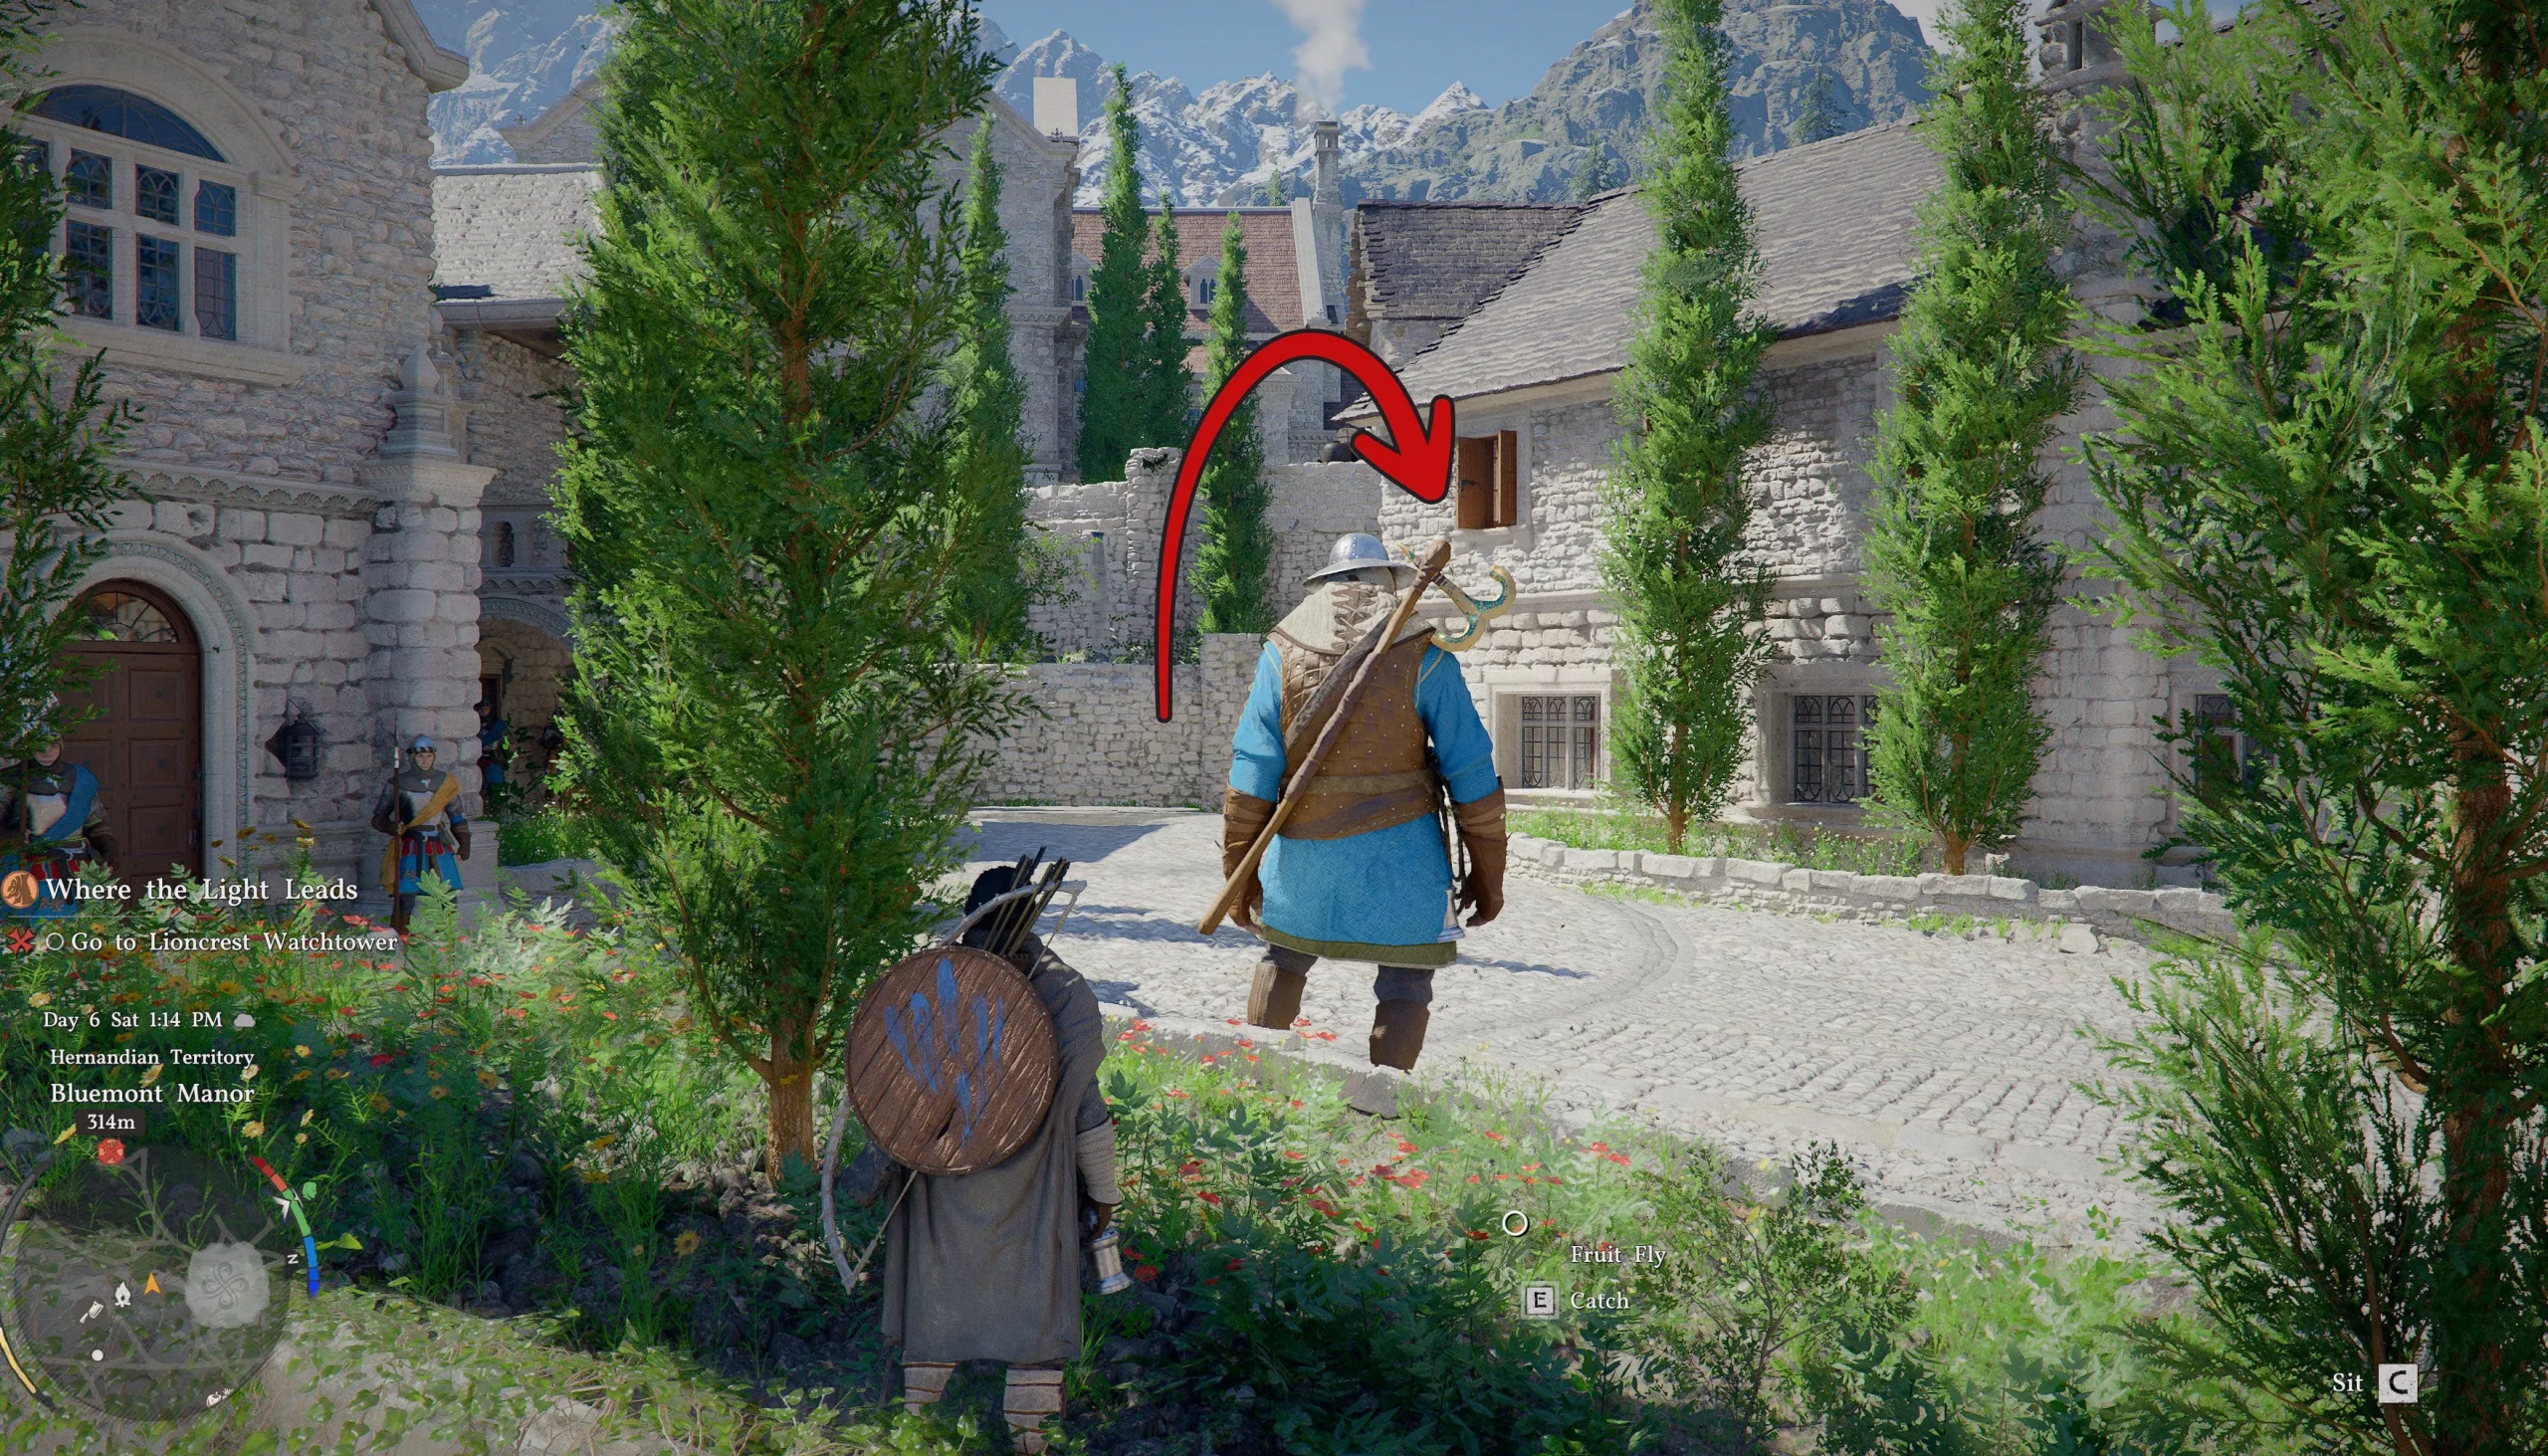
Northern Bluemont Manor Strongbox Puzzle
- Treasure: Oath of Darkness Earring
In Hernand Town, the Bluemont Manor is found on the western side. The complex includes a larger southern structure and a smaller stone building to the north that’s attached to some shops. Head due south of the main plaza tree where the notice board sits, and note that—unlike the southern building—the northern structure isn’t guarded or locked.
Go up to the second floor and enter the southernmost room to find a strongbox puzzle shaped like a rotating owl picture. Unlocking it requires pressing buttons to rotate different parts; some buttons rotate multiple panels at once.
The intended panel order (panels numbered 1–4 from left to right) is:
- Press the fourth button to rotate panels 1 and 4 until panel 4 is aligned.
- Press the first button to rotate panels 1 through 3 until panel 1 is aligned.
- Press the second button to rotate panels 2 and 3 until panel 2 is aligned.
- Press the third button to rotate panel 3 until it matches the others.
After the puzzle is solved, the door unlocks and you can take the strongbox loot, the Oath of Darkness Earring. The item can be refined multiple times to unlock an extra passive power.
Southern Bluemont Manor Strongbox Puzzle
- Treasure: Finely Crafted Gold Necklace
The larger southern building of Bluemont Manor contains a second strongbox puzzle in the corner of a big room on the second floor’s western side. The manor sits just west of the butcher shop, between the larger manor with the fountain farther west. While entrances are guarded, the second-floor balcony that leads to the room isn’t guarded—but the door itself is locked and requires a key.
The strongbox uses a contraption with several small metal cylinders. Each cylinder has a rotating board beneath it, plus a button on the right. Think of it like a tall tumbler lock: you must raise each cylinder so the silver tops sit above the wood panel line, while the golden bottoms remain below it.
Each cylinder needs individual calibration. Use the rotating board to control how high it rises when you press the right-side button, which also lets you judge whether you’re close to the correct height for that cylinder. Because the cylinders are set to different heights, you’ll adjust each one separately—raising the far-left and far-right cylinders the most, and only nudging the middle ones slightly.
When all cylinders are aligned via the rotating boards, press the right-side button. The lower wooden paneling will swivel, unlocking the strongbox so you can open it and steal the treasure: a Finely Crafted Gold Necklace.
Hillside Manor Strongbox Puzzle
- Treasure: Saint’s Necklace
Hillside Manor is just below the eastern edge of Hernand Castle. It’s a large home above the Church of Hernand and is heavily guarded at its main entrances. The workaround is to climb through a window into a second-floor room on the southwest side.
Once you align the puzzle properly with the rotating boards, pressing the right-side button will swivel the lower wooden paneling, unlocking the strongbox. You can then open it and loot the Saint’s Necklace, which can provide a temporary stamina boost.
Lioncrest Manor Strongbox Puzzle
- Treasure: Engraved Gold Earring
On Hernand Town’s far northwest outskirts, Lioncrest Manor is spread out on a hill due west of the castle, with a large cliff behind it.
The manor is crowded and its entrances are strongly guarded, but you can usually get in the way many manors allow—via a second-floor window, including a window on the back side near the rear entrance.
Once inside, go through the locked door on the southeastern side (not the double doors) to find a strongbox featuring a misaligned picture of a girl with fairy wings.
To solve it, align the image by rotating each of the nine painting fragments until they form a complete scene, matching the before-and-after references shown in the guide.
After solving, open the strongbox and claim the Engraved Gold Earring. With further refinements, you can also unlock a passive bonus for the item.
Mudridge Cabin Strongbox Puzzle
- Treasure: Flower Petal Earring
In Hernand, Mudridge Cabin is a pair of swampy towers and the location of not just one strongbox, but two similar puzzles—though only a single solution is needed to reach the treasure. The site sits in central Hernand, just below the Unicorn Cliffs and southeast of the Sanctum of Temperance. Watch out: bandits guard the area at first, and the swampy terrain beneath the buildings can poison you.
Head to the larger of the two buildings on the north side. On the lower level, you’ll find a sliding block puzzle on a door, but it only opens into a small storage room containing a unique lantern.
On the floor above, there’s a wall panel with another sliding block challenge: 9 tiles total, and only the lowest 6 can be moved. The blank space can only slide by one tile at a time. To finish the puzzle, arrange the blocks to reveal the cliffside tree painting, ensuring the blank slot ends in the bottom-right corner.
Once complete, open the strongbox to obtain the Flower Petal Earring. It can be equipped and used to play music while you walk.
Pailune Unique Accessory Locations
Stellen Manor Strongbox Puzzle 2
- Reward: Finely Crafted Gold Ring
This puzzle technically sits in the realm of Beighen. Even though it’s swarming with Demeniss Guards and has the look of a traditional manor, it still lies right on the edge of Pailune territory—along the southeastern border connecting Pailune, Hernand, and Demeniss just south of Beighen, and east of Drakesfall Castle.
The second of two strongbox puzzles is built as a self-contained challenge inside a hidden tower room. You can only reach it through the windows, but you’re in luck: servants and guards are patrolling outside, leaving you free to loot what you can inside. From outside, check the manor’s southeast corner for a third-floor window you can climb into.
Inside the small room, you’ll find plenty of loot and a strongbox locked by a cylinder-and-rotating-board contraption with a right-side button. As with other puzzles, you must align each cylinder so the silver tops are above the wood panel line and the golden bottoms stay below it.
Once you align everything using the rotating boards, press the right-side button. The lower wooden paneling will swivel, unlocking the strongbox. Open it to steal the Finely Crafted Gold Ring, which can be refined to grant extra stamina regeneration, attack, and attack speed.
Vat’nholl Fortress Strongbox Puzzle
- Reward: Flame Lantern
This strongbox is hidden in a secret alcove inside Vat’nholl Fortress. The fortress is on Pailune’s southwestern edge along the Upper Nas River, north of the Calphade North Gate along the river boundary. Your first visit is met with heavy guarding, and you’ll need to defeat the commander known as White Bearclaw before the area becomes safe to explore.
After the fort is liberated, enter through the main gate and immediately keep to the right. Look for a low stone wall with hinges running through the middle. You can illuminate a leaf symbol on the wall using your lantern or Blinding Light. Then use Force Push to rotate the wall around—though you may need to cling to it first and hold on.
Inside, the strongbox is locked by a light puzzle with colored runes and dots arranged in three rows of four columns, plus a red symbol on the right to reset. The solution follows a similar concept to the Hernand Ruins puzzle: trace a route between two matching runes, then move to the next route. Start by activating the purple triangle in the top right, then work your way downward across the small button tiles and left until you reach the second purple triangle. Next, push the blue symbol to the right, then go up and left to the second blue symbol. Finally, hit the green symbol in the top left corner and trace a path down to the matching green symbol to complete the puzzle.
Your reward is the Flame Lantern, a purely cosmetic alternate look for your currently equipped Lantern.
Whisperleaf Fortress Strongbox Puzzle
- Reward: Ring of the Lightning
This strongbox is tucked away in another secret fortress area, located deep in Whisperleaf Fortress in Pailune’s far northwest corner. You can find it west of the Silver Wolf Mountains, following the lone road west of the Longleaf and Longbranch settlements. In later faction missions, the fortress may be occupied, but early on you should be able to visit without resistance.
Once inside, go around to the far western side and search behind a small shed for a strange rock slab sticking straight up. Use Force Palm while standing in front of the slab to spin the plate, which opens a nearby hole in the ground.
Dropping down, you’ll see the strongbox is locked by a small sequence puzzle. You must press the stone plates in the correct order to lower them all. Start with the top-left button, then press the top-right button, and finish with the bottom-left button to unlock it.
Inside, the reward is the Ring of Lightning, a special ring you can activate to charge explosive power and unleash it on enemies.
Demeniss Unique Accessory Locations
Demeniss Castle Strongbox Puzzle
- Reward: Orgre’s Ring
The Demeniss Castle strongbox is tucked behind a secret bookshelf on the ground floor. That secret shelf is indoors by the stairwell at the castle’s southwest tip.
Here’s the puzzle solution for the Demeniss Castle strongbox:
- Use #4 to align the fourth frame.
- Use #1 to align the first frame.
- Use #2 to align the second frame.
- Use #3 to align the third frame.
When you open the strongbox, you’ll find Orgre’s Ring. Despite the name, it’s actually a necklace that provides +5 Attack and +0.2 Spirit Regeneration. At maximum refinement, the bonuses increase to +11 Attack and +0.4 Spirit Regen.
Demeniss City 1 Strongbox Puzzle
- Reward: Golden Deer’s Tear
Among the four strongboxes in Demeniss City, this one is arguably the most hidden. It’s located in a manor wing that you can’t reach from inside the manor itself. Instead, you’ll need to climb in through a window. The easiest window is in the southeast corner of the inner courtyard on the second floor.
This is a musical strongbox, so you must hit the keys in the proper order to play the correct song. With the keys numbered 1 through 8, the right sequence is 6-4-2-6-5-3-1.
After opening, you’ll obtain the Golden Deer’s Tear, a defensive earring that grants +4 Defense and +0.8 Health Regen at maximum refinement.
Demeniss City 3 Strongbox Puzzle
- Reward: Tarivian Necklace
The third Demeniss City strongbox is in a manor near the city center, east of the Abyss Nexus. It’s hidden behind a rotating bookshelf on the ground floor.
Like the other musical challenges, you’ll need to press the keys in the correct order. With the keys numbered 1–8, the correct sequence is 1-5-2-6-5.
Inside is the Tarivian Necklace, a defensive necklace with the Second Wind ability. It revives you if you are critically wounded once every thirty minutes. At full refinement, it also adds +5 Attack, Lv 3 Critical Rate, and +0.4 Spirit Regen.
Eastern Court Strongbox Puzzle
- Reward: Necklace of Lightning
The Eastern Court strongbox is located in the Elemore Estate. You’ll find it down a ladder hidden behind a tapestry near the stairs. You’ll visit as part of a faction quest chain requiring you to defeat the Court Reapers.
The strongbox is a safe with a dial. To find the combination, you need to “read” the clicks. Start by turning right until you hear a click, then go left, right, and left again. Every click means you reverse direction. If you get stuck, remove your hand to reset.
Inside the safe is the Necklace of Lightning, an offensive accessory that boosts Attack, Critical Rate, and Spirit Regen.
Southern Court Strongbox Puzzle
- Reward: Witch’s Earring
The Southern Court strongbox is in the Azerian Estate, in an upstairs bedroom. Like Eastern Court, it’s tied to a faction quest line where you must defeat the Court Reapers.
To solve it, you rotate sections of the image displayed above until a picture of a knight on horseback becomes aligned. The third button controls the middle two sections, so use the other buttons to line up the ends, then use the third button to finish the image.
Once opened, you’ll find the Witch’s Earring, a defensive accessory that increases Defense, Movement Speed, and Health Regen.
Western Court Strongbox Puzzle
- Reward: Karanda’s Necklace
The Western Court strongbox is inside the Marshell Estate. It’s down a ladder hidden behind a tapestry by the stairs, and it’s also part of the faction quest line focused on defeating the Court Reapers.
This strongbox uses a tile-puzzle format. Slide the tiles into place to complete a picture of a sheep framed by an illuminated manuscript border.
Inside, you’ll get Karanda’s Necklace, an offensive accessory that increases Attack and Critical Rate.
Windmere Manor Strongbox Puzzle
- Reward: Mark of Darkness
Windmere Manor’s strongbox is located in the second-floor library, tucked against the wall in the room’s northeast corner.
It’s a tile puzzle. Arrange the tiles to form a whale picture—once the correct image is assembled, the strongbox opens.
The loot inside is the Mark of Darkness, a powerful offensive accessory that increases Attack, Attack Speed, and Stamina Regen.
Azerian Manor Strongbox Puzzle
- Reward: Ancient Earring
The Azerian Estate strongbox is on the upper floor in a secret room hidden behind a rotating wall. When you reach the stairs, turn right and you’ll see the wall on the left side of the hallway ahead, with a small picture hanging at its center.
Rotate the four wheels on the strongbox to form an image of two foxes. Then open the strongbox to retrieve the Ancient Earring from the chest.
Delesyia Unique Accessory Locations
Delesyia Castle Strongbox
- Reward: White Horn’s Earring
In Delesyia Castle, the strongbox is hidden behind a rotating fireplace in the dining room on an upper floor. The easiest route is to reach the east side roof, where you’ll find a door leading to a balcony above the dining area.
Approach the fireplace along the eastern wall to rotate it until the strongbox becomes accessible. Turn the dial to the right until you hear a loud click, then turn it left until you hear another click. At that point, the strongbox opens and you can loot the White Horn’s Earring from inside.
Eastern Hills Strongbox
- Reward: Relic of Darkness
In the Eastern Hills, the strongbox sits inside a lone house along the train tracks running through the region. It’s hidden in a secret room on the ground floor behind a rotating bookshelf.
This strongbox puzzle asks you to adjust the dials beneath each tumbler. You must apply enough force so they align properly with the image above. The indicator line on each tumbler should line up with the bottom edge of the image. Use the button on the side to test alignment. If the tumblers are aligned correctly, the box opens and you can loot the Relic of Darkness.
For more on the best items and builds, the guide recommends the following Crimson Desert guides:
- Best Builds Guide: Weapons, Armor, and Abyss Gears
- Strongbox Puzzle Locations and Solutions
- Treasure Chest Locations
- Unique Armor Sets and Locations
Up Next: Things to Do First in Crimson Desert
Top Guide Sections
- Things to Do First in Crimson Desert
- Essential Tips and Tricks
- Walkthrough
- Things Crimson Desert Doesn’t Tell You