Mass Effect 2 Omega Dossier: The Professor Walkthrough & Loot Guide
Mass Effect 2’s Omega dossier for “The Professor” takes you through a full run on Omega Nebula’s Sahrabarik system: from setting up with Aria T’Loak, to pushing into the Quarantine Zone, treating the outbreak, and finishing with the new weapon Mordin leaves you. Below is a mission walkthrough focused on what you need to survive each combat stretch, where the loot is hiding, and which dialogue options impact your Paragon/Renegade score.
Task Search
Checklists
- Mission Stats
- Travel to Sahrabarik
- Ask Aria About Mordin
- Enter Quarantine Zone
- Cure the Plague
- Back on the Normandy
Mission Stats
Video Guide
Mission Rewards
- Experience: 1,000 XP
- Weapon: M-6 Carnifex
- Research:
- Assault Rifle Damage
- Medi-Gel Capacity
- Mission Credits: 25,000 credits
- Found Credits:
- 23,000 credits (Paragon)
- 25,000 credits (Renegade)
- Resources:
- 1,000 Element Zero
- 2,000 Palladium
- 2,000 Platinum
- 2,000 Iridium
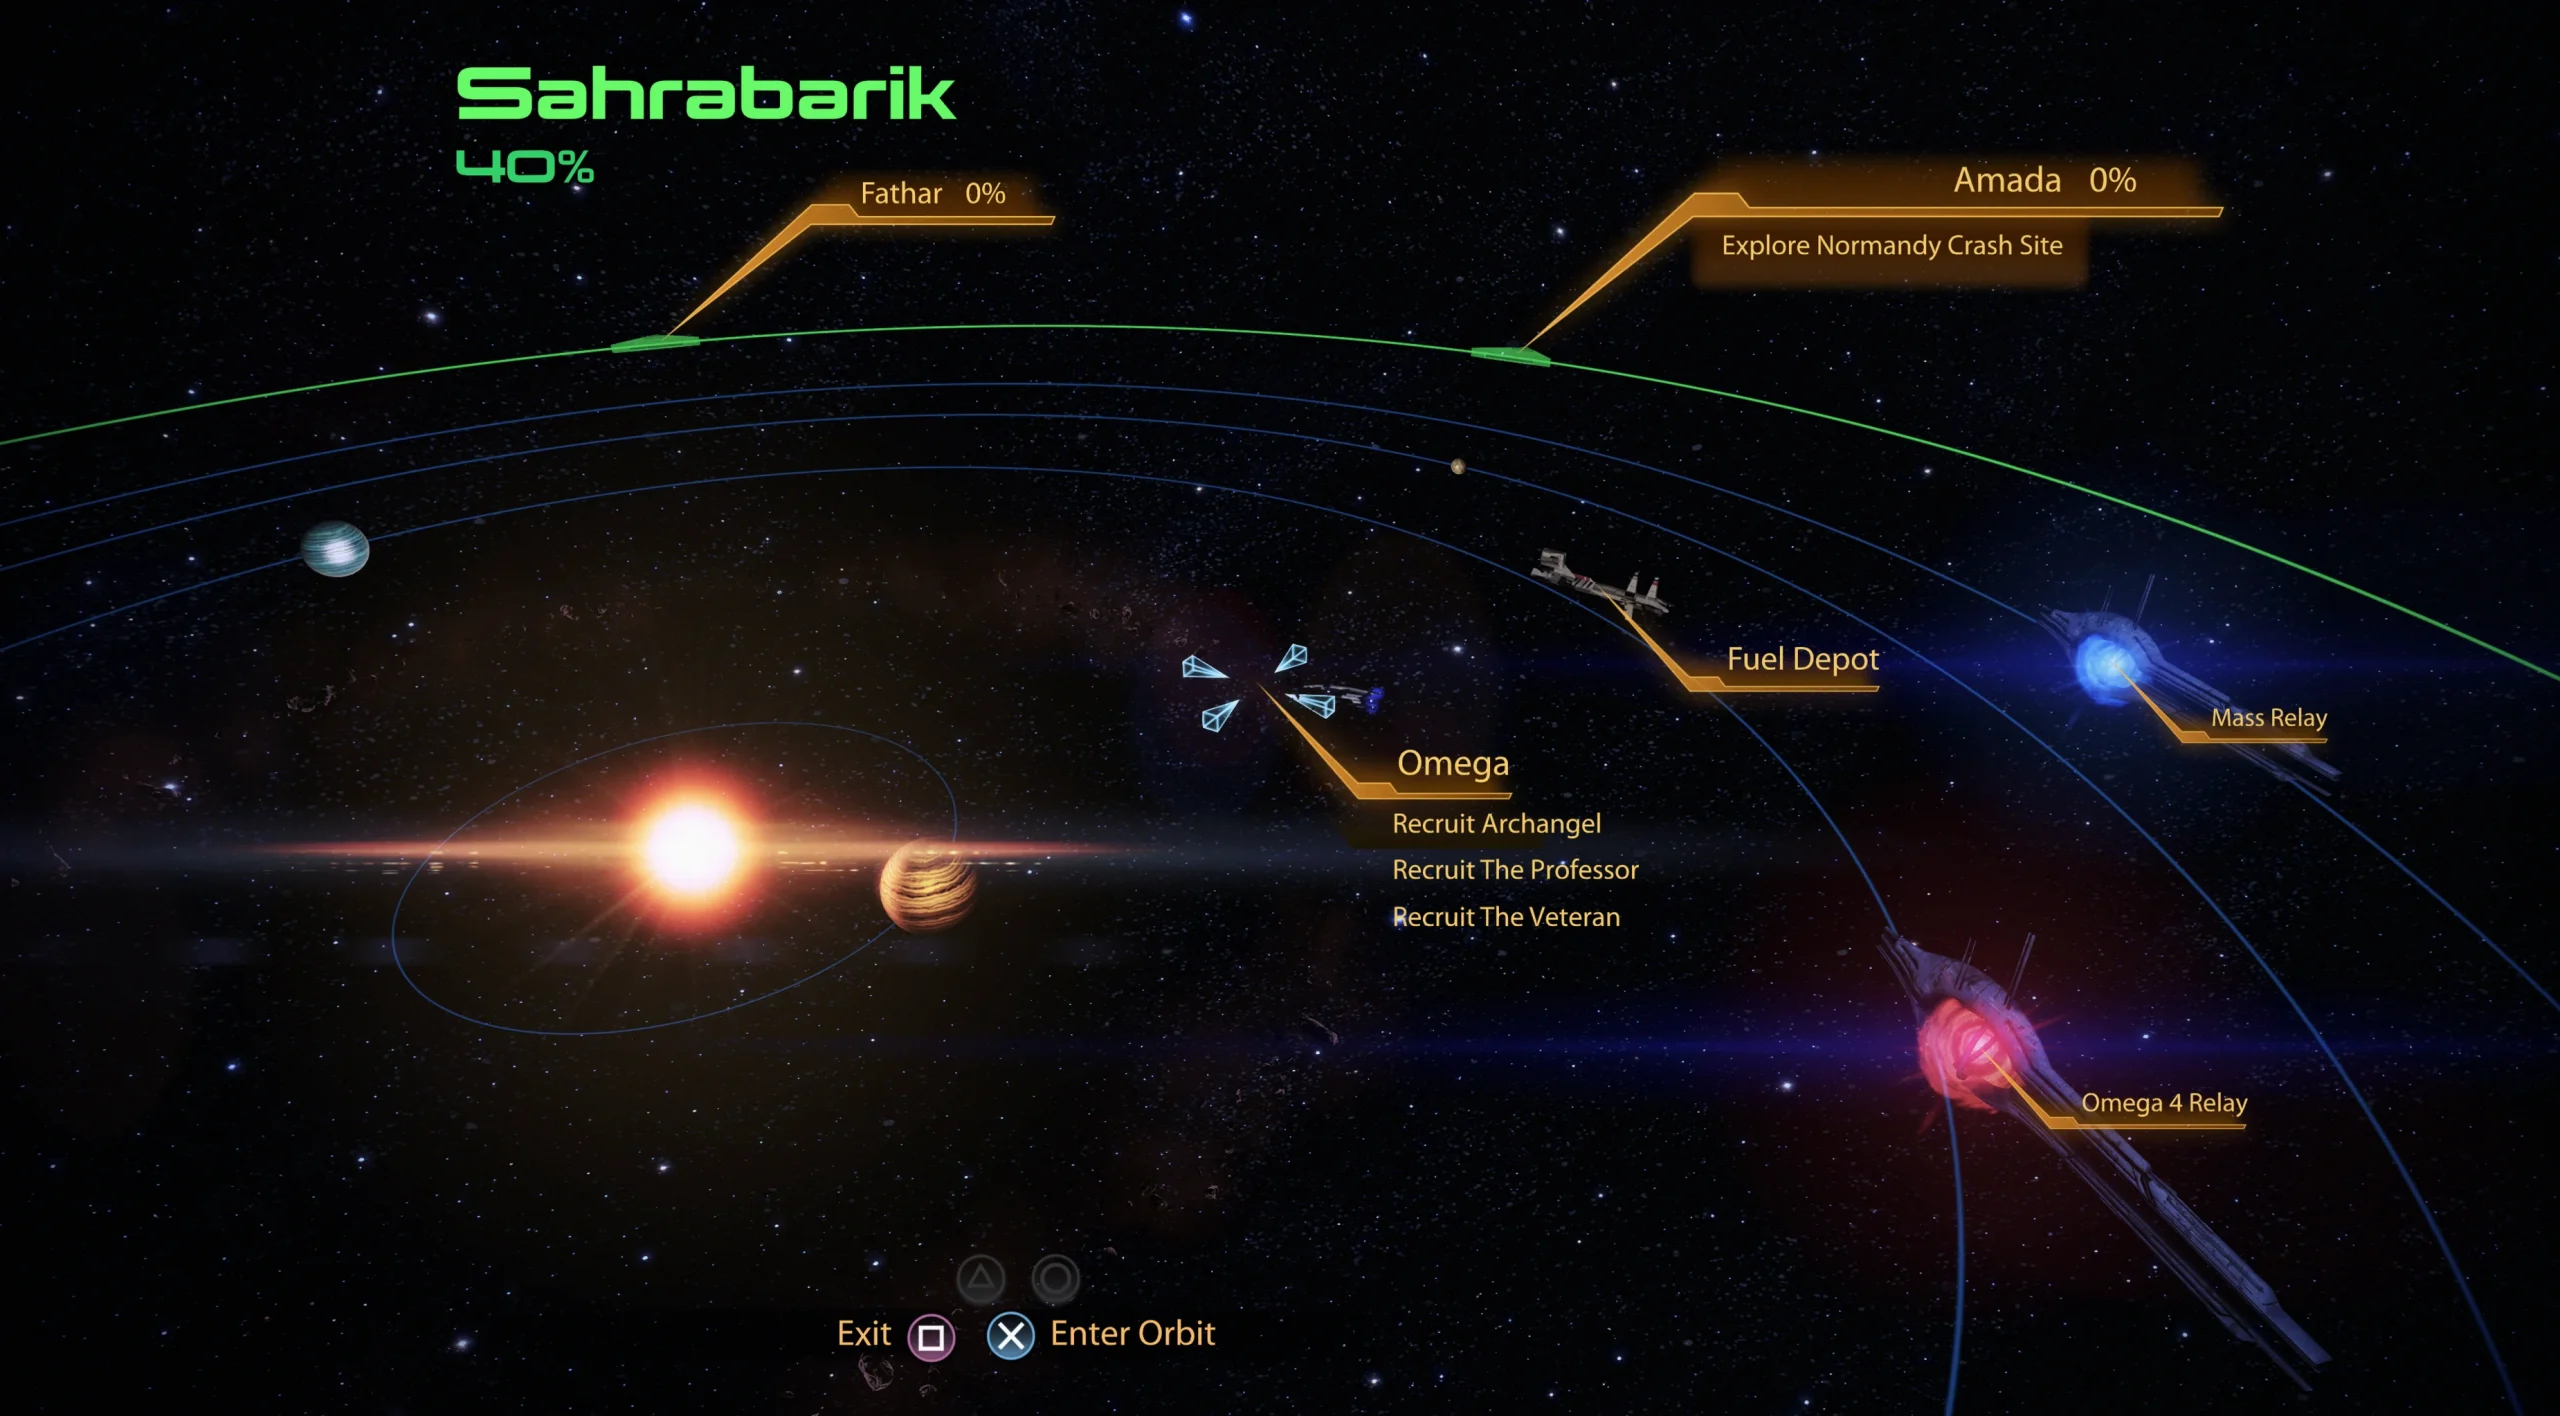
Travel to Sahrabarik
- Location: Omega Nebula – Sahrabarik – Omega
This dossier mission is one of two that happen on Omega, which sits in the Sahrabarik system inside the Omega Nebula. This is the same system you originally landed in after getting the Normandy SR-2. If you’ve been following the guide in order, it’s your third stop here—coming after shopping and picking up Archangel.
If you’re planning to mine, Sahrabarik is the system’s one Rich planet.
Chances are, though, this is your first visit. The game pushes you to recruit Mordin as soon as you get the Normandy SR-2, so when you arrive you’re met by two emissaries—one is a fake—who insist you meet with the station’s power player, Aria T’Loak. There’s no real need to rush it immediately, even if their tone tries to force urgency.
Recommended Loadout
- Squad Tactics:
- If you’re focusing on tactics, Zaeed and Grunt are solid picks. Both bring fire-based abilities that strip Armor, which you’ll be dealing with often in this mission.
- Unique Dialogue:
- For story reasons, Grunt and Archangel have the most distinctive dialogue during this mission.
- If you’re focusing on tactics, Zaeed and Grunt are solid picks. Both bring fire-based abilities that strip Armor, which you’ll be dealing with often in this mission.
- For story reasons, Grunt and Archangel have the most distinctive dialogue during this mission.
Ask Aria About Mordin
After you’ve handled shopping and added Zaeed and Archangel to your squad (or skipped them—your choice), go to Afterlife and bring up Mordin with Aria. If you put Archangel in your squad, he’ll react to the news EDI delivers.
If it’s your first time in Afterlife, you can speak with a Batarian named Kylan in the entry hall. Use Charm or Intimidate to earn Morality Points. Inside the bar, head to the right side of the floor and order drinks—ordering three gets you intoxicated.
Then take the stairs at the back to meet Aria. On your first visit, she’ll have her people verify you’re truly Shepard; your response here earns Morality Points. Either way, ask about Mordin to learn he’s located in the Quarantine Zone, where he’s helping sickly people—an ominous phrase, to say the least. Aria also warns that getting there is at your own risk, and that reaching it might not even be possible.
Enter Quarantine Zone
The Quarantine Zone entrance sits at the southeastern edge of the map, down an alley near the right-hand approach to the Markets. Getting to it is trickier than it sounds. When you reach the door, you’ll find a Turian guard arguing with a human woman. Talking to him reveals the plague driving the quarantine: it doesn’t affect humans (or Vorcha), but nearly every other race can be killed by it quickly.
From here, you can force your way in using one of two routes on the Dialogue Wheel: the white options on the right, or colored persuasion options on the left. Here’s what happens with each:
- If you use Charm with “Let me in and I’ll help”, you get +5 Paragon Points, and the guard radios ahead to let you pass.
- If you use Intimidate with “I’m going in”, you get +5 Intimidate Points, and the guard radios ahead to let you pass.
- If you choose “I really need to get in” or “You can’t stop me”, Shepard enters anyway. Because the guard doesn’t radio ahead, you’ll have to kill three Turian guards at the start of the level.
If you brought Garrus and/or Grunt, they’ll talk with you before entering, mentioning the hazards of a Quarantine Zone where a plague kills Turians and Krogan. This gives you another chance at Morality Points:
- Pick “Don’t worry. You’ll stay back” for +2 Paragon Points.
- Pick “I need you to come” for +2 Renegade Points.
Once you’re inside the Quarantine Zone, things are quiet—at least for now. Move forward down the first corridor.
- 250 Refined Element Zero – Before crossing the right-side doorway, check the boxes at the corridor’s end. Element Zero is among the rarest resources in the game, so grab as much as you can.
Proceed through the doorway to reach the main barricade. If you persuaded the Turian guard earlier, the barricade patrol lets you through peacefully. If you didn’t, they open fire and you must eliminate all three of them.
- Medical Station – 100 Credits. To move on, you’ll go through a side corridor that circles the barricade. The Medical Station is near the exit door.
With the guards dealt with and the Medical Station salvaged, go through the door to continue.
As soon as you step through, keep your weapon ready. Two Blue Sun mercenaries are waiting ahead. When you start moving into the room, they open fire from near the burning corpses. Trigger the fight on your terms, aim carefully, and maximize damage. Cover is available, so use it if you need it.
After you take them down, search for loot.
- Bank Terminal – 5,000 Credits. Located to the left of the white-lit door the two Blue Sun troops were standing in front of; look for “Mechanical Sciences” above the door.
- Power Cells – 100 Credits. Go through the door next to the Bank Terminal, then move left around the column to find them on a table.
If you bypass the next door in the room where the Power Cells are, you can Examine a deceased Turian Plague Victim lying on the ground. You can also use a nearby Computer Console to hear four log entries.
Return to the main area and head left. You should spot a Batarian Victim on the right side of the floor near a floor lamp. Talk to him to start a long, surprisingly thorough conversation.
- You can earn +2 Renegade Points by saying “Leave him”. This doesn’t end the conversation.
No matter what you choose, once you advance the conversation the Batarian’s condition worsens. You’re then faced with two paths:
- If you act quickly and use the Paragon Interrupt, you apply Medi-Gel and save him, earning +5 Paragon Points.
- If you ignore the Paragon Interrupt or miss it, the Batarian dies. He drops his Datapad, which you can Examine for 2,000 credits. This option gives no Renegade Points.
If you saved him using the Paragon Interrupt, you can then reply with:
- “I’m here to help” for +2 Paragon Points.
- “I need information” for +2 Renegade Points.
After that, you can ask more questions and get additional details from the Batarian.
When the conversation ends, keep moving down the corridor. Look for a right-side door you can Bypass with an “Apartments” sign above it. Go down the stairs into a room with a dead Batarian on the bed, then play the logs on the Datapad to learn what happened to him.
- Wall Safe – 4,000 Credits. Found on the right-hand wall of that room.
Continue onward into an area called Kokomo Plaza. Tables sit in the middle, and a Blue Suns barricade blocks the far end. Expect assault from multiple directions, so rely on cover. Use your own special skills and your squad’s abilities—this fight is usually not too long, but the sheer number of Blue Suns Troopers is what makes it feel hectic rather than their raw strength.
For positioning, your best option is to sprint forward along the left side, climb the stairs, and fight from the balcony to flank from above. If you want a riskier play, you can rush to the far side of the room to flank enemies at the upper portion of the area, using nearby explosive barrels for major impact. Otherwise, slow down and pick enemies off one at a time.
Once most (or all) of the enemies are down, explore the area.
- Med Kit – 100 Credits. With your back to where you came from, head left and up the stairs. At the top, you’ll find it on a round table overlooking the stairs.
- Circuit Boards – 1,000 Credits. On the back wall, just left of where the Med Kit is located.
Then enter the doorway to the right of the Blue Suns barricade and find the white-lit “Apartments” entrance. Go inside and ignore the residents for now to grab supplies.
- Med Kit – 100 Credits. Hidden on a table behind the column at the foot of the stairs leading to the slightly raised area where the occupants are.
- Wall Safe – 4,000 Credits. Take the steps near the Med Kit and move to the back-right corner. The safe sits on the right above a seat next to the bed.
Now talk to the occupants, who are afraid to be noticed. Say “You should go to the Clinic”, which unlocks:
- “I’ll help you get there” for +2 Paragon Points.
- “Hiding here won’t save you” for +2 Renegade Points.
After that, go back outside and move around behind the barricade.
- Modified Assault Rifle – Assault Rifle Damage. On the far side of the barricade, face away from it to find a lamp in the corner. A Blue Suns corpse sits nearby—Scan the rifle. This is a very useful upgrade for Soldiers, because assault rifles can struggle with damage even on Easy difficulty.
You’re approaching the final combat zone before reaching Mordin’s clinic. Here you’ll fight Vorcha, Krogan, and Varren. To get an advantage, climb the stairs on the right as you near the battlefield and reach an upper balcony so you aren’t rushed immediately.
This fight is longer than you might expect because more enemies keep showing up even after you think the area has been cleared. Vorcha also heal automatically—meaning you must kill them all the way, or they effectively reset after a short time. Once the battle ends, collect the Thermal Clips you need.
- 500 Element Zero – Check the left side of the battlefield for a door leading into a small room. The Element Zero is on the left shelves just inside the next door.
Next, go through the following door in the same room to reach another apartment. It currently has two looters inside, so there’s nothing for you to take here.
- Ask “Who are you”, then say “I don’t like looters” for +2 Paragon Points.
Then choose “I want you to stop” to open the final set of options:
- Charm: “No… but someone will” for +5 Paragon Points.
- Intimidate: “If I have to” for +5 Renegade Points.
- “Yes” to kill both looters for +2 Renegade Points.
- “Forget it. I don’t care” to end it with no Morality Point gain.
Exit to the main area and look for a glowing red line on the ground. It leads around the corner and to the door that takes you to the Med Clinic. When you approach the front entrance, listen to the Clinic Guard’s warning: if you cause trouble, you’ll have to deal with him and an army of mechs. The good news is that Shepard and the squad put their guns away when entering.
Explore the lobby to speak with the two Clinic Receptionists, the Turian Patient, the Batarian Patient, and the female Clinic Guard around the corner.
- Medical Station – 100 Credits. Located around the corner near the female Clinic Guard, right beside her on the wall.
Go back to reception and move down the nearby hallway. Mordin is working in the room on the right, but before talking to him, check the room on the left.
- 2,000 Refined Platinum – On the table to your left as soon as you enter, under a lamp.
- Med Kit – 100 Credits. On a medical bed toward the center of the room.
- 2,000 Refined Palladium – On a table in the back-right corner.
- Research Station – Medi-Gel Capacity. Access it via a computer on the same table where you found the Refined Palladium.
Now enter Mordin’s room. Before speaking with him, pick up these items:
- Med Kit – 100 Credits. On the table to your left right as you enter.
- Power Cells – 100 Credits. On a table in the back-middle of the room, across from a medical bed.
- 500 Refined Element Zero – On a table to the right of where Mordin is working.
- 2,000 Refined Iridium – On the same table as the Element Zero.
Talk to Mordin. He talks fast and can be hard to keep up with (subtitles are recommended). He starts by trying to figure out who you are and why you’re here:
- You can pull the Renegade Interrupt for +5 Renegade Points.
- If you’re patient, the Renegade option fades and you can pull a Paragon Interrupt for +5 Paragon Points.
Eventually, Mordin tells you to go to the ventilation system to help disperse the cure:
- Reply “I’ll take care of it” for +2 Paragon Points.
- Reply “Why can’t anything be simple?” for +2 Renegade Points.
Right after the power cuts out, Mordin urges you to move—then adds a side mission. You must locate his missing assistant, Daniel. Even though the Dialogue Wheel appears, you don’t receive Morality Points for any responses here.
Finally, if you healed the sick Batarian earlier in the level, you can say “I met a sick batarian” to send help out for him and earn 40 XP.
M-6 Carnifex
The last thing Mordin does before you leave is hand you a new weapon: the M-6 Carnifex. It’s a “hand cannon” pistol, comparable to a Desert Eagle, trading a higher hit impact for a slower rate of fire—making it best for accurate shots.
If you’d rather use a different pistol, you can swap back at the Weapons Locker in the reception area.
Cure the Plague
Now leave the clinic and head for the Environmental Control Center. This is where you use Mordin’s cure to heal everyone who’s injured or infected. Find the door that was previously locked near the Medical Station—now it should be open.
Combat and progression through the Environmental Control Center
- Go up the stairs beyond the door, turn left immediately, and take cover behind the first piece of cover you find.
- Start the fight against Vorcha loitering nearby. They should ignore you until you open fire (as long as you don’t get too close).
- Pick targets off as Vorcha—and some Krogan—advance. Let your squad reposition where they can fight effectively, but focus on your own survival and return fire when you have openings.
- At the top edge of the room, move leftward toward the long, narrow staircase that climbs up. Expect more enemies on and around it, so stay alert.
When the enemies are gone, explore the area for loot—all of it is around that thin staircase.
- Medical Station – 100 Credits. On the right side of the thin stairs leading to the next area.
- Gambling Terminal – 3,000 Credits. On the left side of the thin stairs, around the corner by the lightstand.
- Bank Terminal – 5,000 Credits. At the top of the thin stairs in the back-left corner.
Continue into the next hallway. You’ll see two doors: one close by on the left, and a locked one on the right. Enter the left door to find Mordin’s assistant Daniel, captured by Batarians. They believe Daniel is spreading the plague itself rather than distributing the cure. This is a delicate conversation you can resolve in multiple ways.
First, you get two right-side dialogue options that don’t end the exchange. Choosing either replaces both with new choices:
- If you’re Paragon, start with “Everybody stay calm” for a free +2 Paragon Points.
- Picking “He’s not my friend” provides no reward.
Next are the options that conclude the conversation:
- “Let’s talk this out” for +2 Paragon Points. Daniel dies.
- “[Signal Henchmen]” for +2 Renegade Points. Daniel dies.
- “No” gives nothing, and Daniel dies.
- Use Charm: “Nobody needs to die” for +5 Paragon Points. Daniel lives.
- Use Intimidate: “Kill him, and you’re next” for +5 Renegade Points. Daniel lives.
If you used one of the persuasion options above, you then get two additional choices:
- “You can go” to let the Batarians leave with no further conflict.
- “No. I can’t trust you” to kill the Batarians, horrifying Daniel.
If Daniel dies, you can Examine his body for comments from squad mates. If he survives, you can talk to him for one more parting remark.
- Med Kit – 100 Credits. After the cutscene ends, it’s visible straight ahead, next to the couches and a fallen plant.
Return to the main hallway and enter the other door. Don’t open the next door right away—take cover on the right. A few enemies are across the far side of the room. Kill them before opening the door to reach the staircase, since you’ll have ample cover.
Once enemies are eliminated and the door is open, dash down the stairs and switch to your sniper rifle if you have one. As soon as you turn left through the open doorway, you’ll spot a distant enemy on a balcony. He’s launching rockets from safety, and the most realistic way to remove him is to use the sniper rifle effectively. Rush forward and slightly to the right to get closer to him and his allies.
Deal with them quickly, because more enemies are coming from the ground floor below. The balcony is a safe spot, giving you time to take out Vorcha at your pace before descending a staircase and cleaning up the remaining threats. Strangely, while ammo is available after the fight, there are no additional items to collect.
When you’re ready, go through the door the Vorcha earlier came out of. This door doesn’t have a green holo-button; it opens automatically when you approach. Beyond the second door, you’ll run into more Vorcha and Krogan. Take cover behind the door you came through as soon as enemies appear—this is close-quarters fighting, and it’s easy to get dropped if you aren’t careful.
After clearing that wave, explore a side pocket on the right for loot:
- Med Kit – 100 Credits. On the back wall directly ahead when you enter the right-side area.
- Spare Parts – 1,000 Credits. In the back-right corner to the right of the Med Kit.
Back in the central corridor, move left and forward toward a series of uphill staircases. A squad mate will comment that you’re almost at the Environmental Control Center.
Using the cure (and surviving the defense)
Upon arriving at the Environmental Control Center, you’ll find the Vorcha. They aren’t very clever: they quickly reveal they’re working for the Collectors. You can respond with:
- “Why are you doing this?” for +2 Paragon Points.
- “You’re dead” for +2 Renegade Points.
The first firefight is manageable. Take cover and shoot back at the small group guarding the main control panel. That panel is what inserts the cure into the air supply throughout the Quarantine Zone. The actual act of placing the vial into the machine isn’t described as the full work here—you’ll still need to handle what comes after.
Once you kill the enemies guarding the machine, dash up and place the cure into it. That’s step one. Unfortunately, there are still two more tasks before you’re safe.
Double unfortunately, placing the cure draws far more enemies into the area immediately. Once it’s done, run to the nearest cover and hold position until the pressure eases.
When you get a moment, reopen fire on the many attackers around you. The balcony above the door you entered from now holds rocket-armed enemies, so switch to long range and take them out first.
Then work your way toward both sides of the room: descend the stairs to parallel routes. It doesn’t matter which side you start on since you must clear both eventually. After the first corridor is cleared, return to the room it led to and activate one of two fans. These fans must be turned on so the cure can spread around the Quarantine Zone.
- Medical Station – 100 Credits. In the fan control room, in the corner next to the door farthest from the fan controls.
The other corridor is harder to clear than the initial approach (regardless of which door you open first). You’ll need to fight your way back to the room center, then fight a new wave of Vorcha and Krogan as well as elevated rocket-launching Vorcha when you approach the second, previously untouched corridor. The fighting is intense—take your time, keep cover in mind, and don’t rush or you’ll risk an untimely death.
- Medical Station – 100 Credits. Again in the fan control room corner next to the door farthest from the fan controls. Make sure you collect this before turning the fans on, because the mission will automatically send you back to Mordin’s Clinic.
Turn on the fans to trigger the return to Mordin’s Clinic. Mission complete.
Back at the clinic, the conversation quickly shifts to Daniel. What happens next—and what dialogue you get—depends on whether you saved him, saved him but killed the Batarians, couldn’t save him, or skipped/missed the encounter.
- Choosing the upper-right option grants +2 Paragon Points.
- Choosing the lower-right option grants +2 Renegade Points.
No matter how the Daniel scene played out, the cure for the Collectors’ plague should now be dispersing through the Quarantine Zone. At this point, invite the doctor to join you:
- “Will you join me?” for +2 Paragon Points.
- “Don’t forget our deal” for +2 Renegade Points.
After this, you decide whether to go straight back to the Normandy or remain in the clinic. If you want more remarks from the NPCs, stay awhile—especially if you’re playing Paragon and have encouraged everyone to head to the Clinic. You can speak with the Wounded Batarian, Daniel, the Turian Patient, the two apartment refugees, the Batarian Patient, the Clinic Guard, and both Clinic Receptionists. Return to the Normandy via either of the doors or by speaking to Mordin again.
Back on the Normandy
When you return to the Normandy, Mordin is waiting in the Comm Room. Here, you can respond with:
- “Cerberus hasn’t changed” for +2 Paragon Points.
- “Cerberus does good work” for +2 Renegade Points.
You then receive two Paragon Interrupt options. Pulling them won’t award Paragon points, but if you ignore them you can say “You think this is fascinating?” for +2 Renegade Points.
Your final Morality choice options are:
- “Yes” for +2 Paragon Points.
- “Stay focused, Professor” for +2 Renegade Points.
With Mordin on the team, the Research Lab is now open. In addition to researching Research Data you find in missions (plus DLC armor and weapons for Legendary Edition players), every squad mate can offer a Research Project when you ask. Some projects help only the individual who offers them, but several characters—Jacob and Garrus included—have options that improve the Normandy’s weapon and armor. If you want a strong chance at a positive ending, buy these upgrades.
With Mordin and the Research Lab unlocked, talk to your squad mates and request the Research projects they want to pitch. While many apply only to them, there are three you’ll definitely want to complete because they affect the game’s final mission.
Here’s what you need to know about them:
Okay, now for our rounds!
- CIC – Speak with Mordin, Kelly, and Jacob about the Mission.
- Crew Deck – New exchanges appear in the Crew Quarters room and the Mess Hall.
- Engineering – If you purchased Garrus’ Thanix Cannon upgrade, Gabby and Ken reference it in a new exchange. Zaeed also has a story-related line involving Mordin, though you may need to spend time talking to him over a few missions to reach it.
Want more Mass Effect 2 help? Check out:
- Legendary Edition Changes
- How-To Guides
- Key Choices and Consequences
- Romance Options
- Walkthrough
- Side Quests
Up Next: Dossier – The Warlord
Top Guide Sections
- Legendary Edition Changes
- Basics
- Tips and Tricks
- How-To Guides