Virmire Assault Mission Guide: Maps, Loot, Codex, and Best Dialogue Choices
The Virmire Assault Mission on Virmire is one of Mass Effect’s most punishing stretches of combat, and it’s also where your build and your dialogue choices start to feel especially important. This walkthrough-style guide breaks down how to survive every major fight, where to locate loot and codex content, and which conversation options to select as you move through Kirrahe’s plan, Saren’s base, and the final confrontation.
Checklists
Here’s what this mission guide covers, from setup through the end of the assault: mission stats, preparation steps, infiltrating Saren’s base, disabling the AA defenses, providing the needed backup during the bomb sequence, and finally returning to the Normandy to deal with the aftermath.
Mission Stats
Essential Stats
- Persuasion Points: 7 Charm / Intimidate
- Minimum Decryption: Hard Decryption
- Minimum Electronics: Average Electronics
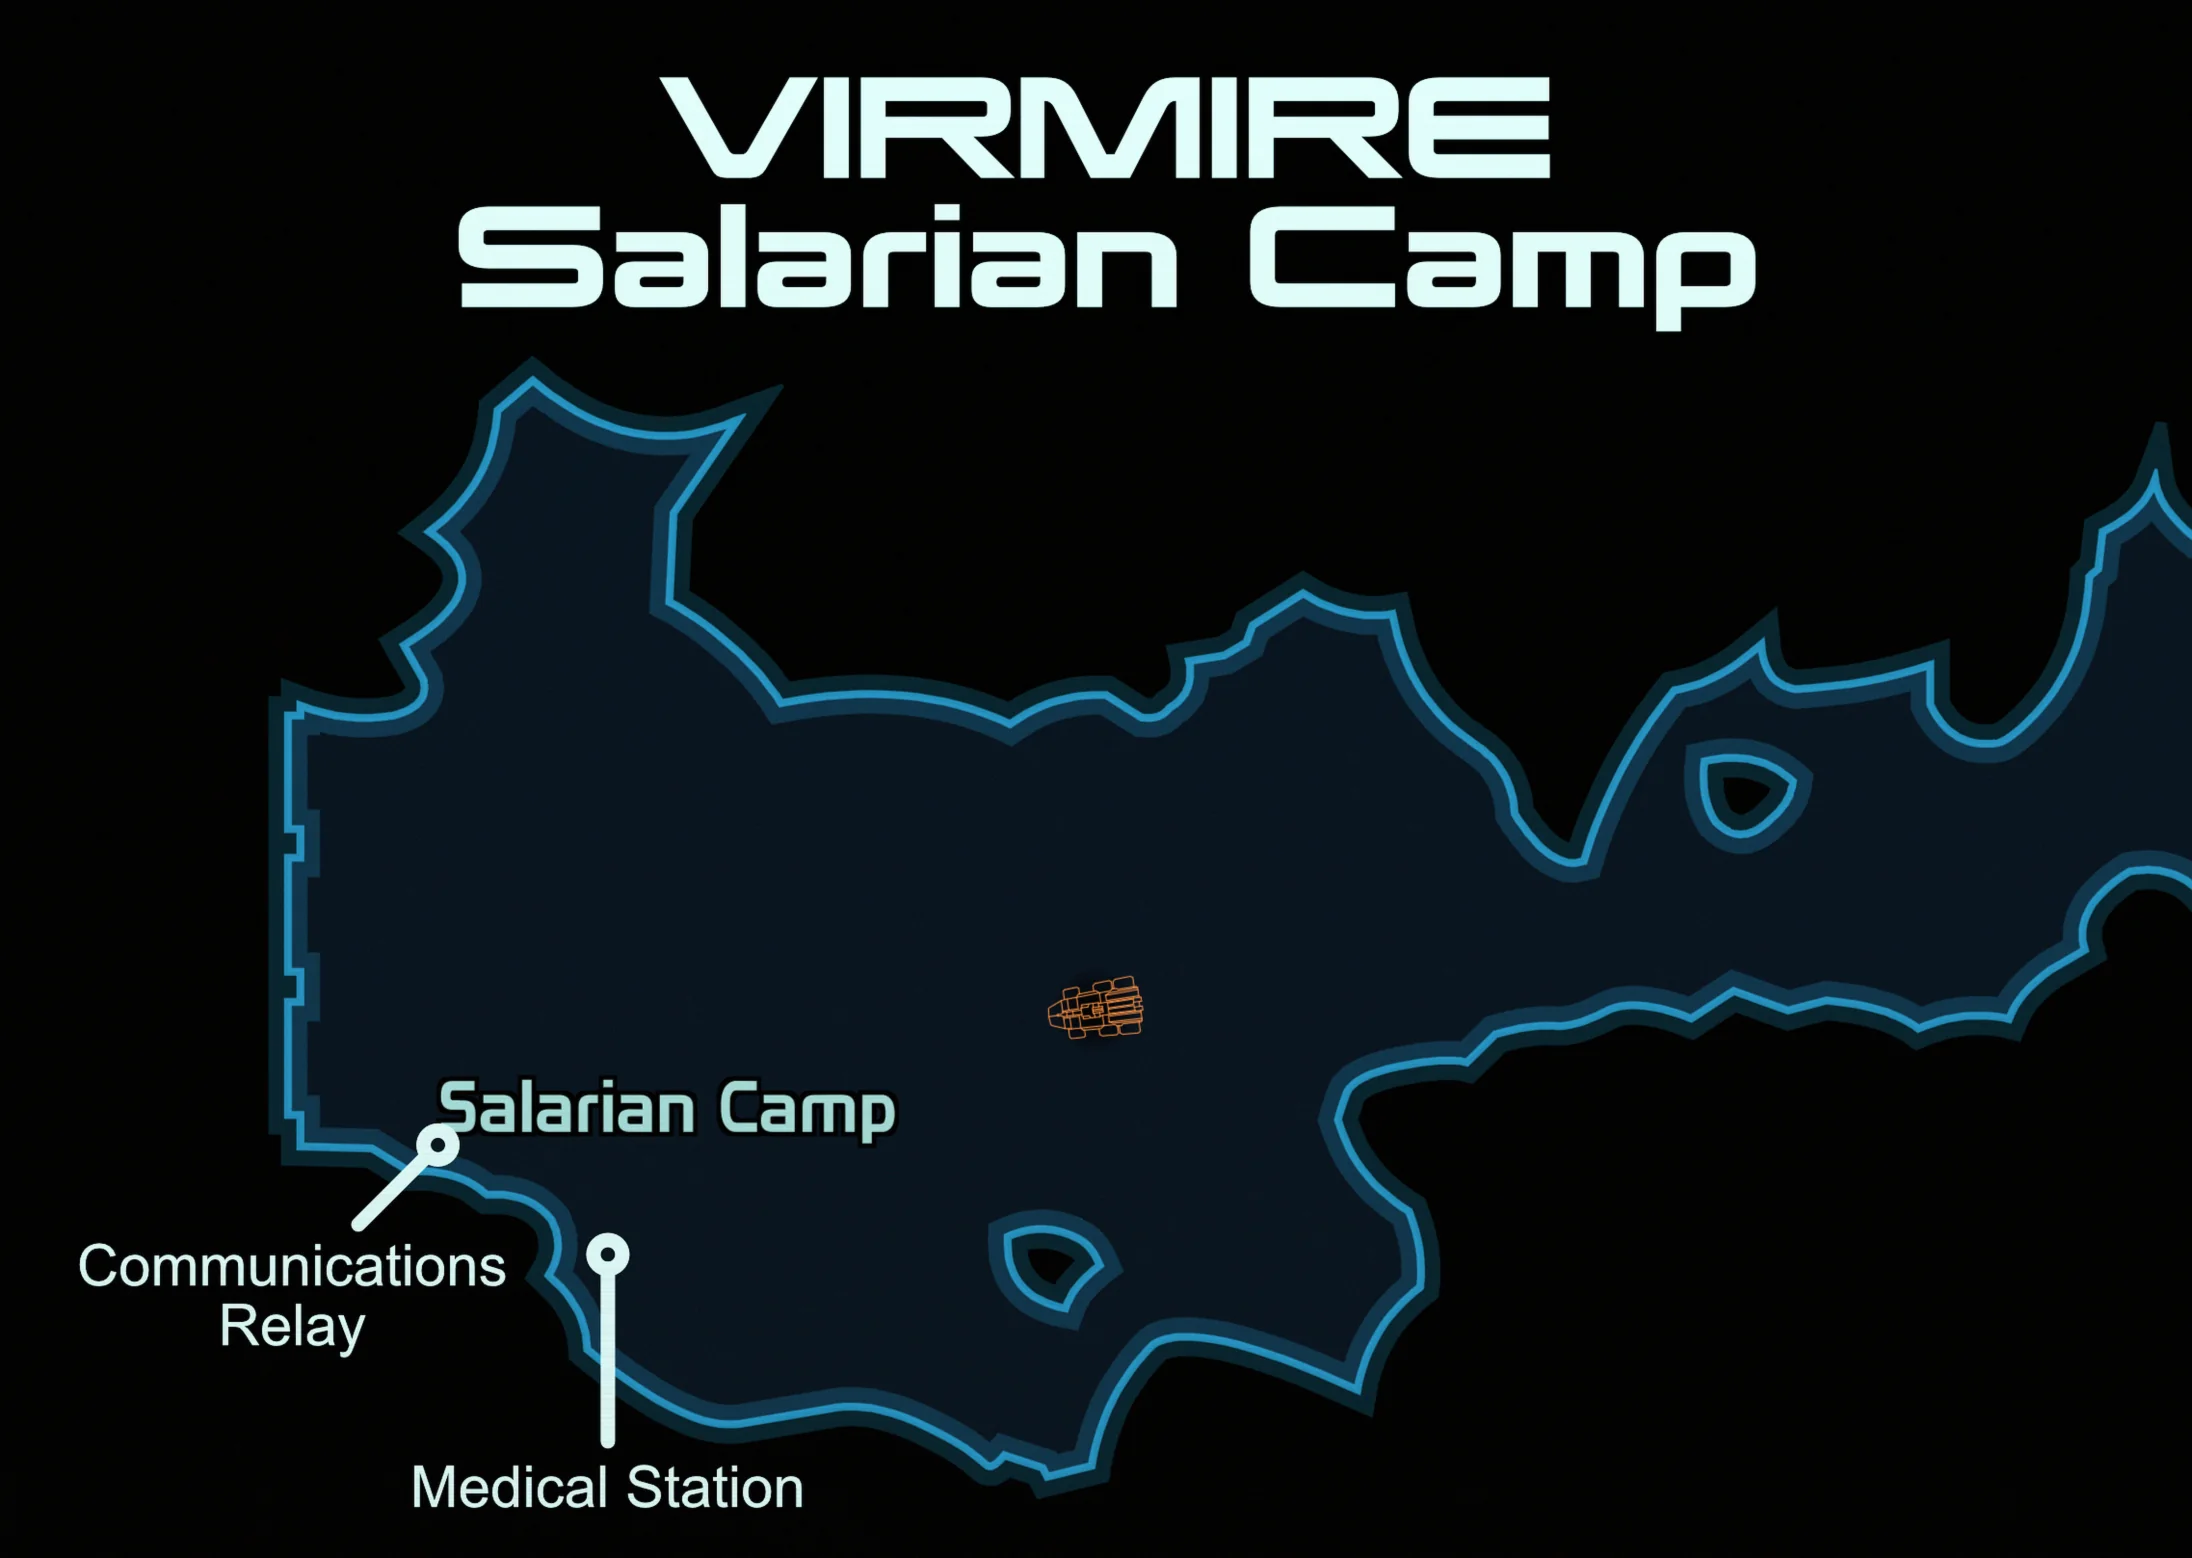
Prepare for the Assault
After you finish dealing with Wrex, head into the nearby camp and look around for items that can grant codex entries you may not have collected yet. The catch is that, unless you’re playing as an Engineer, Sentinel, or Infiltrator, you won’t be able to crack those items. The game treats you as having no squad members at this point, so your access to certain interactable containers is limited.
- Communications Relay (Easy Decryption): Found inside the western-most tent. This location provides a codex entry plus XP.
- Medical Station (Easy Decryption): Located inside the eastern-most tent, where Commander Rentola is stationed.
Commander Rentola, in that eastern-most tent, is the place where you can buy and sell items from your inventory. It’s worth using him here because Virmire’s assault is among the longer sequences in the game.
If you didn’t obtain the Armali Council License during the persuasion moments at the end of UNC: Asari Diplomacy, you can still purchase it from Rentola now.
Next, talk to Kirrahe in the middle tent. He’s preparing to use his ship’s drive core like a nuclear device, but it has to be placed at a precise location inside the enemy base. His plan is to have his own people act as a distraction while you move inward, clear space, and enable the Normandy to plant the bomb.
Kirrahe also needs a coordinator for his team, and your choice comes down to either Kaidan or Ashley. After Kirrahe finishes his speech, you’ll be asked to select your squad for the infiltration. For the mission to go smoothly, you’ll want at least one squad member who can handle both Decryption and Electronics.
Recommended Squad
- Squad Tactics:
- You’ll be fighting nearly every toughest Krogan and Geth enemy you’ve faced up to this point, so Wrex and Tali are strong picks. If Wrex isn’t available, you can use Ashley as a substitute.
- You’ll be fighting practically every strongest Krogan and Geth enemy you’ve met at this point, so Wrex and Tali are great choices. Wrex can be substituted with Ashley if he’s unavailable.
Infiltrate Saren’s Base
Once you’re on the move, Kirrahe hints that you’ll have chances to sabotage elements on your side. This is tied to the assignment Virmire: Assisting Kirrahe’s Team. While you’ll be rewarded with Paragon points for any of these actions, only one of them truly changes what happens to Kirrahe in the end. If you want all of the Paragon rewards, you must complete them in the correct order—doing them out of sequence means you’ll miss some Paragon points even if you return later.
From this point on, you’re also on foot. You no longer have the Mako, so fighting gets slower and more careful. You can’t absorb damage the way you did in vehicle combat, so keep your movement deliberate and your pressure steady as you push through enemy installations.
As you travel north from the start, expect resistance from a Communications Tower. Clear out the Geth here using your usual tactics, and take cover behind rocks or other debris while enemies on the northern installation line up shots.
- Weapon Locker (Easy Decryption): Inside the Communications Tower, at the southwestern end, positioned near a column.
After the enemies are down, go into the building to help Kirrahe’s side more directly. Search for the Triangulation Tower and Disrupt it. Doing so grants +2 Paragon Points.
Leave the outpost and head west. Like the earlier vehicle segment, the route will split and then rejoin. Take both paths as you progress: go down one side, backtrack to the other, and continue west from there. This approach helps you earn XP from enemies you might otherwise skip, and it also reduces the chance of being ambushed by enemies you didn’t clear earlier.
Westward combat takes place in another building—this time the Sattelite Uplink Tower area. Expect Krogan to mix in with Geth forces here, and because those enemies are tougher and more resilient, the fight tempo ramps up.
- Aid Station: Located on the side of the column at the eastern edge of the Satellite Uplink Tower.
Cross the western bridge and reach an intersection. For now, go left (south) toward a platform guarded by two Krogan. Eliminate them, then search the area for loot:
- Crate: On the southern side of the round platform guarded by the two Krogan.
- Upgrade Kit: From the walkway intersection directly west of the Satellite Uplink Tower, head northwest up the rocky tunnel slope; it’s at the top.
Now return to the task of assisting Kirrahe’s team. From that same walkway intersection directly west of the Satellite Uplink Tower, move north. The long walkway ends at a Refueling Platform guarded by Geth Assault and Rocket Drones. Prioritize the drones—destroying them grants +8 Paragon Points.
After that, continue along the path. It leads back south into the next western area, where strong Krogan and Geth wait at the Research Facility balcony. Clear them out quickly when you can, using cover as needed. When the area is secure, look for the following loot:
- Storage Locker (Easy Decryption): On the northern-most wall of the base entrance balcony, close to the doorway you use to enter.
- Crate: At the southern end of the base entrance balcony. Walk to the south side to find the Crate.
You now have two ways to get into Saren’s base. The most straightforward entry is a door on the northern side of the balcony, but it prevents you from backtracking all the way to the south entrance. The other option is a hidden route under the southern edge of the balcony, which requires Easy Decryption. Taking the hidden entrance lets you backtrack to the northern entrance and explore the whole base.
To use the hidden entrance, find the gap in the balcony railing at the south end. Walk down the sand bank, angle right around the rock to get underneath the balcony, then locate the hidden doorway and open it with Decryption.
Make your way through the Sewers and into a Maintenance Bay with Indoctrinated Salarians. These enemies are comparatively simple: they don’t bring serious firepower, and their health is low. They aren’t a major threat compared to the Krogan and heavy Geth encounters elsewhere.
- Upgrade Kit: In the Maintenance Bay with the Indoctrinated Salarians, on the ridge in the middle of the shallow water pool.
In the upper area, there’s a door leading to a Security Console. Using it lets you access Base Security. This is the final stage of the Assisting Kirrahe’s Team side quest, but like the earlier two phases, it only rewards Paragon points and doesn’t change Kirrahe’s actual fate.
- Select “They’ve got enough trouble” for +2 Paragon Points. This increases the number of enemies you’ll face inside the base, which can mean more XP, credits, and loot.
- Select “They can handle it” for +9 Renegade Points, reducing the enemy count inside the base.
Proceed through the door into a room with a stairwell. Before you climb, check behind the stairs for:
- Crates x4: Behind the stairs that lead from the Maintenance Bay to the Storage Room.
Head upstairs into the Storage Room and deal with two more Indoctrinated Salarians. They should fall quickly.
- Aid Station: To the left of the exit door.
Going up the next stairs takes you to Cell Block B, where you can examine prisoners. Most of the Salarians here are delirious, but the middle prisoner can be spoken to. You’ll need to decide whether to release him or leave him behind in the cell.
- Choose “All right. Let him out” for +8 Paragon Points. This also frees the Salarians in the other cells.
- Choose either “No” or “Sorry. I can’t risk it” to keep him locked up for +2 Renegade Points.
Leave the room by going back downstairs out the north side to the Security Office. Expect two additional Indoctrinated Salarians to be waiting there. This room is also where the two base routes converge again.
- Crate: On the wall directly opposite the southwest stairs of the Security Office.
- Hardened Weapon Locker (Hard Decryption): Next to the Crate described above.
At this stage, you can move in three different directions:
- The central elevator continues down the main route, so ignore it for now.
- The northern door leads to the other path into the base.
- The northwestern door goes downstairs to Cell Block A for additional opportunities to earn Morality points.
Start by going through the door heading north. You’ll cross a walkway overlooking Cell Block A and hear a Salarian call out to you, but you should ignore him for now and take the door on the opposite side.
Inside, open the door to your right into the Maintenance area, then retreat immediately. A Geth Juggernaut is waiting here in addition to Shock Troopers and Indoctrinated Salarians.
Hold position in the corridor and let the enemies come through the doorway. Once they’re dealt with, move into the Maintenance room, descend the ramp at the far end, and enter the Warehouse space. You’ll encounter and eliminate two Geth Destroyers plus two more Indoctrinated.
- Aid Station: On the wall at the top of the ramp that connects the Maintenance and Warehouse areas.
At this point, you’ve fought and looted everything on both routes.
Return to the Security Office and take the door to your right. Go outside, descend the stairs, and then head back inside to Cell Block A. Here, you’ll find another Salarian captive to talk to. This one looks far more coherent than the earlier prisoner.
- Pick “I think I can trust you,” then choose “I’m letting you out” for +2 Paragon Points.
- Pick “I can’t trust you,” then choose “Too risky” for +9 Renegade Points.
- You can still release him afterward, after the choice above, letting you earn both Paragon and Renegade points.
- You can however then let him out after the above, letting you get both the Paragon and Renegade points!).
After the conversation, inspect the cell to the right and decide the fate of the delirious occupants.
- Choose “They’re no threat” for +2 Paragon Points.
- Choose either “Open the door and kill them” or “Eliminate them” for +2 Renegade Points (and you’ll also gain XP from killing them).
When that’s complete, head back to the Security Office and take the elevator for the next part of the base. This brings you to the Genophage Labs.
- Before anything happens, investigate the Stasis Console on your right to grab a codex entry.
Fighting starts quickly against Husks and a group of scientists. Once the threats are eliminated, scan the area for additional loot:
- Wetware Kit: On the table on the northern side of the elevator shaft you entered through.
- Upgrade Kit: On the same table as the Wetware Kit.
- Medical Station: On the northern wall of the Genophage Labs.
Once you’ve cleared the Labs, exit westward through the door into an adjacent catwalk. You can run along the linear walkway and arrive at a new building, where you’ll fight another wave of enemies as you go. Remember this route, because you’ll be coming back later and taking a different path forward.
As you push into another Security Office, you’ll meet Rana Thanoptis. She explains what’s happened to the Salarians—indoctrination. This is a concept that matters a great deal for Mass Effect’s broader story, so pay attention.
After the conversation, you’ll determine Rana’s fate:
- Choose “You’re free” or “Get out of here” to give her a chance to escape, with no Morality points awarded.
- Choose “You deserve to die,” then “Too late” to kill her for +9 Renegade Points.
Afterward, pick up a nearby loot item:
- Secure Weapon Locker (Average Decryption): On the wall to the left of the southern exit door.
No matter how you handle Rana, she will open the southern door for you first. Step through, go outside, and then back inside to an elevator that takes you up to the Communications Tower. There you can find a Prothean Beacon similar to the one on Eden Prime. Head down the ramp to complete the missing pieces of Shepard’s vision, and then—right as you prepare to leave—you’ll face a powerful enemy in person.
Disable AA Guns
With the new information in hand, it’s time to backtrack. Return all the way to Rana’s Security Office, go out the door, and eliminate a Geth Destroyer along the way. After leaving Rana’s office, the route changes: you can’t go back the same way and must continue forward along the long walkway. There are three Krogan here—if you’re comfortable with sniping, remove them from a distance—then take the far-end door.
Eventually you’ll reach a new section called the Virmire Base Main Level. As soon as you step outside, look to the right for a lower side area where you can grab loot:
- Crate: Tucked into the corner of the southern steps down into the side area.
- Secure Crate (Average Decryption): Next to the crate described above.
- Locked Crate (Average Electronics): Across from the first crate, tucked into the corner of the northern steps in that same side area.
As you round the curved ramp, you’ll deal with another Krogan, Geth Stalkers, and three Geth Rocket Drones around the corner. After clearing the area, look for these loot items:
- Technician Kit: On the northern balcony overlooking the sea, tucked into the corner of the middle steps.
- Secure Crate (Average Decryption): Next to the Technician Kit.
- Supply Container: On the wall to the left of the Turret Controls you’re meant to deactivate.
- Secure Weapon Locker (Average Decryption): On the left-hand wall of the elevator that leads to the next area. This one is very easy to miss.
Now find the Turret Controls and deactivate them. This lets the Normandy slide in and deliver the makeshift bomb. Be cautious afterward: you’ll be attacked by enemies entering from the right of the elevator, plus Geth that are already inside the elevator itself.
After you clear everyone out, take the elevator down to the Breeding Ground.
- Aid Station: On the wall directly ahead when you exit the elevator.
From the Aid Station, round the corner to enter the Breeding Trench. Move quickly and eliminate the Geth Stalkers first—they’ll try to strip away your health and shields with accurate sniping.
NOTICE
Because of story progression, the Door Control at the end is the final chance to manually save on Virmire. If you tend to hesitate, make a save NOW.
Provide Backup
Once you go through the large door, the Normandy arrives and your spare human squad mate helps plant the bomb. Unfortunately, Kirrahe’s team is getting hit hard and needs backup immediately. Since it takes time to arm the bomb, you get a window to run over and stabilize the situation.
Choose your squad again—remember to bring someone who can handle Decryption if Shepard can’t do it—then go through the other large door on your right as you regain control of Shepard.
This next Breeding Trench section features Geth and Krogan. Find a safe position, clear the enemies, and then push to the other side. Ride the elevator upward. There’s a small ramp on your left, and before you go up it, grab another loot item:
- Crate: To the right of the ramp leading up to the balcony.
The next part of the guide contains major spoilers. If you haven’t reached this point in the level yet, stop reading here.
As soon as you head up the ramp, a Geth Dropship lands at the bomb site. At that moment, both human squad mates are under heavy fire, and your attention is required immediately. You’ll have to make a brutal choice: who you rush to save, and who you leave behind to be killed by the bomb.
Where each person ends up depends on who you assigned to Kirrahe’s team. If you chose Ashley, she will be at the AA Tower while Kaidan is at the bomb location. If you picked Kaidan, he’s at the AA Tower and Ashley is at the bomb site. In the end, the decision is mostly cosmetic.
However, if you followed the guide’s earlier suggestion, your preferred human squad mate should be with Kirrahe’s group at the AA Tower.
The reason for this is practical, even if it’s a little petty: returning to the bomb site means more backtracking, and that AA Tower route includes a Hardened Locker with loot and XP. The AA Tower also gives significantly better cover than the bomb site.
Who you rescue and who you leave behind won’t grant Morality points because the situation is effectively a catch-22. What matters is your response after you make the choice:
- Pick “I’m sorry” for +2 Paragon Points.
- Pick “Of course it was” for +2 Renegade Points.
If you choose to save the human squad mate at the bomb site, you must go back down the elevator and run through the second Breeding Trench again. Since you’ve already done that route, there’s nothing new to note.
If instead you save the squad mate at the AA Tower, you’ll press through the door on your left. There aren’t enemies along this section, but you can still find loot once inside:
- Hardened Weapons Locker (Hard Decryption): Tucked around the corner of the steps you walk down after entering through the door.
- Aid Station: On the wall directly across from the elevator that leads to the AA Tower.
No matter which path you take, you’ll enter a tense firefight where you must clear Geth to protect your squad mate. The AA Tower and the bomb site have similar layouts, but the AA Tower offers more cover to compensate for the fact that you enter it facing the wrong direction.
After you eliminate all Geth, Saren arrives and you’ll get a crucial conversation. He reveals that he’s worried Sovereign will influence his thoughts, despite his attempt to play strategically and avoid that control.
- Eventually, the dialogue wheel’s upper-right option will show either “It’s already happened!” or, if you used Investigate options earlier, “You are indoctrinated.” Choosing one of those unlocks two Persuasion options:
- If you have 7 Charm, select “Join me” to gain +2 Paragon Points.
- If you have 7 Intimidate, select “Sovereign will betray you” to gain +2 Renegade Points.
- Skipping those options means Shepard fails to unnerve Saren’s loyalty to Sovereign.
- If you have 7 Charm, you can pick “Join me” for +2 Paragon Points.
- If you have 7 Intimidate, you can pick “Sovereign will betray you” for +2 Renegade Points.
- Ignoring the above two options will mean Shepard fails to unnerve Saren’s loyalty to Sovereign.
Once the conversation ends, you’ll fight Saren for real. The battle itself isn’t especially difficult. When he takes enough damage, he retreats to safety. Still, between the new information you’ve gathered and the growing sense that you’re nearing answers about Protheans, Reapers, Sovereign, and Saren himself, you’ll carry your chosen human squad mate back to the Normandy and leave the other behind.
Back on the Normandy
After the mission, the Normandy gets an aftermath cutscene where you explain your decision to your Virmire Survivor. If you have Liara and completed Feros—something this walkthrough implies you’ve done in order—Liara merges her mind with Shepard’s again. She can then see the full vision, and it reveals that the Conduit is on Ilos.
If you choose to report to the Council, you can earn more Morality points based on what you say:
- Say “You need proof?” for +2 Paragon Points.
- Say “Screw you!” for +2 Renegade Points.
- After that, you can also say “You have to trust me” for +2 Paragon Points.
- Interestingly, you can then say “You have to trust me” for +2 Paragon Points.
At this point, you can talk with Joker, your Virmire Survivor, and Liara (if you have her) about what happened. If you didn’t kill Wrex at the Salarian camp, you’ll also be able to discuss it with him.
The Salarian STG team will be on the Normandy in the Cargo Bay. If you destroyed the Geth Flyers at the fuel tanks, then Captain Kirrahe will be among them as well. If you still need it, you can visit Commander Rentola and browse his wares—this is your last opportunity to get the Armali Council License if you don’t already own it.
If you want more Mass Effect support, the guide points you toward additional pages covering Legendary Edition changes, how-to guides, key choice and consequence explanations, romance options, walkthroughs, and side quests.
Up Next: How to Save Kirrahe
Top Guide Sections
- Legendary Edition Changes
- Basics
- Tips and Tricks
- How-To Guides


