Star Fox 64 Hard Route Guide: Unlock Every Step to Venom vs Star Wolf
Want the full, end-to-end “hard route” run in Star Fox 64? This walkthrough-style guide lays out exactly how to chain levels together, what to clear to unlock the next step, and how to handle the tougher fights—culminating in the hard version of Venom against Team Star Wolf.
Release & edition notes
This guide is built for the original Nintendo 64 release of Star Fox 64. Most strategies carry over if you’re playing a similar version, but the layout and checkpoints are written with the N64 game in mind.
If you’re searching for Star Fox for Nintendo Switch 2, the strategy set here is still for the N64 title—but there is also an updated walkthrough for a new 2026 Star Fox. That newer guide covers additional alternate paths, an updated medal tracking approach, Challenge Mode trackers, and steps for earning the True Ending.
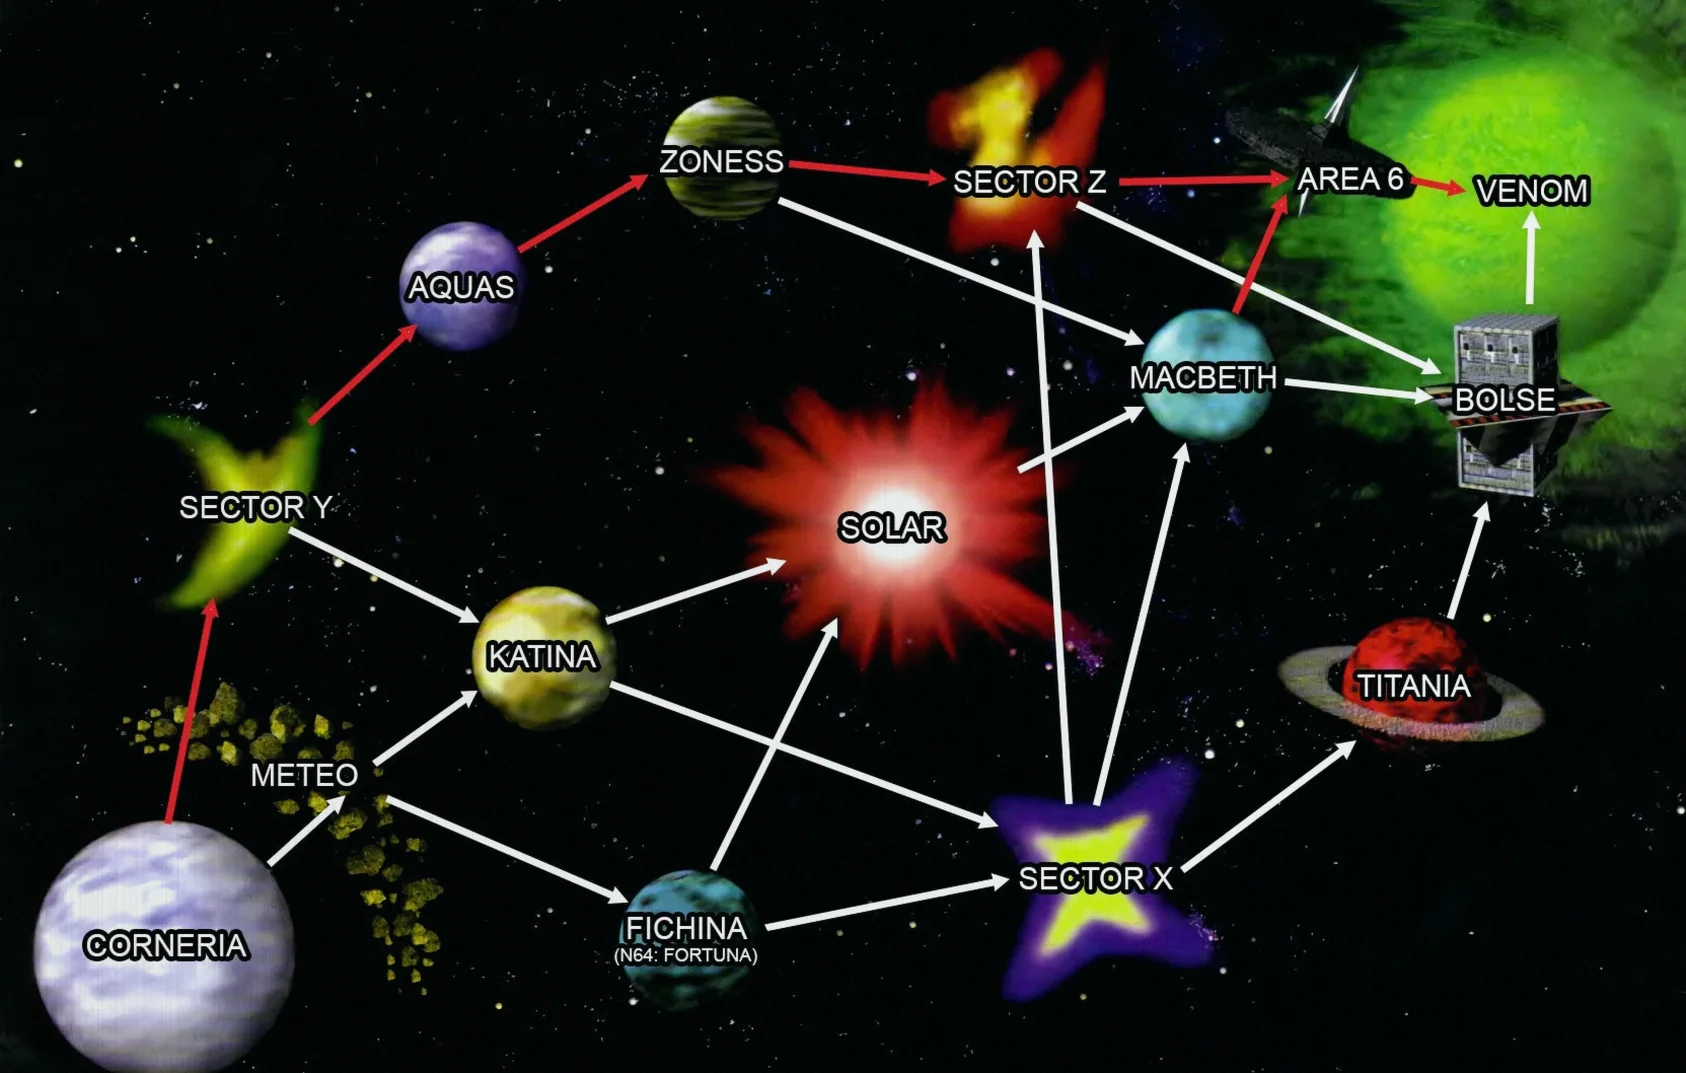
Star Fox 64 Hard Route
Unlike the medium route, the hard route gives you a specific beginning-to-finish path you can follow. Starting from Corneria, take the alternate exit by going down the Attack Carrier to reach Sector Y. From there, proceed to Aquas, then Zoness, continue to Sector Z, move on to Area 6, and finish with an alternate battle on Venom (labeled in this guide as Venom II).
If you want to avoid Sector Z, there’s another option: take the easier exit from Zoness by failing the searchlight challenge, then re-route to Area 6 from Macbeth. You can follow the mini-walkthrough in this article, or jump into deeper walkthrough sections for each stage.
Corneria
Every Star Fox 64 run begins on Corneria under attack, and the game quickly tests whether you’re willing to commit to the hard route. This is the first challenge point. After the checkpoint, boost forward to catch up with and destroy the three enemy aircrafts tailing Falco.
Not long after, you’ll reach a stretch of water lined with stone arches. Fly through all seven arches without missing any. Midway through, Falco will comment on your piloting. After you clear the final arch successfully, he leads you into the secret route through the waterfall and into an alternate boss encounter.
To deal with the carrier, shoot the weak points on the side attachments so they explode and break off, then fire on the remaining ship.
Full Walkthrough: Corneria
Sector Y
To stay on the hard path, Aquas is your next target. The requirement is straightforward: earn 100 or more kills in Sector Y.
Here you face a group of Shogun warriors who fly around in open space and throw potshots at you. Use the radar to locate them, boost in hard, then swing around into a looping attack. From there, fire using lock-on alongside standard laser shots. Be careful with their ramming attempts, then repeat your attack runs as needed.
Full Walkthrough: Sector Y
Aquas
Once you land on Aquas, you get your first chance to pilot Slippy’s new invention, the Blue-Marine.
The Blue-Marine plays differently from the Arwing: you can’t charge your laser, but you do have unlimited torpedoes. Use them frequently. For pickups, shoot clam shells. The giant clam boss, Bacoon, is defeated by targeting its muscles and then its eye. There isn’t a separate objective—your job is simply to reach Zoness by pushing through Aquas and bringing down the boss.
Zoness
In Zoness, progression depends on destroying the radar buoys. You’ll need to move fast and watch the spotlights ahead. If you miss even one, you’ll get detected and forced to either abandon the hard route or restart the level.
This is also where you meet Katt, a flirty cat with her eyes on Falco. Keep her around, and she’ll help you take out the lights that threaten your stealth timing.
Sector Z
Sector Z has the Great Fox under attack. That ship is the home base for Fox and the crew, so you’ll need to keep it from taking damage if you want to reach Venom. Throughout the stage, missiles will be launched at it—your job is to stop those threats before they land.
The missile pattern ramps up. First, there’s just one missile to destroy. After that comes two, and then finally three. Since you’re coming from Zoness, Katt should be nearby to assist you in keeping the Great Fox safe.
If you clear the level without letting a single missile get through, you’ll unlock the hard version of Venom—which this guide refers to as Venom II.
Full Walkthrough: Sector Z
Area 6
Coming into Area 6, Team Fox doesn’t get the element of surprise. This area is packed with dangerous enemies like Umbra Class Stations, Frigates, Cruisers, and more. Keep an eye on your shields as you thread the approach through the hazards.
You’ll also face saucer-shaped Umbra Class Stations that may look tough enough to shrug off your shots, but they can be destroyed. Fire rapidly until you see a +3 hit bonus appear—at that moment, they’re taken down.
There’s only one exit and one route forward, but you can’t reach it without defeating the stage’s cloaking boss, Gorgon. Break it down by shooting its robotic arms and energy orbs until it becomes vulnerable.
Venom II
If you followed the hard route, Venom II pits you against Team Star Wolf. These enemies are more advanced than what you’ve faced so far, so stay sharp. Use u-turns and somersaults to shake off their pursuit when they lock onto your tail. Also keep track of your teammates—if you aren’t careful, they can get taken out.
To win, you need to master the loop maneuver first, with the U-Turn serving as a helpful tool as well. If you still have a bomb saved for this level, use it early: when Team Star Wolf first appears above the center structure, shoot it immediately. This should strip away roughly a third of their health before the main fight begins.
After that, use a lure-and-punish rhythm. Let an enemy follow you and draw closer; once they start firing, barrel roll, then loop over and behind them so you can land a few shots each time.
Also look out for allies being chased and help them when you can. Practice is key here—once you start landing consistent damage, the flow of the fight becomes clearer. Keep this in mind: if someone is tailing you, loop quickly, or you’ll lose a lot of health fast.
The opening Andross boss phase matches the easy route. Shoot his eyes, then aim at his hands and remove them as quickly as possible. His attack pattern goes like this: one hand swings twice, the other swings once, then he claps. After the clap, he begins a vacuum breath. If you saved bombs, use one by firing it into his mouth. Then pull back and blast his hands while he’s “munching” on it. Once he turns red and smoke steams from his ears, you’ll want to shoot him again.
Stay on the upper left or upper right side of the screen after that, because he’ll attempt to suck you into his mouth again. Your brake meter appears in the upper-right area of the screen and indicates how much power you have. It will refill slowly after it runs out. With roughly three bombs into his mouth and plenty of gunfire, he should be finished.
Before you can go after the brain, you must destroy the floating eyes first. They chase you and can follow with a moderate level of stealth. Let them trail you, then when they begin shooting, loop around behind them and blast them. Clearing them grants you five-plus hit points each time.
Once the eyes are gone, it’s time for the brain. This phase punishes mistakes—stay far away, because when it sucks you into its spaghetti-like ganglia, it can steal more than one-third of your shield each time. The medulla oblongata—the green back section—is the area you need to aim at.
However, the brain protects that section by disappearing and dropping small mines whenever you miss a shot and hit the main brain. The bigger risk isn’t the mines themselves—it’s getting into position to reach its rear side and fire at the green area.
Let the brain track you, then perform a U-Turn over it. Watch the map to see which direction it turns. In more than 70% of cases, it will simply reverse and be back on your tail immediately. In the remaining 30%, it makes a slightly broader turn—this is when you must strike.
Whichever way it turns, go the opposite direction: if it turns left, turn left as well (since you’re facing the other way after the U-Turn); if it turns right, turn right. Repeat this maneuver about two to three times, and you’ll be on the home stretch.
In practice, the guide notes that simple laser shots tend to work best here, though bombs can also work if you aim them perfectly.
In the final segment, a familiar-looking fox wearing glasses appears and tells you to follow him. Stay close and use your acceleration as he guides you through the corridors outside the enemy hub. One wrong turn means you’ll have to restart. When you finally reach the opening, you’ve beaten the game.
Full Walkthrough: Venom II
Up Next: Corneria
Top Guide Sections
- Tips and Beginner’s Guide
- Medal Tracker
- Walkthrough
- Boss Fights Guide


