Mass Effect 3 Omega Aria T’Loak Walkthrough: Paths, Enemies, and Key Choices
The Omega DLC mission “Omega: Aria T’Loak” is a long, branching gauntlet of combat, infiltration, and hard choices, and it’s one of the few Mass Effect 3 add-ons that essentially locks you in once you start. If you’re working through the mission line now, this walkthrough-style guide section breaks down where to go, what enemies to expect, and which upgrades and dialogue options matter most for clearing encounters efficiently.
Checklists and the Mission’s “Can’t Quit” Warning
This portion of the mission guide focuses on the primary Omega: Aria T’Loak objective chain—where the key items are found, how to handle every fight you’ll run into, and how to steer your playthrough using the right decisions.
WARNING
Unlike the Leviathan and Citadel DLCs, once you begin this Mission you’re committed: you can only step away by completing the DLC.
Looking for something specific? Click the links below to jump to…
- Mission Stats
- The Invasion of Omega
- Talon Territory
- The Mines
- The Assault on Afterlife
- Back on the Normandy
What You Can Earn: Rewards, Enemies, and Travel Setup
Mission Rewards
- Mission Experience:
- Reputation: +15
- Mission Credits: 15,000 credits
- Found Credits:
- Weapons:
- Chakram Launcher
- N7 Valkyrie
- Phaeston (if not acquired in “Tuchanka: Turian Platoon”)
- Mods:
- Assault Rifle High-Velocity Barrel x3
- Pistol Heavy Barrel x3
- Shotgun High-Velocity Barrel x3
- Shotgun Omni-Blade x3
- Sniper Rifle Thermal Scope x3
- War Assets:
- Omega Eezo Hoard (300 TMS)
- Omega Raiding Fleet (75 TMS)
- Tap to Reveal (30 TMS) / +30 TMS to Alliance First Fleet
Mission Enemies
- Adjutant
- Assault Trooper
- Atlas
- Centurion
- Combat Engineer
- Guardian
- Nemesis
- Phantom
- Rampart Mech
- Turret
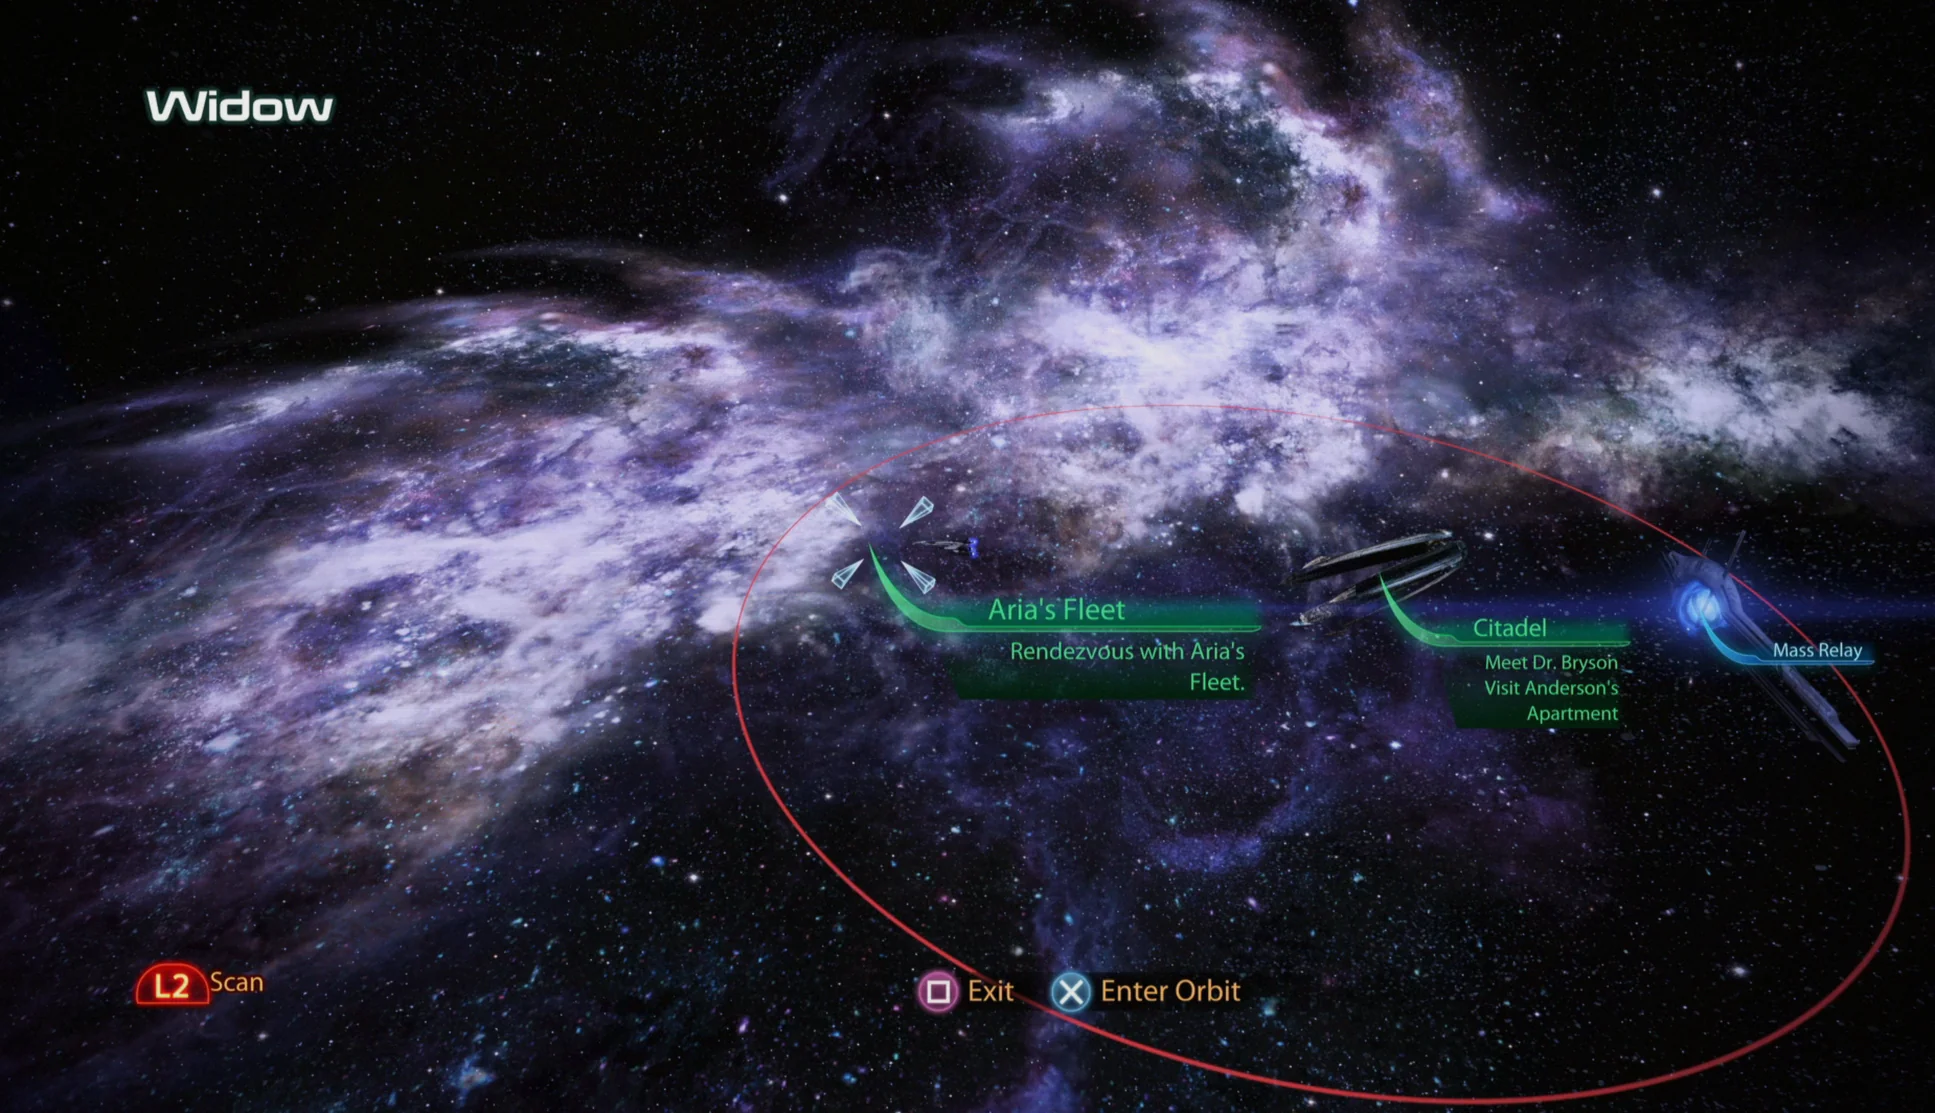
Travel to Widow
- Prerequisite: Complete “Citadel: Aria T’Loak”.
- Location: Serpent Nebula – Widow – Aria’s Fleet
The Omega DLC doesn’t unlock the Omega Nebula cluster on the Galaxy Map. Instead, you begin by traveling to the Widow system inside the Serpent Nebula. If you completed the “Citadel: Aria T’Loak” lead-in, you’ll find Aria’s Fleet positioned to the west of the Citadel—rendezvous with it to start the DLC in earnest.
Recommended Loadout
As established in “Citadel: Aria T’Loak”, Shepard doesn’t bring their usual squadmates into this mission. As a result, the focus here is on Aria’s setup and Shepard’s loadout to cover the DLC’s recurring threats.
- Squad Tactics:
- Upgrade Aria’s Lash to Level 6 and select “Shield Penetration”. This version bypasses Shields and Barriers and strips the metal defenses that Guardians rely on.
- Upgrade Aria’s Flare to Level 6 and choose “Improved Damage”, which boosts damage to Shields and Barriers by 75%.
- Shepard’s Loadout:
- Shield-breaking options are limited in the Omega DLC, so if possible develop Disruptor Ammo, Energy Drain, and/or Overload so Shepard can handle that job independently.
- Piercing, Shredder, or High Velocity mods, plus the Venom Shotgun, help against the many Guardians you’ll fight.
- The Sniper Rifle Enhanced Scope is useful for spotting through the smoke bombs used by Centurions and Atlas mechs.
- Throughout the DLC you’ll pick up Sniper Rifle Thermal Scopes, which reveal targets through smoke bombs and even through walls.
- If you also have the Citadel DLC, an Assault Rifle Thermal Scope can similarly see through smoke bombs and walls.
Why the Early Mission Structure Matters: Defense, Morality, and Loadout Checks
Rendezvous with Aria’s Fleet
Shepard arrives on Aria’s captured Cerberus cruiser. Aria quickly lays out the plan: pose as an allied vessel, hit Omega with a surprise strike, then summon the rest of the fleets. There are Morality Points tied to the opening exchange.
- Choose “It sounds risky” for +2 Paragon Points.
- Choose “I like it” for +2 Renegade Points.
No matter which option you take, Aria ends the conversation with a line that lands as particularly funny if you already know how Mass Effect 3’s ending plays out.
Aria initiates the attack, but before it goes too far, they’re hailed by General Oleg Petrovsky. Aria reveals her “ace”—Shepard—and Petrovsky says he’s heard good things about Shepard. You can respond with:
- “I can’t say the same” for +2 Paragon Points.
- “Not from your boss” for +2 Renegade Points.
After more discussion, Aria explains she intends to infiltrate Omega by ramming it. Petrovsky’s threats turn out to be real: Omega’s new laser cannons quickly destroy the cruiser. Unlike a previous ship loss, Shepard manages to reach the escape pod and reach Omega.
Secure Defense System Station
With the ramming plan a failure, your next job is to manually reach the Defense System Station and shut down Omega’s outer defenses before Aria’s fleet gets wiped out. Aria tells Shepard that in combat, the chain of command is theirs to follow—and you answer with:
- “Why am I skeptical?” for +2 Paragon Points.
- “Glad to hear it” for +2 Renegade Points.
Your first push is into Hangar Bay 28, where you fight the first wave of Cerberus troops. The area includes cover that benefits both sides: you’ll face Assault Troopers and Centurions inside.
After the hangar fight ends, Aria positions herself near the far end of the bay. Here’s your first loot from the DLC:
- Med Kit x2 – 50 XP each. Both kits are just in front of where Aria sets up, near tire channels on the left and right edges of the hangar.
In front of Aria you’ll find Blast Door Controls. Use them to lower the next blast door, then take cover—there’s a Centurion and a Guardian on opposite sides. This is a good spot to use Aria’s Lash. If it’s upgraded to Level 6 with “Shield Penetration,” it rips the Guardian’s shield away.
Once both enemies are down, move along the right-hand side of the fighter launcher track toward the exit, but first collect two items:
- Tools – 3,000 credits. On top of a crate beside the Cerberus fighter’s wing.
- Assault Rifle High-Velocity Barrel – located where the guide notes “see above.”
Go through the door opposite the loot pile and use Elevator Controls. When you exit the elevator, turn left to reach a long hallway with storefronts on the right and a view to space on the left. Expect more Cerberus troops here, including two Combat Engineers—eliminate them immediately.
After killing them, head toward the back-right corner of the large room. Find the exit door, then examine it to re-pressurize the next space.
- Medical Station – 75 XP. To the right of the exit door.
This depressurization sequence triggers Cerberus reinforcements, including Centurions and a Nemesis sniper. Take cover and treat the Nemesis as a serious threat—don’t let yourself get caught in a crossfire. When all enemies fall, depressurization completes and you can proceed.
Go through the hallway with the burning escape pod. Bypass the door at the far end to reach the Defense System Station. Take cover on the left because more Cerberus troops arrive, including two Guardians and a Combat Engineer. Kill the engineer before he can set up a Turret, then clear the rest.
When the room is safe, use the Defense System Controls near the middle to disable the defenses. That enables Aria’s fleet to dock and unload its forces.
During the next exchange—when Aria explains the rendezvous details—Shepard spots a security camera. There’s a Renegade Interrupt to shoot it down. Paragon characters don’t gain Renegade Points here, but the guide notes it’s still a workable option. Either way, Petrovsky learns the rendezvous location and sends forces to eliminate it.
Before leaving, sweep the room for:
- Medical Station – 75 XP. From the Defense System Controls, turn away from the window and check the right-hand wall.
- Med Kit – 50 XP. In the back-left area, near the exit door.
Reaching the Rendezvous: Rampart Mechs and Mobile Threat Awareness
Reach the Rendezvous Point
Exit through the door and enter the right-hand elevator. Examine the Screen overhead if you want, then use Elevator Controls to move upward. As soon as you step out, grab:
- Wall Safe – 3,000 credits. On the left-hand wall immediately after leaving the elevator.
Ahead you’ll face Cerberus soldiers: three Troopers and a Centurion. Use cover, then wait for enemies to expose themselves.
When they’re eliminated, pass through the blue security scanner wall (no wait time), then use the Garage Door Controls on the right to open the door.
Outside, after Aria comments on Omega’s skyline, pay attention to the orange forcefield ahead—your first real introduction to how Omega’s hazards work.
In the meantime, collect:
- Tools – 1,500 credits. Salvage ahead near a Batarian corpse in front of a red skycar.
- Pistol Heavy Barrel – left of the Tools, at the back end of the red skycar.
- Control Screen – left of the Pistol Heavy Barrel. Interact multiple times to hear four different public announcements.
Find the doorway jammed with a crate to the left of the Control Screen and vault over it. Take cover because you’ll fight Guardians and a Centurion supported by a Shield Pylon that isn’t visible. Strip their Shields using Aria’s kit. Remember the hazard works both ways: the Shield Pylon also restores Shepard’s shields.
After the fight, grab loot:
- Med Kit – 50 XP. About halfway down the left lane, left of the first Shield Pylon.
- Graffiti – on a panel to the right as you exit the next elevator.
- Scrap Metal – 2,250 credits. Continue past the graffiti to the end of the hallway, just past the exit door on your left.
Drop down the side of the next walkway and watch one of Aria’s men get ambushed by Omega’s new enemy type: the Rampart Mech. Even if they look like modified LOKI mechs from Mass Effect 2, they’re far more dangerous here.
- Rampart Mechs can run, not just walk.
- They can move through Omega’s orange barriers, allowing ambushes from angles Shepard normally can’t reach.
- They use powerful Omniblades that punish close range.
- After you kill them, they dissolve into sparking, burning cinders that damage Shepard if walked over—similar in spirit to Ravagers.
So keep your distance and, after a kill, remember where it fell so you don’t take extra damage by stepping on the remnants.
As you approach the forcefield to help Aria investigate, collect:
- Med Kit – 50 XP. In the lower area in front of the orange forcefield where the Vorcha died.
- Shotgun High Velocity Barrel – follow Aria left to a Door Control panel that lets you vault into a store. Check the island counter on the right-hand side.
- Medical Station – 75 XP. In the back-left corner of the store Aria leads you into.
When Aria reveals a secret ladder inside the storefront, slide down to trigger a cutscene and meet one of Aria’s old friends—Nyreen Kandros. This meeting includes more Morality Points:
- When Nyreen says she’s been using Aria’s secret tunnels:
- Pick “You two must be close” for +2 Paragon Points.
- Pick “You’re getting sloppy, Aria” for +2 Renegade Points.
- When Aria offers to lead Nyreen to safety:
- Pick “You look capable” for +2 Paragon Points.
- Pick “Just try to keep up” for +2 Renegade Points.
Nyreen joins the squad after this, letting you upgrade her powers. Overload is a straightforward pick for shield stripping, but the guide also suggests placing it into Lift Grenades, since grenade pickups are plentiful across Omega. Biotic Protector is another strong option because it creates a bubble shield that stops damage and can even explode after its duration ends.
As you push forward, pick up more items:
- Scrap Metal – 3,000 credits. Right-hand side, around the middle of the dark room.
- N7 Valkyrie – on the floor toward the back of the dark room. This isn’t present in the base release if you own the N7 Warfare Gear DLC.
- Datapad – 2,250 credits. At the far back of the dark room on the bed of the yellow pickup truck.
N7 Valkyrie: Why It’s Useful Here
The N7 Valkyrie is a burst-fire weapon similar to the M-15 Vindicator. It fires two shots per burst, and each shot deals damage comparable to a single M-97 Viper sniper round. It’s heavier than the Viper, but it carries significantly more spare ammo. With a scope mod, it can function as a practical sniper rifle in its own right.
To continue, bypass the door in the back-left corner of the room. On the right-hand wall you’ll find a Weapon Bench where you can customize Nyreen’s loadout and apply any new mods you’ve collected.
Move right past the Weapon Bench into the tunnel, then turn right at the end. A ladder in the back-left corner brings you back up.
Mid-Mission Gameplay: Atlas Spawns, Bunker Morality, and Talon Territory
Defend Ground Team
At the top, you can use a View Prompt to spot an Atlas mech landing in the distance, supported immediately by a Shield Pylon. Aria asks why the cannons aren’t working. Bray explains something is jamming them, but first you’ll need to clear the area yourself.
- Medical Station – 75 XP. After climbing the ladder, turn left to spot the exit window you can vault through. Before jumping, check behind the fire on the left-hand side of the window to find a hidden Medical Station on the wall.
Besides the Atlas, multiple Rampart mechs roam around and there are two Centurions. Take cover and try to eliminate them from a distance whenever possible so you don’t get caught in the open. Destroy the Shield Pylon as well—it sits right under an enemy spawn point, meaning it helps your enemies far more than it helps you.
Once the initial wave is cleared, Bray informs you there’s a Cerberus Engineer in the area hacking the cannons. You’ll need to find and eliminate him, but more Cerberus forces arrive from the back-left and back-right balconies while you’re doing it.
KBABZ Tip: Engineer Last, Atlas First
The guide recommends killing the Combat Engineer last, because doing so triggers an Atlas mech spawn. The Combat Engineer stays back and doesn’t deploy Turrets, so clear everyone else first. That way, when the Atlas appears, you won’t have other enemies still shooting at you.
When you’re ready to hunt the Combat Engineer, locate him by either clicking R3 on consoles (pushing the right analog stick into the controller) or pressing the V key on PC. This marks him with a blue objective diamond. After the kill, take cover immediately—another Atlas mech drops in at the same location. If you can shoot out the glass and the pilot, you can commandeer the mech.
After destroying the second Atlas mech, sweep the area for:
- Med Kit – 50 XP. Right-hand side of the area, on an upper level between an orange forcefield and a Shield Pylon.
- Med Kit – 50 XP. Left-hand side. A storefront can be entered with a wide window you can vault through, flanked by two doorways. This kit is on the sill of the wide window.
- Medical Station – 75 XP. Close to the second Med Kit, on a column between the wide window and the left doorway.
Once you’re topped up and/or gained XP, use the Cannon Controls to finish the job, punish Cerberus, and enter the bunker.
Exploring Aria’s Bunker
During the arrival cutscene, Aria and Nyreen’s discussion offers Morality Point opportunities:
- Paragon – “I’m concerned too,” “We could use Nyreen’s help,” and “You better control yourself” (+6 Paragon Points total).
- Renegade – “Do you have another plan?”, “She could be a spy,” and “I won’t stand in your way” (+6 Renegade Points total).
With the talk finished, you can explore Aria’s Bunker, though it’s a fairly limited space. The guide calls out key points in the main control room:
- Near the back-left exit: a Weapon Bench and Armor Locker, which let you adjust Shepard’s gear. At the moment, Aria and Nyreen aren’t treated as squadmates.
- Near the Weapon Bench and Armor Locker: a Batarian in white agonizing over tech issues. Talking to him reveals he needs a Kehri Power Inverter for “Omega: Assist the Mechanic”.
- On the opposite side of the control room: a human Hacker at a control panel. Talking to her reveals you can help by activating Cerberus Terminals during your travels for “Omega: Assist the Hacker”.
When you want to proceed, speak with Aria at the window beside the circular hologram display. She lays out the next move: her losses are significant, and she’s reluctantly recruiting the Talons—the last mercenary band still available—to fill the missing ranks. Dialogue options include:
- “We’ll negotiate an alliance” for +2 Paragon Points.
- “Mercs only respect strength” for +2 Renegade Points.
You can speak with Aria a second time afterward to learn more about her future plans, including what’s going on with Nyreen and Petrovsky. When you’re ready to leave, use the exit near the Weapon Bench and Armor Locker.
Reach Talon Territory
Aria explains that the Talons rose to power around the time of the Plague in 2185, largely because Shepard eliminated the Omega branches of the other three mercenary groups while recruiting Archangel. Aria stresses that she only intends to use the Talons as disposable manpower for her push to reclaim her throne. You can respond with:
- “I don’t use people” for +2 Paragon Points.
- “That’s war” for +2 Renegade Points.
Cerberus is in the area immediately after, so head forward and examine the Red Sand crates blocking the doorway to see a brief observation between Shepard and Aria. Continue right, climb a tall ladder, then take a right-hand U-turn into a control station. Technically you can use Air Lock controls to open the way ahead, but the guide recommends grabbing loot first for an alternate route.
Start by finding the Lift Control. It attempts to raise a distant platform, but it’s blocked. Shoot the canisters on the platform to clear the obstruction. Then use the Lift Control again to lower the platform so you can reach it and collect items:
- Terminal – 30 XP. Activate it beside the Lift Control to contribute to “Omega: Assist the Hacker”.
- Datapad – 1,500 credits. Exit the control room, look right, and find it to the right of the locked door.
- Assault Rifle High Velocity Barrel – slide back down the tall staircase, then step onto the platform on your right (the one you lowered). Use the Lift Control button on the platform, then turn left at the top to find the mod beside the crates.
- From here, you can vault over the white crates to return to the main path via a shortcut.
At the end of the tunnel, you’ll enter a broader space with walkways. One goodie is available:
- Datapad – 1,500 credits. Head straight past the intersection and find it at the dead end in front of some crates.
Return to the intersection and take the other route. You’ll find an Air Seal, but it’s useless without power. Go left to find a Datapad on crates, then turn left again past a Terminal. At the end you’ll locate a Generator. Reactivate it to restore power, and use the Terminal you passed to open the forward path with the Air Seal.
Break Through Cerberus Forces
At the end of the tunnel you return outside and see a Cerberus shuttle crash into a walkway that leads into the Talon Outpost. Slide down the ladder, but watch for loot:
- Salvage – 1,500 credits. When you slide down, turn left and go past stairs on your right to a door lit in white. Follow the wall right to find it near dumpsters.
- Salvage – 1,500 credits. Continue down the stairs, then do a right-hand U-turn at the bottom. Find it between the stairs and a white container tank.
Find the door and proceed down into a control room. Expect a Combat Engineer and a Shield Pylon here—remove those first to avoid being overwhelmed by Troopers and a Centurion entering from a back door.
After that, face the windows to gather loot:
- Terminal – 30 XP. At the right-hand side of the windows. Activate it to contribute to “Omega: Assist the Hacker”.
- Datapad – 1,500 credits. In a small office room directly opposite the windows; it’s on a desk with three laptops.
- Medical Station – 75 XP. Visible through the doorway where the Troopers and Centurions entered.
Next door leads to a hallway with a Trooper and another Combat Engineer. The engineer needs to die first so he can’t deploy Turrets. While the area is briefly calm, grab:
- Datapad – 1,500 credits. First side-room on the right. Look right; it’s on top of a low bookcase.
- Injured Talon – 60 XP. Second side-room. A Turian is slumped in the back-left corner; revive him for XP.
- Terminal – 30 XP. Behind the Injured Talon. Activate it for “Omega: Assist the Hacker” (the final one).
Return to the room with the Datapad and use the laptop to deactivate the Cerberus Lockdown. This opens the way forward, allowing a Guardian and two Rampart Mechs to enter. Use Aria’s Lash to strip the Guardian’s shielding, and be careful where you step in this enclosed space—fallen Rampart Mechs can punish you.
Go down the elevator at the end of the hallway, then turn around and descend another hallway into an open cargo hangar. Both zones contain enemies. The cargo area includes a Combat Engineer, so if possible kill him first before his Turrets become a major problem. The guide also notes there are three Shield Pylons here.
After you reach the back of the hangar, more Rampart Mechs appear as a Cerberus shuttle arrives to drop off additional Assault Troopers and another Combat Engineer. Destroy the engineer’s Shield Pylon first to make the fight easier. When everything is down, loot:
- Medical Station – 75 XP. Turn around to face the cargo hangar doorway and check the right-hand wall. It’s under a spotlight and near the “Cargo Hangar 04” label.
Head to the landing pad where the shuttle arrived, then turn left down to another landing pad. Another shuttle arrives with a pair of Centurions and an Assault Trooper, but you’re protected by deployable cover. Before moving on, collect:
- Med Kit – 50 XP. At the base of rubble on the right side of the landing pad.
- Injured Talon – 60 XP. Hidden under the back of the crashed Cerberus fighter at the edge of the landing pad.
- Injured Talon – 60 XP. Slumped at the nose of the crashed Cerberus fighter.
In the next door, you trigger a cutscene where you reunite with Nyreen and learn her role on Omega now. Dialogue options here offer more Morality Points:
- Pick “Let us help” for +2 Paragon Points.
- Pick “Not a chance” for +2 Renegade Points.
Reach Talon Outpost
Nyreen returns to your squad at this stage, so if you leveled up while she was away, check the Squad menu for improvements. Then loot the room:
- Medical Station – 75 XP. To the right of the door Shepard faces after the cutscene ends.
- Phaeston – if you haven’t obtained this Turian assault rifle yet, another copy is near the Medical Station.
- Shotgun High Velocity Barrel – from the Medical Station, turn around toward the command center. On your left is a dead Cerberus Assault Trooper at the bottom of a platform with a crate; the mod sits beside the trooper.
- Datapad – 1,500 credits. From the Shotgun High Velocity Barrel location, cross to the opposite side of the room and find it behind large crates.
Exit through the room and use the Elevator. You’ll reach the open Cargo Processing area where Rampart Mechs enter from the left. Destroy the nearby Shield Pylon first, then kill the Rampart Mechs quickly. After that, an Atlas mech appears along with another Rampart wave. Clear the Ramparts first, then find the M-560 Hydra in the middle of the room and use it to rapidly destroy the Atlas.
When the area is quiet again, check for loot:
- Med Kit – Return to the elevator-facing side of the Cargo Processing area. Walk forward, but before descending to the central section with the burning vehicle, look left beside some crates.
- Salvage – 1,500 credits. From the Med Kit location, turn right and cross to the other side toward a corner lit overhead. It’s among the debris.
Now move to the exit door. Cerberus still tries to slow you down: shoot the Latch of the electricity box beside the entry door, then activate Emergency Access to drop a ladder you can use to escape the cab.
- Datapad – 1,500 credits. After climbing out, vault up the yellow pipe and go clockwise around the outside of the shaft. It’s on the ground.
To progress, head counter-clockwise around the elevator shaft and slide down any ladders you find until you exit onto the walkway connecting to the Talon Outpost. It’s an open battlefield, so before fighting, grab:
- Med Kit – on your right at the corner of the walkway as you exit the elevator shaft.
- Salvage – 1,500 credits. From the Med Kit, turn left, go to the far walkway end, and find it in front of a fire.
- Assault Rifle Thermal Scope – from the Salvage location, backtrack to the Med Kit and turn left to cross to the opposite side. Turn left and head forward; the mod is on the nose of a crashed Cerberus shuttle.
Now the walkway fight begins. This is your first encounter with Phantoms in this DLC, and they’re protected by Barriers. Aria’s Reave can drain those defenses. After you kill the Phantoms and their allies, a shuttle drops off more enemies, including Centurions and a Nemesis sniper.
After they’re cleared, go to the far end door. It locks due to a glitch. Nyreen orders a tech to fix it, but until it’s bypassed you must hold position for 60 seconds. A meter in the top-right corner tracks progress. While you wait, turn around and take cover because Cerberus attacks from the upper walkway.
- You’ll face Assault Troopers, lots of Centurions, and the occasional Nemesis sniper. You won’t need to handle Phantoms or Combat Engineers during this hold.
- On easier difficulties, the best approach is to shoot enemies before they can drop down from the upper level.
- On harder difficulties, that method may fail because you can’t kill fast enough. Use the standard plan: fire while they hover briefly over the ground before landing.
- When two Atlas mechs arrive, you might panic, but it’s scripted to happen exactly as the door bypass completes. The roof is closed, preventing the mechs from dropping down to you.
Once the roof seals, the door opens and you can finally proceed. As you move through corridors, keep an eye out for:
- Med Kit – 50 XP. After turning left, go to the end of the corridor past the next door on your left. It’s in the back-left corner beside an ammo box and an Asari tending to a Krogan’s wounds.
At the next door you reach the Talon Outpost itself. Shepard leans about Adjutants—Reaper enemies Aria has fought previously in the “Mass Effect: Invasion” comic. Morality Points are available through your response:
- Pick “You overcame a lot” for +2 Paragon Points.
- Pick “Shake it off” for +2 Renegade Points.
Talk to Nyreen, Then Move On
Once the Talon Outpost scene finishes, you’re free to explore the area. The guide then points you toward the broader help pages for Mass Effect 3, including “Legendary Edition Changes,” “How-To Guides,” “Key Choices and Consequences,” a “Romance Guide,” “Walkthrough,” and “Side Missions.”
Up Next: Omega: Assist the Hacker
Top Guide Sections
- Legendary Edition Changes
- Game Basics
- Tips and Tricks
- How-To Guides


